Still slammed at work but thought I would add some new additions to the New Kingdom Egyptian Inspirational Readings. Check out the page to the right. The five new additions are highlighted yellow.
Sunday, September 30, 2018

Sunday, September 23, 2018
Message from Lurkio
Sad news to hear from Simon at Lurkio. I have some of his terrain including the Sassanid Fire Temple. Great terrain and some interesting figure lines. Heres hoping someone picks them up.
Announcement
After our extended break over the summer, it is with heavy heart, that I am announcing the closure of Lurkio. The reasons for this are manyfold, but primarily a change in personal circumstances means will I not not have the time to devote to running the store and provide the service that is expected. My commitments are now to look after my family, and Lurkio is unfortunately just too much effort for me to continue with.
Lurkio has been running for just over 10 years now. Starting with the Sassanid Persians to over a dozen ranges now - including some that never saw the light of day :-( Over those 10 years I have met a lot of new friends, and I thank you all for your support over this time. I hope that the ranges we have brought to light do not fade away, and I am looking to find someone to take over the ownership of Lurkio. I will leave the store running in browse mode while i try to find a buyer, or at least liquidate the stock.
If you , or know anyone, that might be interested in purchasing Lurkio , then please do drop me a line at Simon@lurkio.co.uk
Until then many thanks for all of your support over the years and good luck to you all.
Thanks Simon
Lurkio has been running for just over 10 years now. Starting with the Sassanid Persians to over a dozen ranges now - including some that never saw the light of day :-( Over those 10 years I have met a lot of new friends, and I thank you all for your support over this time. I hope that the ranges we have brought to light do not fade away, and I am looking to find someone to take over the ownership of Lurkio. I will leave the store running in browse mode while i try to find a buyer, or at least liquidate the stock.
If you , or know anyone, that might be interested in purchasing Lurkio , then please do drop me a line at Simon@lurkio.co.uk
Until then many thanks for all of your support over the years and good luck to you all.
Thanks Simon
This Week
No after action report this week. Too busy with work and family. I have been working steadily on an opponent for my NKEs and hope to have something to put in on the table in the next month or so.
Thanks to inspiration from Simon at Lurkio, I have been experimenting with the dip method to deploy a Nubia host against my Egyptians. The figures are a mix of Old Glory, Black Hat/Gladiator and Essex.
In V3 the Nubian list went away so I have been working on a draft list drawing from the original FOG list, DBM, ADLG, Triumph, MEG and as many books and articles I can find on the subject. The list is highly conjectural, so comments are welcomed.
Thanks to inspiration from Simon at Lurkio, I have been experimenting with the dip method to deploy a Nubia host against my Egyptians. The figures are a mix of Old Glory, Black Hat/Gladiator and Essex.
In V3 the Nubian list went away so I have been working on a draft list drawing from the original FOG list, DBM, ADLG, Triumph, MEG and as many books and articles I can find on the subject. The list is highly conjectural, so comments are welcomed.
Nubian
Nubian, 3000 BC - 1400 BC
Territory Types: Agricultural, Hilly
- Generals should be depicted as Archers.
| Commanders | Cost | Total | |
| CinC | Inspirational Commander/ Field Commander/ Troop Commander | 80/40/30 | 1 |
| Sub-commanders | Field Commander/ Troop Commander | 40/30 | 0-2 |
| Nubian Allied Commanders | Field Commander/ Troop Commander | 30/20 | 0-3 |
CORE TROOPS
| ||||||||||
Troop name
|
Troop Type
|
Capabilities
|
Points per base
|
Bases per BG
|
Total bases
| |||||
Type
|
Armour
|
Quality
|
Training
|
Shooting
|
Close Combat
| |||||
| Archers |
Medium Foot
|
Unprotected
|
Average
|
Undrilled
|
Bow
|
-
|
5
|
6-8
|
40-168
|
40-186
|
Light Foot
|
Unprotected
|
5
|
6-8
|
0-16
| ||||||
OPTIONAL TROOPS
| ||||||||||
| Javelinmen |
Medium Foot
|
Protected
|
Average
|
Undrilled
|
Javelins
|
Light Spear
|
6
|
6-8
|
0-16
|
0-24
|
Light Foot
|
Unprotected
|
5
|
0-8
| |||||||
| Close Fighters |
Medium Foot
|
Protected
|
Superior
|
Undrilled
|
-
|
Swordsmen
|
7
|
6-8
|
0-18
| |
Average
|
6
| |||||||||
| Upgrade Archers to Veteran |
Medium Foot
|
Unprotected
|
Superior
|
Undriiled
|
Bow
|
-
|
7
|
6-8
|
0-8
| |
Fortified Camp
|
24
|
0-1
| ||||||||
ALLIES
| ||||||||||
Nubian Allies - Lost Pages Volume IV
| ||||||||||
Egyptian Allies (in 2310 only) - Old or Middle Kingdom Egyptian, p. 13, Army Book 1
| ||||||||||
Nubian Allies
| ||||||||||
| Commander |
Field Commander/Troop Commander
|
30/20
|
1
| |||||||
Troop name
|
Troop Type
|
Capabilities
|
Points per base
|
Bases per BG
|
Total bases
| |||||
Type
|
Armour
|
Quality
|
Training
|
Shooting
|
Close Combat
| |||||
| Archers |
Medium Foot
|
Protected
|
Average
|
Undrilled
|
Bow
|
-
|
5
|
6-8
|
20-56
|
20-62
|
Light Foot
|
Unprotected
|
5
|
0-6
| |||||||
Monday, September 3, 2018
FOG 300 NKE Civil War 1334 BC
It is the regnal year 17 of the rule of the King, Akhenaten. Turmoil reigns around the people of the Two Lands as the Lands of the Nine Bows seethe with unrest. Yet all is not tranquil within the lands of the Chosen of Aten. The king is dead. The fear in the home of Amun is that the loins of Akhenaten will stand true to his teaching and continue to disrupt Ma'at. The High Priest position of Amun has been vacant since the death if Maya in regnal year 4. The slight to the lord of the lands, Amun, cannot go unpunished. Ma'at must be corrected.
The lesser priests of Amun recognize that a new leader must arise to lead the people of the Two Lands. Ahmenmose has been chosen to lead the forces of Amun against the heretic in the north.
Grand Vizier Ay in Memphis is not ready to give up his power. Proclaiming the child Smenkhkare Pharaoh, he has sent the Royal army south under the the Fan Bearer on the Right Side of the King, Horemheb.
The armies meet somewhere north of Abydos...
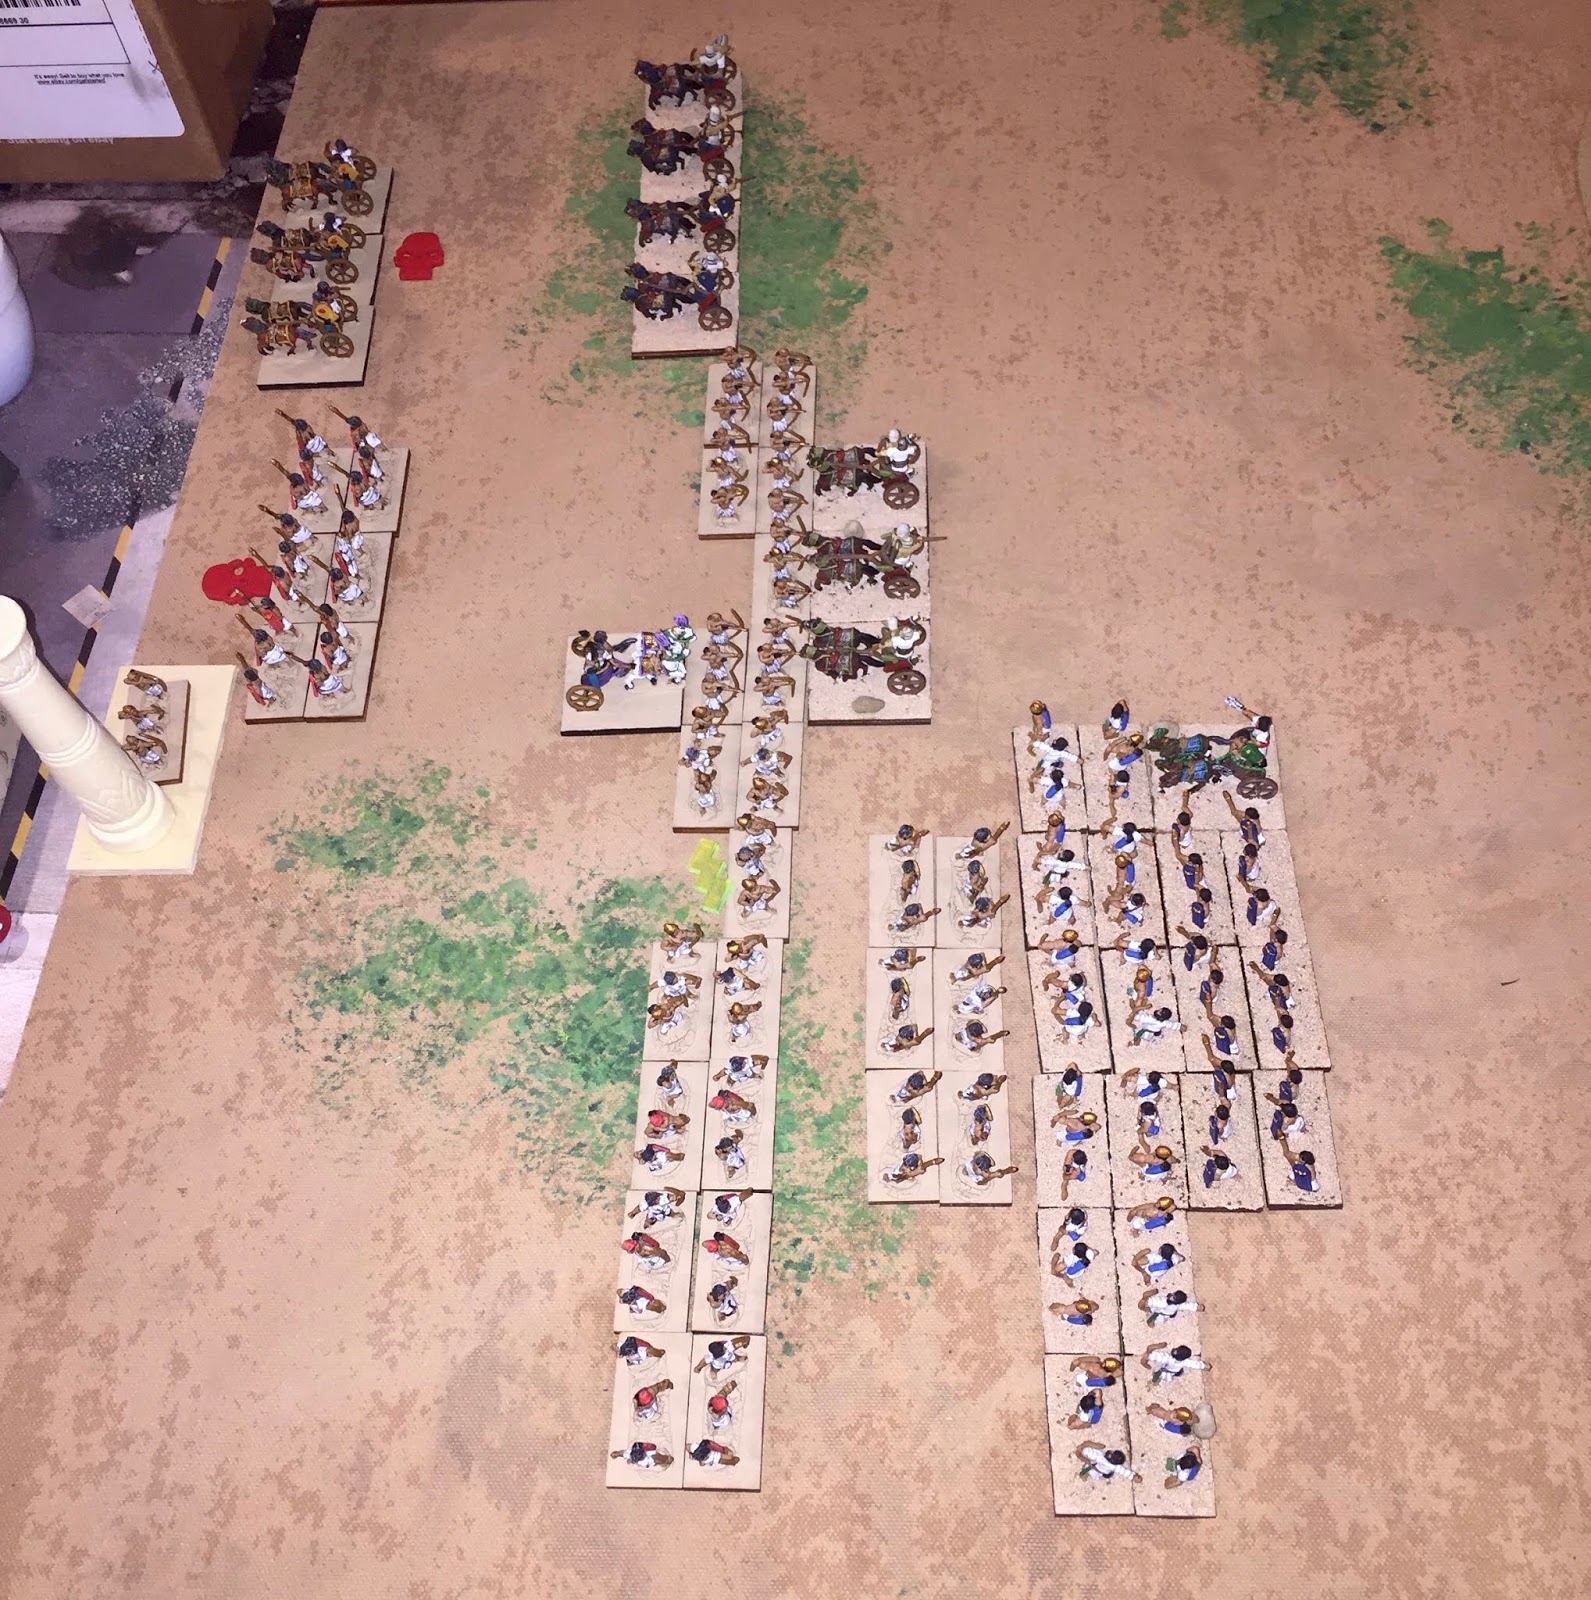
The Army of Amun


The Army of Amun deployed: Red Archers on the left with the Yellow Archers to their right. The Yellow Close Fighters are behind the two archer BGs. The Archers of the Temple are next in line with the Red Close Fighters deployed behind them. The loan BG of Chariots of the Army of Amun anchors the right end of the line. (The Archers of the Temple is a BG made up Essex ANK20 Bald Headed Archers and a few of ANK6 Light Archers thrown in to the mix).


The Royal Army won the initiative and opted for Agricultural. The Army of Amun chose an open field and a gentle hill. The Royal army took an open. All of the terrain fell on the Royal Army's baseline.


To start the Amun 2nd turn, the Chariots of Amun passed a CMT and rolled back 2" to get out of bow range. The Red and Yellow Amun Close Fighters both passed through the now to their front and took station less than 1/4" from the Royal line. In the shooting phase, the Red Amun archers scored 2 hits and took 2 in return. The Yellow Close Fighters of Amun shrugged off the bow fire from the combined fire of the remaining base of Royal archers. The Red Amun Close Fighter however, took 2 hits from the Green chariots. Neither side lost a base from bow fire but the Red Close Fighters did disrupt. In the Joint Action Phase, the Amun general attempted to rally the Yellow archer BG but failed. The Royal general moved to the archer BG in the center of the main Royalist line. (No picture for this turn)
 The Royal 3rd turn started with both Royal Chariot BGs launching charges: The Green Royal chariots to the Red Close Fighters in front of them and the Blue Royal chariots towards the Archers of the Temple. The Chariots of Amun, however, passed a CT and intercepted the Royal Blues. In Impact, the Green chariots scored 4 hits to 1 from the Red Close Fighters. The Blue chariots scored 5 hits to 4 against the Chariots of Amun. The Blue chariots survived their death roll as did both BGs of Amun. However, both Amun BGs failed their cohesion tests badly and fragmented. In the shooting phase, Red Archers of Amun scored 3 hits on the Royal archers to their front while the Yellow Close Fighters suffered 2 hist from bow fire. Both sides shrugged off the bow fire. In melee, the Green Royal chariots scored 3 hits to 1 against the Red Close Fighters while the Royal Blue chariots scored 3 hits and took 3 from the Chariots of Amun. Neither the Blue chariots of the Chariots of Amun suffered from their hits but the Red Close Fighters managed to roll poorly and broke. This caused the Chariots of Amun to also break. None of the other BGs of Amun seemed to care. In the pursuit, the Chariots of Amun rolled down 1" and were caught by the Royal Blue chariots losing a base in the process. The Red Close Fighters passed through the archers to their rear and the Green chariots plowed into the Archers of the Temple. In the Joint Action Phase, the Royal Blue chariots passed a CMT and stopped pursuing. The Chariots of Amun routed to within 1" of the table edge and the Red Close Fighters routed to just in front of the Amun camp. The Amun general moved to the Temple Archers while the Royal general stayed with the Royal archers to his front.
 Down 4 attrition points to 0 to start the Amun 3rd turn, the Army of Amun was desperate. Consequently, the Yellow Close fighters charged the Royal Archers to their front and the Red Archers of Amun passed a CMT and charged to the right of the Yellow Close Fighters dropping a file in the process. In the Impact, the Red Bow and 1 file of the Yellow Close Fighters scored 4 hits and 2 hits and took 2 hits and 3 hits respectively in return. The other two files of the Yellow Close Fighters scored 2 hits to the archers to their front but took 3 in return. The Temple Archers with general attached scored 3 hits but took 8 hits (would have been possibly 9 if the Amun general had not committed). The Royal archers on the left end of the line took 1 hit automatically and disrupted. The Yellow Close Fighters of Amun lost a base on the death roll and disrupted. The Temple Archers proved to not be so holy as they suffered two base loses on the death roll and double dropped to fragmented. In the maneuver phase, the Red Archers of Amun expanded a base to get an overlap on their opponent. In melee, the Red Archers of Amun managed 2 hits to 1. The Yellow Close Fighters missed against the Royal archers on their right end file and scored 2 hits to the other Royal BG. The Yellow Close Fighters ended up taking a total of 3 hits from the Royal Archers with the general attached. The Green Royal chariots scored 3 hits to the Temple Archers who gave 2 back themselves and scored another from their overlap. The Yellow Close Fighters of Amun lost a base from hits but otherwise survived melee. The Royal Archers on the left end of the line, however, lost a base from hist and then dropped to fragmented. The Temple Archers lost yet another base on the death roll breaking them from loses. The Yellow Archers of Amun to the right of the Temple Archers fragmented for seeing a friend break and then the Yellow Close Fighters double dropped to broken. At this point the remnants of the Army of Amun fled off the field to maybe one day fight again...
The lesser priests of Amun recognize that a new leader must arise to lead the people of the Two Lands. Ahmenmose has been chosen to lead the forces of Amun against the heretic in the north.
Grand Vizier Ay in Memphis is not ready to give up his power. Proclaiming the child Smenkhkare Pharaoh, he has sent the Royal army south under the the Fan Bearer on the Right Side of the King, Horemheb.
The armies meet somewhere north of Abydos...
The Army of Amun

The Camp of the Army of Amun is still a work in progress.

The Royal Army

The Army of Amun deployed: Red Archers on the left with the Yellow Archers to their right. The Yellow Close Fighters are behind the two archer BGs. The Archers of the Temple are next in line with the Red Close Fighters deployed behind them. The loan BG of Chariots of the Army of Amun anchors the right end of the line. (The Archers of the Temple is a BG made up Essex ANK20 Bald Headed Archers and a few of ANK6 Light Archers thrown in to the mix).

The Royal Army deployed: The Blue BG of Chariots are on the left with a gap between them and the Green Chariots, then the two BGs of Archers deployed across the front of a field with the lone BG of Close Fighters in support.

The Royal Army won the initiative and opted for Agricultural. The Army of Amun chose an open field and a gentle hill. The Royal army took an open. All of the terrain fell on the Royal Army's baseline.

The Royal Army moved first and the foot BGs moved 5" straight ahead. The Green chariots made a single move of 5" and stayed on line with the foot. The Blue chariots passed a CMT, expanded two bases and moved 3" forward. There was no shooting to be had so the turn ended.
In the Amun 1st turn, The foot BGs of Amun moved 4" straight ahead. The Amun chariots passed a CMT, expanded two stands and advanced 3". In the shooting phase, the Amun Red Archers took 1 hits and gave 1 in return. The Amun Yellow Archers took 2 and gave 2. The Archers of the Temple scored 4 hits on the Green chariots and took 0 in return as they were out of range. Both the archers of Amun and the Royal archers passed their cohesion tests but the Green Royal chariots lost a base and dropped cohesion. (No picture for this turn)

To start the Royal 2nd turn, the Royal foot rumbled forward 3" while the Green chariots passed a CMT, expanded 2 bases and move up 3". The Royal Blue chariots moved straight forward 5". In the shooting phase, the Red Amun archers scored 1 hit and took 3 from their Royal counterparts. The Amun Yellow archers scored 3 hits and took 3 in return from their counterparts. The Green chariots took 3 hits from the Temple Archers of Amun and gave 2 back while the Blue Royal chariots added another hit. The Blue Royal chariots also scored 2 hits on the chariots of Amun but took 3 back. The Royal forces survived all of their death rolls without loss and passed all of their cohesion tests. The Yellow Amun archers suffered a base loss from their death roll and then disrupted. The Temple Archers also lost a base but survived their cohesion test. The Chariots of Amun disrupted from their hits. In the Joint Action Phase, the Green Royal chariots rallied back from disrupted.
To start the Amun 2nd turn, the Chariots of Amun passed a CMT and rolled back 2" to get out of bow range. The Red and Yellow Amun Close Fighters both passed through the now to their front and took station less than 1/4" from the Royal line. In the shooting phase, the Red Amun archers scored 2 hits and took 2 in return. The Yellow Close Fighters of Amun shrugged off the bow fire from the combined fire of the remaining base of Royal archers. The Red Amun Close Fighter however, took 2 hits from the Green chariots. Neither side lost a base from bow fire but the Red Close Fighters did disrupt. In the Joint Action Phase, the Amun general attempted to rally the Yellow archer BG but failed. The Royal general moved to the archer BG in the center of the main Royalist line. (No picture for this turn)

Sunday, September 2, 2018
Desert Hills
Finished up some desert hills/dunes for desert themed armies this morning. These are resin casts from Battlefield Terrain Concepts (battlefield terrain.com) out of Virginia. They sell them finished or unfinished. They also sell fields, fences, roads, rivers and buildings. They are specifically designed for ACW but as you can see they can be adapted. The shadows in the man cave did not always help with the pictures but I hope you get the picture. These have a texture to them unpainted that once I sprayed them with a flat khaki camouflage paint from Ace Hardware just needed a dry brush of a lighter tan. I used a sand wash on the rock outcroppings. The contrast does not show as much in the pictures but I pretty please with these.


Here is the tear shaped hill from above. I think this one will also work as soft sand.


RH 14 Rough Hill from an angle with one of two rock outcroppings showing. The rock outcroppings are the only parts of these three hills that will effect figure stands.

Here is RH 14 with the Egyptians marching across one of the rock outcroppings.

The above picture is of all three hills. The top hill is SL 1 Tear Drop Hill and measures roughly 7" x 9". The right one is labeled as SL 11 and measures 5" x 8" although there is not a hill labeled as such on their website. The bottom one is RH 14 Rough Hill and measures 4.5" x 6". The rise is less than 0.5".

Here is the tear shaped hill from above. I think this one will also work as soft sand.

Tear shaped hill with a battle group of Egyptian Close Fighters marching across.

SL 11 Hill from above. This one will also work as soft sand.

SL 11 with the Egyptian foot marching across.


Here is RH 14 with the Egyptians marching across one of the rock outcroppings.
Sunday, August 5, 2018
FOG-AM Players Association
Pete Dalby has set up an information distribution list for the FOG-AM Players' Association. If you would like to be a part of the association (its free) and on the distribution list check outage details here:
FOG-AM Players' Association

FOG-AM Players' Association

Sunday, July 22, 2018
FOG 300 Ptolemaic vs Kyrene Greek circa 320 BC
In the summer of 320 BC, the Greek inhabitants of Kyrene availed themselves of the absence of the Ptolemaic governor, Ophellas, to rise up against the garrison and declare themselves free once more. Ophellas, upon hearing of the rise of the populace, and having only a handful of men, withdrew to Alexandria to consult with his lord, Ptolemy of Lagus, and gather more troops. The oligarchs of Cyrene, taking advantage of Ophellas' withdrawal, quickly sent out a call for men to defend their new found freedom recruiting near and far. As late summer dawned, Ophellas returned to retake his province. On a plain seven miles west of Cyrene, the Army of the City formed up to face the armies of the oppressor...
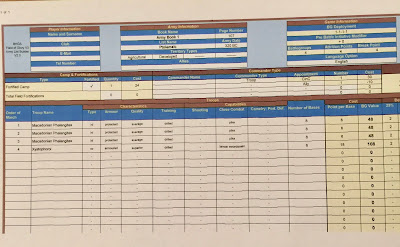
Ptolemaic list and host:


The Kyrene Greeks won the initiative and opted to play in Agriculture. The Ptolemaic took the compulsory open field, an open and the gully. The Greeks took a gentle hill. The open field fell on the left side of the Greek board edge. The gully fell on the other side of the Greek edge. The open ended up in the center of the Greek deployment area. The gentle hill fell on the Ptolemaic side but ended up getting picked up.
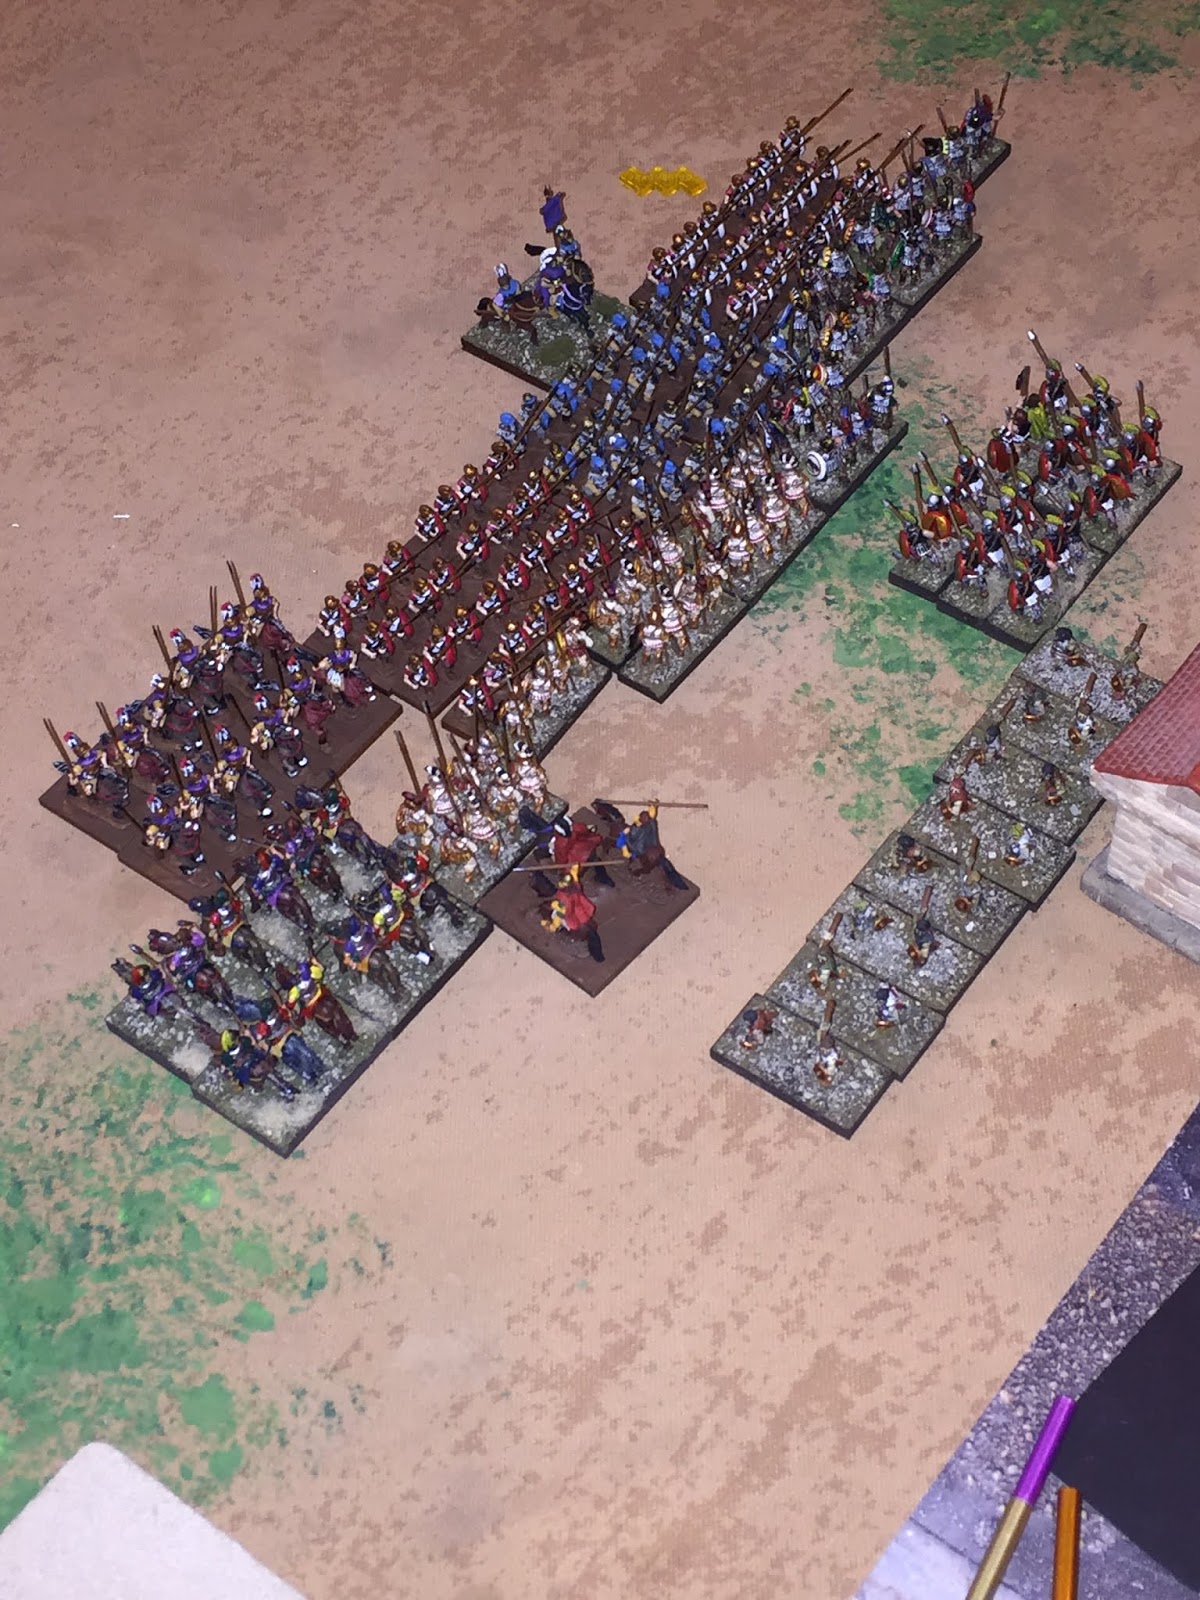
Once deployed, the Ptolemaic forces presented a solid line with the Xystophoroi on their left followed by the red shielded pike, the blue shielded pike and the white shielded pike with the fortified camp behind. Ophellas took station with the blue pike.

The Kyrene Greeks deployed with the light javelinmen in front of the two 8 stand hoplites with their own Xystophoroi cavalry anchoring the end of their line. The six stand hoplites formed up in a three deep, two wide column to the left of the temple. The Greek stratigos deployed with the hoplites next to the cavalry.

The Ptolemaic won the roll to move first and opted to double move the blue and red pike 8" forward. The white pike moved 4" on their end and the cavalry advanced 5." There was no shooting so the first Ptolemaic turn ended.

For the Greek first turn, the Greek cavalry moved up to just outside 5" of the Ptolemaic mounted. The Greek light foot moved a full 5" straight ahead into the face of the Ptolemaic wall of pike. The main line of hoplites moved 3" straight ahead. The reserve hoplites wheeled 3" to their left to move towards supporting both front hoplites. In the shooting phase, the Greek javelinmen scored 3 hits on the blue pike who shrugged them off with no ill effects. The Greek stratigos moved to the middle of his line.

To start the Ptolemaic 2nd turn, the both center pike BGs successfully rolled not to charge and held their posts. The white pike moved 3" up to be only 1" behind the blue pike front. The Ptolemaic cavalry moved to within 2" of the Greek mounted. In the shooting phase, the blue pike took 2 hits but passed their cohesion test again. In the joint action phase, the Ptolemaic general moved to his cavalry while the Greek general moved back to the left end of the left hoplite BG.


To start the Ptolemaic 3rd turn, the entire Ptolemaic host rolled CMTs not to charge. The blue pike failed and charged forward. The Greek light foot evaded 6" and ended up behind the reserve hoplites. The blue pike rolled normal and trundled forward 3". The red pike moved up to stay on line with the blue pike while the white pike moved a full 3" to stay 1" back. The Ptolemaic cavalry moved up into the face of the Greek mounted. There was no shooting this turn and in the joint action, the Ptolemaic general moved to the blue pike and attempted to rally. He failed.

The Greeks opted to wait a little longer before charging. The Greek mounted successfully held but both front line hoplites threw caution to the wind and charged into the Ptolemaic pike. With both front line hoplites in contact, the reserve hoplites did not have to roll not to charge through friends in combat. In impact, both generals joined the front line. The red pike scored 3 hits on the hoplites to their front and took 1. The blue pike scored 0 to the left Greek hoplite and 2 against the right Greek hoplite. The blue pike took 1 hit from each of the hoplites BGs. The red pike scored 3 hits to the right hoplites who gave 3 in return. Neither Greek hoplite BG suffered a loss from hits and the left hoplite passed cohesion. The white pike lost a base from death roll. The only maneuvering to be done by the Greek saw the Greek light foot turn to their left and begin moving to their left flank, In melee, the red pike scored 2 hits and took 2 in return. The blue pike scored 1 hit on the right hoplite and 2 on the left. In return, the blue pike took 2 and 1 respectively. The white pike scored 2 hits and took 3 hits. The left hoplite escaped the death roll but the right hoplite and the white pike both lost a base. The white pike suffered a cohesion loss as well and disrupted. In joint action, the blue pike rallied back from disrupted.

In the Ptolemaic 4th turn, the Ptolemaic held once again. The Ptolemaic forces had no maneuvering to do and there was no shooting. In melee, the red pike scored 4 hits on the left hoplites. The blue pike scored 1 hit on the left hoplites but missed on the right hoplite. The white pikes also failed to score a hit. The left hoplites scored 1 hit on each of the red and blue pike. The right hoplites managed 1 hit on the blue pike and 3 on the white pike. The white pike passed their death roll but fragmented. The left hoplites lost a base to the death roll but passed cohesion. With both generals fighting, the joint action phase was inconsequential.

The Kyrene 4th turn opened with the Greek mounted rolling not to charge - they held. The Greek light foot continued their movement towards the Greek flank and began wheeling to turn. In melee, the red pike scored 4 hits and took 1. The blue pike scored 2 hits on the hoplites to their right and 1 hit to the hoplites to their left. In return, the blue pike suffered 1 hit only from their left. The white pike only managed 1 hit and took 1 in return. The hoplites with the general suffered a base loss from hits but passed cohesion. With both generals still fighting, joint action and the turn ended.


Ptolemaic list and host:

Kyrene Greek List and Host:


The Kyrene Greeks won the initiative and opted to play in Agriculture. The Ptolemaic took the compulsory open field, an open and the gully. The Greeks took a gentle hill. The open field fell on the left side of the Greek board edge. The gully fell on the other side of the Greek edge. The open ended up in the center of the Greek deployment area. The gentle hill fell on the Ptolemaic side but ended up getting picked up.
Once deployed, the Ptolemaic forces presented a solid line with the Xystophoroi on their left followed by the red shielded pike, the blue shielded pike and the white shielded pike with the fortified camp behind. Ophellas took station with the blue pike.

The Kyrene Greeks deployed with the light javelinmen in front of the two 8 stand hoplites with their own Xystophoroi cavalry anchoring the end of their line. The six stand hoplites formed up in a three deep, two wide column to the left of the temple. The Greek stratigos deployed with the hoplites next to the cavalry.

The Ptolemaic won the roll to move first and opted to double move the blue and red pike 8" forward. The white pike moved 4" on their end and the cavalry advanced 5." There was no shooting so the first Ptolemaic turn ended.
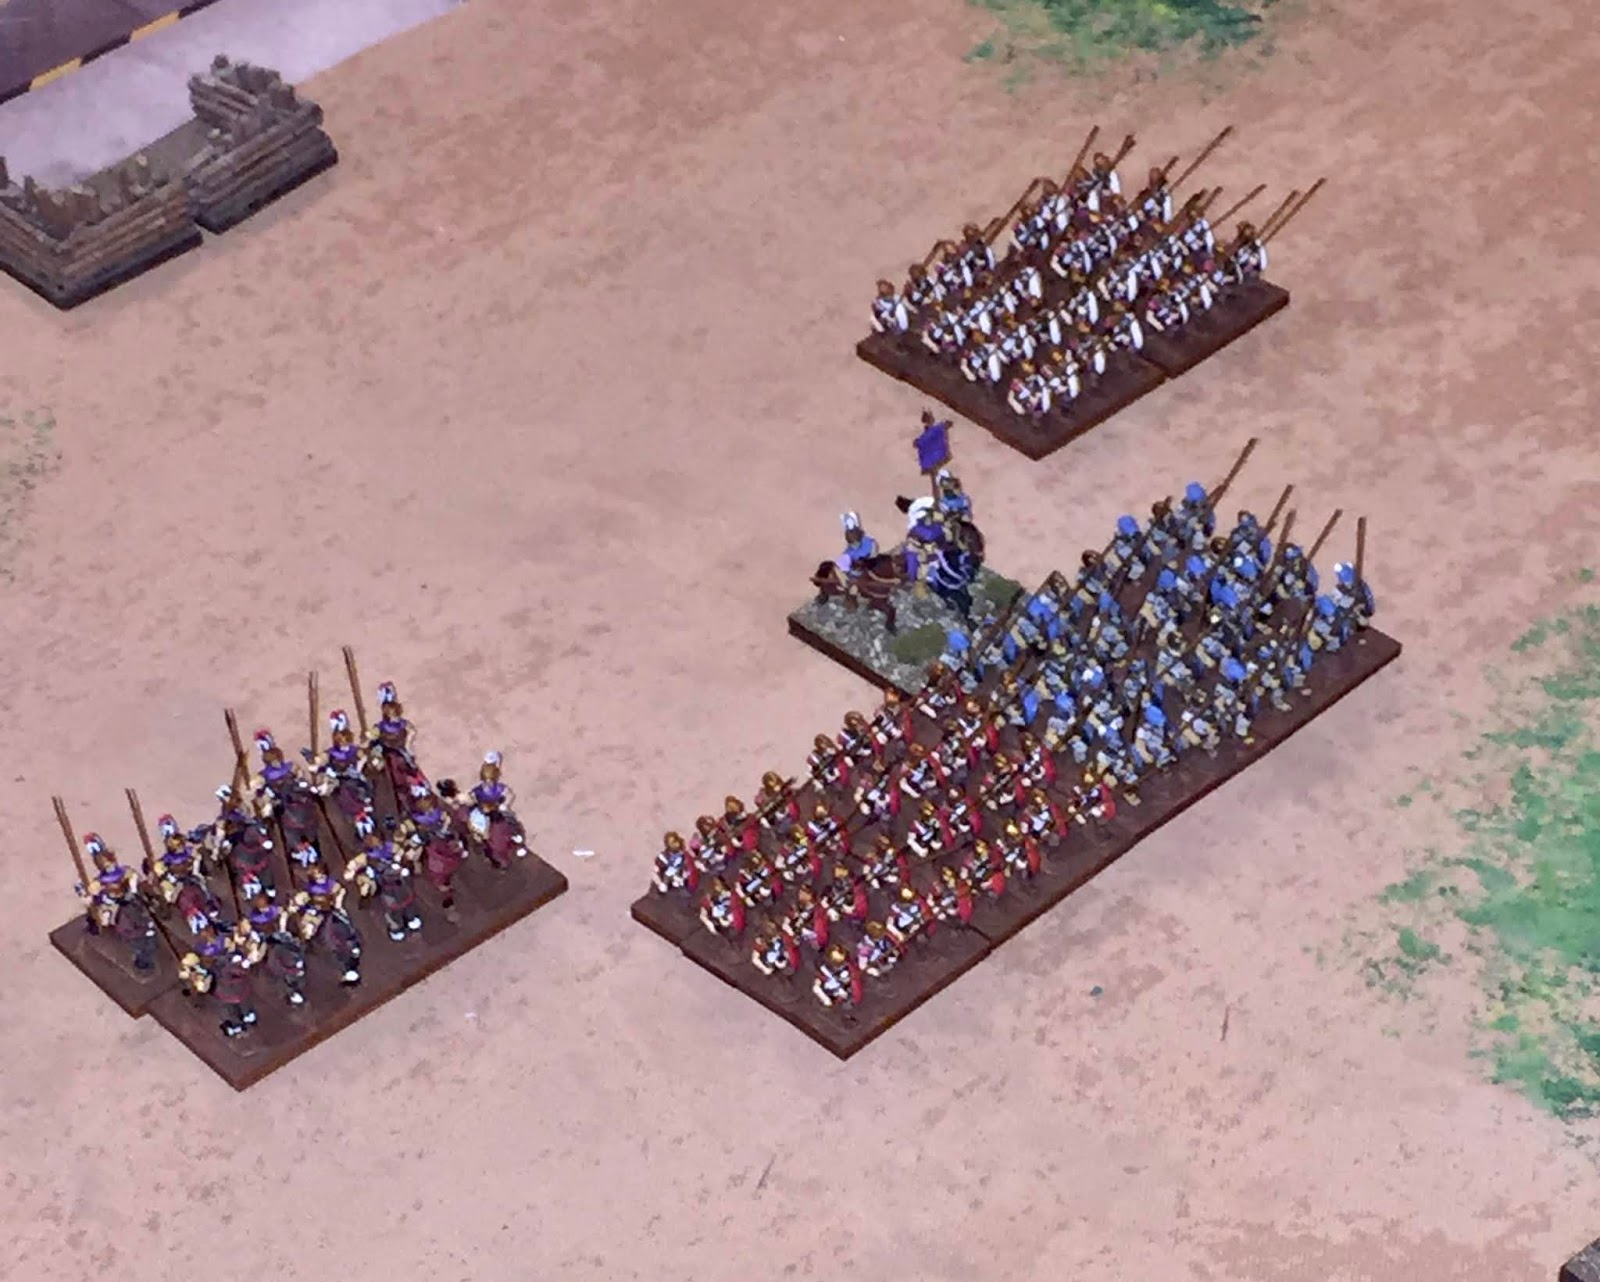
For the Greek first turn, the Greek cavalry moved up to just outside 5" of the Ptolemaic mounted. The Greek light foot moved a full 5" straight ahead into the face of the Ptolemaic wall of pike. The main line of hoplites moved 3" straight ahead. The reserve hoplites wheeled 3" to their left to move towards supporting both front hoplites. In the shooting phase, the Greek javelinmen scored 3 hits on the blue pike who shrugged them off with no ill effects. The Greek stratigos moved to the middle of his line.

To start the Ptolemaic 2nd turn, the both center pike BGs successfully rolled not to charge and held their posts. The white pike moved 3" up to be only 1" behind the blue pike front. The Ptolemaic cavalry moved to within 2" of the Greek mounted. In the shooting phase, the blue pike took 2 hits but passed their cohesion test again. In the joint action phase, the Ptolemaic general moved to his cavalry while the Greek general moved back to the left end of the left hoplite BG.

For the Kyrene 2nd turn, the cavalry passed a CMT not to charge and held their post. The left end hoplites tried to move short but failed their CMT which prompted the rest of the front line to sit still for the turn. The reserve hoplites wheeled up to be behind the joint between the two front hoplites. In the shooting phase, the blue pike took two hits and subsequently disrupted. In joint action, the Ptolemaic general moved to the red pike.

To start the Ptolemaic 3rd turn, the entire Ptolemaic host rolled CMTs not to charge. The blue pike failed and charged forward. The Greek light foot evaded 6" and ended up behind the reserve hoplites. The blue pike rolled normal and trundled forward 3". The red pike moved up to stay on line with the blue pike while the white pike moved a full 3" to stay 1" back. The Ptolemaic cavalry moved up into the face of the Greek mounted. There was no shooting this turn and in the joint action, the Ptolemaic general moved to the blue pike and attempted to rally. He failed.

The Greeks opted to wait a little longer before charging. The Greek mounted successfully held but both front line hoplites threw caution to the wind and charged into the Ptolemaic pike. With both front line hoplites in contact, the reserve hoplites did not have to roll not to charge through friends in combat. In impact, both generals joined the front line. The red pike scored 3 hits on the hoplites to their front and took 1. The blue pike scored 0 to the left Greek hoplite and 2 against the right Greek hoplite. The blue pike took 1 hit from each of the hoplites BGs. The red pike scored 3 hits to the right hoplites who gave 3 in return. Neither Greek hoplite BG suffered a loss from hits and the left hoplite passed cohesion. The white pike lost a base from death roll. The only maneuvering to be done by the Greek saw the Greek light foot turn to their left and begin moving to their left flank, In melee, the red pike scored 2 hits and took 2 in return. The blue pike scored 1 hit on the right hoplite and 2 on the left. In return, the blue pike took 2 and 1 respectively. The white pike scored 2 hits and took 3 hits. The left hoplite escaped the death roll but the right hoplite and the white pike both lost a base. The white pike suffered a cohesion loss as well and disrupted. In joint action, the blue pike rallied back from disrupted.

In the Ptolemaic 4th turn, the Ptolemaic held once again. The Ptolemaic forces had no maneuvering to do and there was no shooting. In melee, the red pike scored 4 hits on the left hoplites. The blue pike scored 1 hit on the left hoplites but missed on the right hoplite. The white pikes also failed to score a hit. The left hoplites scored 1 hit on each of the red and blue pike. The right hoplites managed 1 hit on the blue pike and 3 on the white pike. The white pike passed their death roll but fragmented. The left hoplites lost a base to the death roll but passed cohesion. With both generals fighting, the joint action phase was inconsequential.
The Kyrene 4th turn opened with the Greek mounted rolling not to charge - they held. The Greek light foot continued their movement towards the Greek flank and began wheeling to turn. In melee, the red pike scored 4 hits and took 1. The blue pike scored 2 hits on the hoplites to their right and 1 hit to the hoplites to their left. In return, the blue pike suffered 1 hit only from their left. The white pike only managed 1 hit and took 1 in return. The hoplites with the general suffered a base loss from hits but passed cohesion. With both generals still fighting, joint action and the turn ended.

To begin the Ptolemaic 5th turn, the Ptolemaic cavalry rolled a CMT not to charge and held. With no maneuvering to be done, the Ptolemaic proceeded into melee. The red pike scored 2 hits and took none. The blue pike scored 1 hit to the hoplites to their right front and 2 to the left front. In return, the blue pike took a total of 2 hits, all from the hoplites to their right front. The white pike scored only 1 hit but took 2 in return. The hoplites in front of the red pike suffered a base loss from the death roll and disrupted. The hoplites in front of the white pike survived both their death roll and cohesion test but the white pike were not so lucky. Surviving the death roll, the cohesion test saw them break fleeing 4" away. The blue pike where not so happy with that and disrupted.

To start the Kyrene 5th turn, the Greek mounted opted to charge in an effort to protect the wavering hoplites next to them. In impact, both cavalry BGs managed 2 hits for a draw. The Greek light foot continued moving towards the Ptolemaic flank by moving up alongside the Greek cavalry. In melee, the Ptolemaic cavalry scored 2 hits to none. Th Greek cavalry passed their death roll but disrupted on cohesion. The red pike scored 3 hits on the hoplites to their front taking none in return. The blue pike managed no hits on the hoplites to their right front but 2 to the one to their left front. The blue pike took 2 hits total from the hoplites to their left front. The hoplites in front of the red pike survived their death roll but fragmented on cohesion. In joint action, the blue pike rallied from disrupted once more.

The Ptolemaic 6th turn opened going straight into melee as their was nothing else to be done. The Ptolemaic cavalry scored 3 hits to 2. The Greek cavalry survived their death roll and their cohesion test. The red and blue pike combined for 5 hits on the hoplites with the Greek general while only the blue pike took a hit in return. The other hoplite BG failed to hit the blue pike who also failed to hit in return. The hoplites in front of the red pike survived their death roll but disintegrated on cohesion and broke. Fleeing short, the red pike caught them from behind inflicting another base loss. Both remaining hoplites shrugged off seeing their friends break but the Greek cavalry fragmented as a result. The Greek general moved to the reserve hoplites and the red pike passed a CMT to stop pursuing. As the turn ended, the broken hoplites were removed from the table as they were at 50%.

To start the Kyrene 6th turn, the reserve hoplites passed a CMT and expanded to in front of the red pike. The other hoplites shifted a file to cover the blue pike's overlap. The Greek light foot continued moving around the Ptolemaic flank. In melee, the blue pike scored 3 hits and took 3. The hoplites passed their death roll but the blue pike took a base loss. The Ptolemaic cavalry scored 2 hits to 1 causing the Greek cavalry to break. The Greek light foot disrupted from seeing friends break and in the pursuit the Greek mounted moved 6" only to be caught by the Ptolemaic cavalry losing a base. In joint action, the Ptolemaic cavalry passed a CMT and stopped pursuing as the Greek cavalry fled off the table.

The Ptolemaic 7th turn opened with the red pike rolling not to charge and they held. In the maneuver phase, the red pike moved up into the face of the reserve Greek hoplites. The Ptolemaic cavalry passed a CMT, turned 90 and moved to be within 2" of the reserve hoplites but also positioned themselves that with slight wheel, the Greek camp would fall. In melee, the blue pike scored 4 hits on the hoplites to their front taking only 3 in return. The hoplites passed their death roll but disrupted on cohesion.

At this point the Kyrene Greeks called it quits as no matter what they did in their next turn, the jig was up. Charging with the reserve hoplites would have the Ptolemaic cavalry intercept. Holding would have the camp lost to the same cavalry in the next Ptolemaic turn.
Subscribe to:
Posts (Atom)
-
 Had a bit of inspiration to paint lately and finished up 4 stands of Indian Clubmen. The figures are Khurasan 15s and look a bit cartoonis...
 -
 A new version of the Broken Rays of the Sun campaign map is now available on the blog.
 -
 Finished up two more battle groups for the Normans in the Nunnery Campaign scenario yesterday and started the basing process this morning. ...