
Thursday, May 28, 2020
Test Terrain Pieces
Working on some test pieces of terrain for the Sumerian campaign. Here are two dry steppe examples. One will work as an open field and a base template for other types. The smaller piece with the two rocks can be used on the base template to represent broken/rough/difficult terrain. I have two pieces for the desert also in the works and will post a picture once they are finished.

Wednesday, May 27, 2020
Early Nomad Painting
As I mentioned in an earlier post, I have been experimenting with the dip method as I work through some Essex Biblical for the King of the Two Rivers campaign. Here are some pictures of the first stand completed for this project.


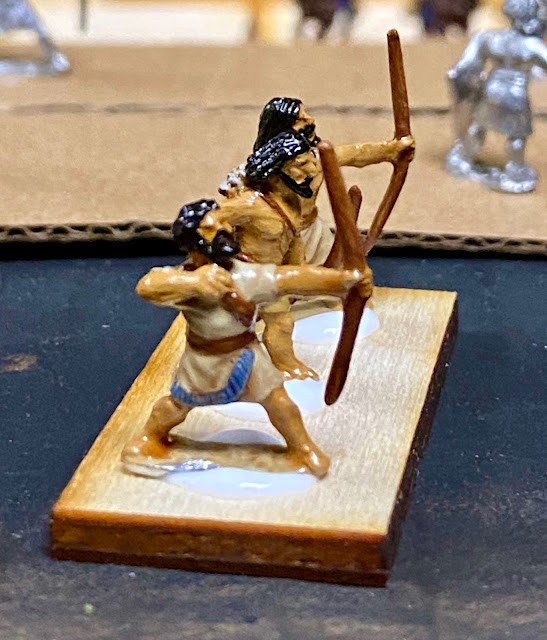


The dip method has never been a favorite of mine and I have attempted it off and on several times. I blame my DnD background as I started out hand-priming everything in white for the colors to pop. When I moved into 15mm Napoleonic, I started out with the white hand-primer but an old friend talked me into trying a black spray primer and dry brushing. The dry brushing part never took but the black spray primer has been my preferred method for over 25 years now. Problem is I hate painting all that flesh on biblicals. This time I opted for a sand yellow camouflage car spray paint, blocked in the main colors, added some details and dipped them with a Min Wax Polly Shade pecan. The old Min Wax Polly Shade tudor appears to be out of production. Skin tone could probably stand to be darker but I think they turned out okay. I have some Nubians that I have been working on and off on that I have been using a brown spray as the primer that I will post some pictures of later along with some dry steppe and desert terrain pieces.
Sunday, May 24, 2020
Lord of the Four Corners
As I mentioned in my last post, the squirrels are alive and well and work on a Sumerian campaign is coming along.
Figures have been ordered and shipped off to The One Tree Painting Service. The campaign rules are in draft form and a map has been devised. I have set up a new campaign page here on the blog so that everyone can find the current information as it gets finished. You can find the latest here:
Lord of the Four Corners Index
I am trying out a new painting method with some Essex Biblicals as I need two 8 stand battlegroups of Martu (or Amurites if you will) to complete a Sumerian list. May add some Amurite archers so I can run a FOG 300 force of them as well. I will add some pictures as I get them complete. Some new lists are also almost finished to complement the campaign so look for the Early Highland Raiders, Early Nomad and Early Elamite brought up toV3 compliance soon. Until next time, enjoy.
Wednesday, May 20, 2020
Campaign Update
Taking a bit of a break from the Broken Rays of the Sun Campaign for now. We still are in the Summer of 220 AD and there is still no clear King of Kings.
In true wargamer fashion, I have been distracted reading about the Sumerians, Akkadians, Elamites and the like. The Happy Wanderer created a nice blog covering the period several years ago called Sumer to Sargon that provides quite a bit of information to digest. Too bad he is not still working on it.
To complicate things there are these nice new Sumerians from Museum that look exquisite. Price is not too bad for almost 1000 points of FOG to cover most options. The plunge has been taken and to speed up production I went ahead and commissioned Mark Kernan of The One Tree Painting Service to paint them up. Mark has done a couple of armies for me and I try to send him work at least once a year. I will be working on some Amorite Mercenaries to flesh them out and will post pictures of the entire host once it is finished and based.
In the meanwhile, I am drafting a map for a possible campaign during the age of Sumer. Trying to get some computer images to fit on a hand drawn background to improve the map look. I will post when I get something worth looking at. Until next time...
Monday, May 11, 2020
FOG 3.0: Battle of Hegra, Summer 220 AD
The Broken Rays of the Sun Test Run Campaign continues with the Battle of Hegra, Summer 220 AD, at 400 points on a 3x2 table using FOG 300 set-up rules. In retrospect, I think a 3x3 table would have been better.
The Summer of 220 AD is moving forward and Vologases VI sends his minion Kwalak of Ctesiphon into the desert to bring the desert oasis town of Hegra into his sphere while he oversees the continuing siege of Ecbatana.
The host of Kwalak of Ctesiphon:
The Sheik of Hegra, Mayk Badyu, (using the Pre-Islamic Arabian list from the Broken Rays of the Sun Extra Lists Addendum) has summoned the Bedouins of Ilik Al-shan from the desert to his aid (this is a campaign mechanic where Hegra is required to have a Bedouin Ally if more than 300 points are fielded).
The Parthians win the initiative and opt for Steppe. The Arabs take the compulsory open and after the Parthians take one open, the Arabs take two broken. The two broken fall on opposite corners of the table so that each side has one in part of their deployment zone.
The Parthians move 1st. There are no charges so Parthian BG 1 and BG 3 move 5" forward. BG 1 shifts one base to its right and BG3 shifts one base to its left. Camelphract BG 5 moves 4" straight ahead. Parthian BG 2 moves 7" forward with a slight wheel towards the Arab light foot. Parthian BG 4 moves 5" forward and shifts one base to its right. The two cataphract BGs (6 & 7) hold in the center. The Parthian leader moves two bases to his right to be with BG 7. The Arab leader decides not to move and thus ends the Parthian 1st turn.
The Arab 1st turn sees Arab BG 6 move 7" forward with a 1" wheel towards the Parthian BG 1. Arab BG 4 moves 5" straight ahead. Arab BG 3 moves 3 1/4" forward stopping just outside of 5" from Parthian BG 3. Arab BG 1 wheels forward towards the Parthian cataphracts stopping level with the end of Arab BG 3. The remainder of the Arab BGs stand firm. In the shooting phase, two targets across the table share two hits for no effect. In the joint acton phase, the Parthian leader moves to the end of Parthian BG 7 ending up within 8" of Parthian BG 3. The Arab leaders opt to stay put ending the Arab 1st turn.
The Parthian 2nd turn begins with no charges. Parthian BG 2 moves up to within 3" of the Arab BG 5. Parthian BG 4 wheels up next to the light horse to be able to shoot at the Arab lights in the broken terrain. Parthian BG 3 wheels towards Arab BG 4 but stops outside of 3" from Arab BG 3. The Camelphract BG 5 makes a CMT and wheels into the gap between Parthian BGs 2 & 4 and within 5" of Arab BG 4. In the shooting phase, the Parthians manage no hits on the Arab light foot who hit Parthian BG 4 with one hit in return for no effect. Parthian BGs 1 & 3 manage one hit to each of their targets again with no effect.
The Arab 2nd turn begins with the Arab BG 6 declaring a charge on Parthian BG 1 and the Arab BG 4 opting not to charge. However, Arab BG 4 fails its CMT not to charge and ends up trundling into the Camelphract BG that intercepts the charge. Parthian BG 1 stands and Arab BG 6 connects one stand with Parthian BG 1 and one with Camelphract BG 5. In the ensuing impact, the Bedouin Ally general leads Arab BG 4 forward resulting in two hits on the Camelphracts who also score two in return. Arab BG 6 scores one hit to the Camelphracts and one hit to Parthian BG 1. The Camelphracts fail to hit the Arab light horse and Parthian BG 1 score one hit on the Arab light horse. The Camelphracts fail to kill the Bedouin Ally leader, lose a base to total hits but survive their cohesion test. The Arabs cannot conform so they will fight as if conformed in melee. Arab BG 3 fails a CMT to move short. Arab BG 5 also fails a CMT to back up. Arab BG 8 makes a CMT, turns 90 and moves 3" on its first move and then moves 5" with a slight wheel towards Arab BG 3 on its 2nd move. In the shooting phase, both sides score a total of one hit each. In melee, Parthian BG 1 scores no hits, the Camelphracts score a total of one hit to Arab BG 6 and zero to Arab BG 4. Arab BG 6 scores one hit to Parthian BG 1 and none to the Camelphracts. Arab BG 4 fails to score any hits. Parthian BG 1 survives its hits and passes its cohesion test. Arab BG 6 survives the phase in a draw. Both CinCs are happy where they are and the Arab 2nd turn ends.
To begin the Parthian 3rd turn, Parthian BG 2 declares a charge on Arab BG 5. After looking at distances behind it, the Arab foot decides to stand in the terrain and take the charge. In the impact, the Parthian BG scores one hit and the Arab BG scores zero. The Arab light foot shrug off the hit and passes its cohesion test. Parthian BG 1 conforms to Arab BG 7. Parthian BG 3 attempts a CMT to expand and fails. Parthian BG 4 makes a double wheel to be in position to fire on Arab BG 5. The Parthian cataphracts (BGs 6 & 7) do a double move of 7" stopping just outside of 5" of Arab BG 1. In the shooting phase, Parthian BG 4 scores all of one hit on Arab BG 5 for no effect. In the melee phase, Parthian BG 2 scores three hits on Arab BG 5 who score zero in return. The Arab BG passes its death roll and survives its cohesion test. The Camelphracts score zero hits to its two opponents and takes one hit from Arab BG 4. Arab BG 7 scores zero hits to either of its opponents but takes one hit from Parthian BG 1. The Camelphracts emerge from the melee phase untouched but while Arab BG 6 survives its death roll it drops to disrupted on its cohesion test. In the joint action phase, the Arab Sheik moves to join Arab BG 1 ending the Parthian 3rd turn.
To begin the Arab 3rd turn, there are no charges. In the maneuver phase, the Arab BG 3 makes a CMT to move short and moves up next to the Arab BG 4. The Arab BG 1 moves 3" forward towards the Parthian cataphracts. Arab BG 2 tries to move short but fails its CMT. In the shooting phase, the Parthian bow fire from BG 4 is again ineffectual. In the melee phase, Parthian BG 2 scores two hits on Arab BG 5 and takes one in return. The Arab BG loses a base to the hits but survives its cohesion test. On the other end of the field, the Camelphracts scores two hits to Arab BG 4 and zero Arab BG 6. Arab BG 4 scores two hits back on the Camelphracts while Arab BG 6 misses. The Camelphracts and Arab BG 4 end in a draw with two hits each. The Bedouin Ally general again escapes unharmed. Parthian BG 1 scores two hits to Arab BG 6 who manages one hit in return. Arab BG 6 survives its death roll but fails on its cohesion test dropping to fragmented. Both CinCs again decide to hold pat and the Arab 3rd turn ends.
To begin the Parthian 4th turn, Parthian BG 4 declares a charge on Arab BG 5 in the broken terrain. Parthian BG 7 opts to hold and successfully passes its CMT. In impact, Parthian BG 4 scores three hits on Arab BG 5 and takes none in return. Arab BG 5 survives the hits but double drops on its cohesion test to fragmented. In the maneuver phase, Parthian BG 3 attempts to expand again but fails its CMT once more. Parthian BG 7 wheels to face Arab BG 1. Parthian BG 6 makes a CMT and moves short and comes up even with BG 7. There is no shooting so into melee the turn moves. Parthian BGs 2 and 4 score three hits and two hits to Arab BG 5 taking zero and one hit in return. Arab BG 5 loses a base to the hits and then breaks. Its rout move takes it off the table. Parthian BG 2 pursues to the table edge and Parthian BG 4 pursues 3" into the terrain. On the other end, the Camelphracts score one hit to none on Arab BG 4 and zero to zero on Arab BG 6. Parthian BG 1 misses Arab BG 6 who misses in return. Arab BG 4 loses a base on its death roll but survives its cohesion test. In the joint action phase, the Arab CinC moves back to Arab BG 8 to end the Parthian 4th turn.
To start the Arab 4th turn, Arab BG 3 charges Parthian BG 3 dropping a file to miss Arab BG 4. In the impact, the Arab foot scores three hits and takes one hit in return. The Parthians survive both their death roll and their cohesion test. In maneuver, Arab BG 1 passes a CMT and moves to within 1/4" of Parthian BG 7. Arab BG 2 fails a CMT to wheel so advances 3" towards Parthian BG 6. Arab BG 8 turns 180 in its first move and then wheels 5" towards the Arab camp on its 2nd move. Arab BG 7 wheels up so it is behind Arab BGs 3 & 4 to give rear support. As there is no shooting this turn, the sides move to melee. In the melee phase, the Camelphracts score one hit to Arab BG 4 and one to Arab BG 7 who also takes two hits from Parthian BG 1. The only hits the Arabs manage in this melee is the one hit from Arab BG 7 to the Camelphracts. Both Parthian BGs in this melee win. Arab BG 7 loses a base on its death roll and breaks on cohesion. Arab BG 4 loses a base to hits but passes its cohesion. The other Arabs just shrugg their shoulders as Arab BG 7 streams off the table. Parthian BG 1 pursues but stops at the table edge. In other action, Parthian BG 3 scores two hits on Arab BG 3 who scores one hit in return. The Arab BG survives its death roll but disrupts on its cohesion test. In the joint action phase, the Parthian leader moves to Parthian BG 6 to end the Arab 4th turn.
In the post battle Victory Ripple, Hegra opens its gates to the Army of Vologases as he continues to expand his control over the deep desert.
The Summer of 220 AD is moving forward and Vologases VI sends his minion Kwalak of Ctesiphon into the desert to bring the desert oasis town of Hegra into his sphere while he oversees the continuing siege of Ecbatana.
The host of Kwalak of Ctesiphon:
 |
| Army with numbered BGs. The numbers correspond to the army list order of march for ease of reference. |
 |
| The army list. |
The Sheik of Hegra, Mayk Badyu, (using the Pre-Islamic Arabian list from the Broken Rays of the Sun Extra Lists Addendum) has summoned the Bedouins of Ilik Al-shan from the desert to his aid (this is a campaign mechanic where Hegra is required to have a Bedouin Ally if more than 300 points are fielded).
 |
| The army with numbered BGs. Again the numbers correspond to the order of march for ease of reference. Please note that I switched to Blue numbering after this picture as the Orange was too hard to pick out on the table mat. |
 |
| The army list. |
 |
| The Parthians deployed. Again all numbers correspond to the army list. BGs 1 & 2 are light horse bow lance, BGs 3 & 4 are cavalry bow* lance, BG 5 is Camelphracts and BGs 6 & 7 are Cataphracts. Kwalak of Ctesiphon is attached to BG 6 to begin the battle. Old figures on the table have been painted by me. All of the bow mounted are Old Glory from pack LA10. The cataphracts are all Old Glory from packs ES03, PA03, AR02 & SA02. The command is Old Glory from PA01. The Camelphracts are Peter Pig from Range 3 Parthians Pack 72. The camp are Xyston figures with 1 figure from the ANC20056 pack plus camels and a foot figure from ANC20282. |
 |
| Another angle of the Parthians deployed with the Arabs in the foreground. |
 |
| The Arabs deployed. Again all numbers refer to the order of march. BGs 1, 2 & 3 are the heavy foot, BG 4 & 7 are Bedouin ally protected cavalry lancers, BG 5 is light foot archers, BG 6 is Bedouin ally light horse lancers and BG 8 is City Cavalry lancers. The Sheik is with BG 8 and the Bedouin leader is with BG 4. Some of these I painted and some others painted. All of the mounted and command are from Khurasan. Personally, I think the Arab mounted are the best figures they make. The Bedouin cavalry are from pack KM1005. The City cavalry are from pack KM1006 with a few from KM1005. The command are from KM1008 & 1005. All of the foot are Old Glory. All of the heavy foot is from AC02. The archers are mainly from Old Glory pack AC03. The figures on the camp stands are Essex that I purchased from China off eBay years ago before their prices skyrocketed. The heavy foot and most of the archers were painted by Larry Reeves in Mississippi. Most of the Bedouin Cavalry was painted by Thomas Demers of Mad Monkey Painting. The City Cavalry, the command and a few odds and ends mounted and archers were painted by me. |
 |
| Another angle of the Arabs deployed. |
 |
| Both armies deployed with a view of the entire field. |
 |
| After the Parthian 1st turn |
 |
| After the Arab 1st turn. |
 |
| After the Parthian 2nd turn. The heat of the Arabian summer is obviously causing the heat shimmers in the distance in this picture. |
 |
| After the Arab 2nd turn |
 |
| After the Parthian 3rd turn. In retrospect and as Graham Briggs pointed out, Parthian BG 2 should have broken off from Arab BG 5 in joint action. |
 |
| After the Arab 3rd turn. |
 |
| After the Parthian 4th turn. The black marker by the Arab camp is the 1 attrition point for the broken Arab Light Foot BG killed this turn. Things got a bit fuzzy at the top of the field. The orange marker on Parthian BG 4 is the disorder for the terrain. |
 |
| After the Arab 4th turn. The two black markers beside the Arab camp are the two attrition points lost for the two broken skirmish BGs. |
To begin the Parthian 5th turn, the two cataphracts opt to hold and pass their CMTs to do so. Parthian BG 4 turns 180 in place. Parthian BG 2 turns 90 and moves up to the edge of the terrain just short of the Arab camp. Parthian BG 1 moves down the table edge to within 3" of Arab BG 7. In the shooting phase, Parthian BG 1's attempts against Arab BG 7 are for naught. In the melee phase, Parthian BG 3 scores two hits to Arab BG 3 and takes two in return for a draw. The Camelphracts score three hits to Arab BG 4 and take one in return. The Bedouin Ally general survives again but the BG loses a base to hits and breaks routing 4". The Camelphracts pursue and catch the broken Arabs taking another base. The Bedouin Ally general survives again. Arab BG 3 does not care about the breaking Bedouin Arabs. In the joint action phase, the Bedouin Ally general moves to Arab BG 7. The broken Arab BG 4 routes 6" going through and disrupting Arab BG 7. The Camelphracts drop a base to miss Parthian BG 1 and plows into Arab BG 7. Arab BG 4 is picked up at the end of the turn.
(Unfortunately, no picture survives of the turn).
To start the Arab 5th turn, the Bedouin Ally general throws himself into the front ranks of Arab BG 7. In the ensuing impact, both Arab BG 7 and the Camelphracts score two hits for a draw and the Bedouin Ally general survives with minor bruises. In the maneuver phase, Arab BG 3 expands to cover an existing overlap against Parthian BG 3. The Camelphracts expand to cover an overlap so it can fight with all three bases. Arab BG 8 moves 5" towards the Parthian mounted in the broken near the camp. Arab BG 2 is heard lamenting that light spears do not spearmen make and Orb is beyond their capabilities. In the shooting phase, Parthian BG 2 scores two hits on Arab BG 8 who disrupt. In melee, the Camelphracts score two hits on Arab BG 7 who score zero in return. The Bedouin Ally general survives another round but the Arab BG suffers a base loss and drops to fragmented. Arab BG 3 scores two hits on Parthian BG 3 and takes zero in return. Parthian BG 3 loses a base to hits and fragments. Both CinCs see no reason to move and the Arab 5th turn ends.
 |
| After Arab 5th turn. The Arabs are now down one BG fragmented, two skirmisher BGs destroyed and one other BG routed for 5 total attrition points (red skull by the camp = a broken non-skirmish BG) to 1. |
To start the Parthian 6th turn, the Parthians opt to hold both cataphracts. However, BG 6 fails its CMT and charges into Arab BG 2. In the impact, Parthian BG 6 scores six hits to Arab BG 2 who manages three in return. The Parthian BG survives its death roll while the Arab foot loses a base automatically and fragments on its cohesion test. In the maneuver phase, Parthian BG 4 makes a CMT and moves enough forward to turn 90 and face Arab BG 8. Parthian BG 1 moves into overlap against Arab BG 7. In the shooting phase, Arab BGs 2 & 4 score two hits on Arab BG 8 who fragments on cohesion. This brings the Arab army to 7 total attrition points breaking the Arab army.
 |
| After Parthian 6th turn. Arab army breaks as it is down 7 attrition points to 1 for the Parthians. |
In the post battle Victory Ripple, Hegra opens its gates to the Army of Vologases as he continues to expand his control over the deep desert.
Friday, May 1, 2020
FOG 300: Battle of Pura Summer 220 AD
Ardashir I, stinging from the rebuke given to his attempts at intrigue to take over Pura, leads his army to the city walls accompanied by his Agraci Mercenaries (bonus BG of Pre-Islamic Bedouin Cavalry Lancers). With Pura being his last remaining stronghold, King Sinnakes of Gedrosis decides to through everything on the table and face the Persis' King.
Editors Note: Green was a bad choice on reflection for denoting the Gedrosian BGs and will not be used in the future.
Aradashir of Persis won the initiative and opted for Steppe. The Gedrosians took the compulsory open and two broken. The Persians took the remaining open. All of the terrain fell on the Persian side and once deployment was completed the field look like below:
The Gedrosians moved first and moved Green Cavalry BG 1 5" forward at a slight angle towards Purple BG 1. Green Cavalry BG 2 and Cataphract BG 4 moved as a group and wheeled towards the center doing a double move. Green Cavalry BG 3 and Green Light Horse BG 5 moved 5" each straight ahead. With no one within shooting range, the Gedrosian first turn ended.
To begin the Persian 1st turn, Purple Bedouin BG 1 moved 5" straight forward. The center line (Purple BG 2, 5 & 6) moved as a group 4" straight ahead. Purple Cavalry BG 3 and Light Horse BG 4 moved 5" each. In the shooting phase, The Green Cavalry BG 2 scored two hits and took one from Purple Cavalry BG 2. Purple Cavalry BG 2 disrupted on cohesion. Green Cavalry BG 3 scored three hits and took two from Purple Cavalry BG 3. The Purple Cavalry survived its death roll and passed its cohesion. The Green Cavalry, however, disrupted on its cohesion test. With no melee to be resolved and the generals good, the Persian 1st turn ended.
To begin the Gedrosian 2nd turn, the Green Cavalry BG 2 and Cataphract BG 4 both charged straight ahead. The Persian leader saw no reason to risk life and limb in combat while the Gedrosian leader decided to lead from the front. In impact, both the Green Cavalry BG 2 and the Purple Cavalry BG 2 scored three hits. Both survived their death rolls. Green Cataphract BG 4 with general fighting scored four hits and took three from Purple Cataphract BG 5 in return. The Gedrosian leader survived impact and the Green Cataphracts survived the three hits. The Purple Cataphracts, however, lost a base to hits and then disrupted on cohesion. In the maneuver phase, Green Cavalry BG 1 made a CMT and expanded to skirmish formation. Green Cavalry BG 3 also expanded into a single rank. In the shooting phase, everyone forgot what a bow was for and arrows ended up in the dirt. In the melee phase, Purple Cavalry BG 2 scored one hit to Green Cavalry BG 2 and took two in return. Purple Cataphract BG 5 scored one hit to Green Cataphract BG 4 while Purple Cataphract BG 6 in overlap missed completely. Green Cataphract BG 4 scored three hits on Purple Cataphract BG 5 in return. Due to hits, Purple Cavalry BG 2 breaks when losing a base and routes. Purple Cataphract BG 5 drops to fragmented for losing its combat and then breaks for seeing Purple Cavalry BG 2 breaking. Both Green BGs (2 & 5) pursue the broken Purple BGs who route 3" & 4" respectively and are caught losing yet another base. Ardashir was crushed in the route and his mangled body was found on the field after the battle. Purple Cataphract BG 6 was dismayed for seeing the king die and disrupted. In the joint action phase, both Green BG 2 & 4 pass a CMT and stop pursuing. The two broken Purple BGs roll long and route off the table.
To begin the Persian 2nd turn, the Purple Bedouin BG 1 charged the Green Cavalry BG 1. Both BGs evade and pursue 5" respectively. Purple Cavalry BG 3 and Light Horse BG 4 both charge. Green Cavalry BG 3 and Light Horse BG 5 evade. The two Green BGs evade 6" and 8" respectively. The Purple BGs pursue 5" and 6". In the maneuver phase, Purple Cataphract BG 6 move 4" straight ahead. With no shooting or melee, the Persian 2nd turn ended.
To begin the Gedrosian 3rd turn, Green Cataphract BG 4 wanted to charge the Persian camp but after measuring it was just outside of charge range. In maneuver, the Green Cataphracts moved 4" towards the Persian camp. The Green Cavalry BG 1 turns 180. The Green Cavalry BG 3 moves to the table edge. The Green Light Horse BG 5 moves to the table edge and turns around. Green Cavalry BG 2 turns 90 towards the center of the table. No on is close enough to shoot so in joint action the Gedrosian leader moves 7" towards his table edge ending the Gedrosian 3rd turn.
To begin the Persian 3rd turn, Purple Bedouin BG 1 charges Green Cavalry BG 1. Green Cavalry BG 1 evades long and goes off the table. The Purple Bedouin BG 1 only pursues 3". In the maneuver phase, the Purple Light Horse BG 4 moves 7" straight ahead. Purple Cavalry BG 3 moves 5" forward with a slight wheel towards Green Cavalry BG 3. Purple Cataphract BG 6 moves 4" forward. In the shooting phase, both sides again demonstrate their incompetence with a bow as one hit is scored between nine shots. With no melee, in the joint action the Gedrosian leader moves to Green Cavalry BG 3 and attempts to rally but fails ending the Persian 3rd turn.
To begin the Gedrosian 4th turn, the Green Cataphract BG 4 moves into contact with the Persian camp. The Green Light Horse BG 5 charges the Purple Light Horse BG 4. The Purple Light Horse evades 9" and the Green Light Horse charge into the Purple Cavalry BG 3. In impact, the Green Light Horse score one hit but take two in return from the Purple Cavalry. The Green Light Horse proceed to lose a base to hits but survives on cohesion. In the maneuver phase, Green Cavalry BG 3 turns 180. Green Cavalry BG 2 moves 5" with a slight wheel towards the Purple Cataphract BG 6. With no shooting, the turn progressed into melee where the Green Light Horse scores two hits and takes two in return from the Purple Cavalry BG 3 for a draw. In joint action, the Green Cavalry BG 3 rallies back from disrupted while the Green Cataphract BG 4 stops looting the Persian camp ending the Gedrosian 4th turn.
To begin the Persian 4th turn, no charges are in the offing. In the maneuver phase, the Purple Cataphract BG 6 moves into overlap next to the Purple Cavalry BG 3. Purple Light Horse BG 4 turns 90 and moves 5" towards Green Cavalry BG 2. The Purple Bedouin BG 1 wheels towards the center. In the shooting phase, three total hits are done to three different targets for no effect. In melee, The Green Light Horse score one hit and take a total of four in return. The Green Light Horse loses a base to the hits but survives the cohesion test. No action occurs in the joint action phase so the Persian 4th turn ends.
To begin the Gedrosian 5th turn, the Green Cavalry BG 2 decides to get rid of the pesky Purple Light Horse BG 4 and charges. Both go 7" with the Purple Light Horse BG choosing to go in the direction of the charge rather than to its rear. In the maneuver phase, Green Cataphract BG 4 attempts a CMT to turn 90 but fails so wheels as far as it can (2") stopping at the table edge. Green Cavalry BG 2 attempts a CMT to contact but fails. In the shooting phase, Green Cavalry BG 2 hits the Purple Cataphract BG 6 twice (needing 6s). The Purple Cataphracts shrugs off the hits and passes its cohesion test. In melee, the Purple Cavalry BG 2 and the Purple Cataphract BG 6 each score one hit on the Green Light Horse who manages zero in return. The Green Light Horse BG ends up losing a base to the hits causing it to autobreak routing off the table. The Purple Cataphract BG 6 rolls short and only goes forward 2" while the Purple Cavalry BG 3 pursues into the Green Cavalry BG 3 who opts to stand as evading off the table breaks the Gedrosian army. The Gedrosian leader opts to stay with Green Cavalry BG 3 ending the Gedrosian 5th turn.
To begin the Persian 5th turn and even with Ardashir's corpse getting cold somewhere on the field, the Persians still have a chance to win the battle and the Purple Cataphract BG 6 launches itself into Green Cavalry BG 3. The Gedrosian leader opts to join the fight to help balance the quality factor in this action. The Purple Cavalry BG 3 manage only one hit while the Purple Cataphract BG 6 only scores two. The Green Cavalry BG 3 however manages two versus the Purple Cavalry and FOUR against the cataphracts. The Gedrosian leader survives the impact and the Gedrosian Cavalry survive its death roll. Both Purple BGs survive their death rolls but the Purple Cavalry disrupts on cohesion while the Purple Cataphracts fragment. With the fragmentation of the Purple Cataphracts the Persian army breaks.
Campaign Note: Gedrosia is not a rich kingdom in the campaign and is limited to a maximum of 1/2 the normally allowed cataphracts. In FOG 300, that maximum is 4.
 |
| List of Ardashir I - Mercenary Bedouin Cavalry are free for this battle only - total with Bedouins is 326 points |
 |
| BG 1 - Bedouin Lancer Cavalry, BG 2 - Bow* Lancer Cavalry, BG 3 - Bow* Lancer Cavalry, BG 4 - Light Horse Bow Lancer, BG 5 - Purple Cataphracts, BG 6 - Red Cataphracts |
 |
| List of Sinnakes of Gedrosia |
 |
| BG 1 - Bow* Lancer Cavalry, BG 2 - Bow* Lancer Cavalry, BG 3 - Bow* Lancer Cavalry, BG 4 - White Cataphracts, BG 5 - Bow Lancer Light Horse |
Aradashir of Persis won the initiative and opted for Steppe. The Gedrosians took the compulsory open and two broken. The Persians took the remaining open. All of the terrain fell on the Persian side and once deployment was completed the field look like below:
 |
| The numbers correspond to the labels from the previous pictures so I will not repeat them here. I replied the single fortification stand to denote fortified on the Gedrosian camp with two hedge pieces as I thought it looked better. Ardashir deployed with Purple cataphract BG 5. Sinnakes deployed with his only cataphract BG (Green BG 4). |
 |
| After Gedrosian 1st Turn |
 |
| After Persian 1st Turn |
To begin the Gedrosian 2nd turn, the Green Cavalry BG 2 and Cataphract BG 4 both charged straight ahead. The Persian leader saw no reason to risk life and limb in combat while the Gedrosian leader decided to lead from the front. In impact, both the Green Cavalry BG 2 and the Purple Cavalry BG 2 scored three hits. Both survived their death rolls. Green Cataphract BG 4 with general fighting scored four hits and took three from Purple Cataphract BG 5 in return. The Gedrosian leader survived impact and the Green Cataphracts survived the three hits. The Purple Cataphracts, however, lost a base to hits and then disrupted on cohesion. In the maneuver phase, Green Cavalry BG 1 made a CMT and expanded to skirmish formation. Green Cavalry BG 3 also expanded into a single rank. In the shooting phase, everyone forgot what a bow was for and arrows ended up in the dirt. In the melee phase, Purple Cavalry BG 2 scored one hit to Green Cavalry BG 2 and took two in return. Purple Cataphract BG 5 scored one hit to Green Cataphract BG 4 while Purple Cataphract BG 6 in overlap missed completely. Green Cataphract BG 4 scored three hits on Purple Cataphract BG 5 in return. Due to hits, Purple Cavalry BG 2 breaks when losing a base and routes. Purple Cataphract BG 5 drops to fragmented for losing its combat and then breaks for seeing Purple Cavalry BG 2 breaking. Both Green BGs (2 & 5) pursue the broken Purple BGs who route 3" & 4" respectively and are caught losing yet another base. Ardashir was crushed in the route and his mangled body was found on the field after the battle. Purple Cataphract BG 6 was dismayed for seeing the king die and disrupted. In the joint action phase, both Green BG 2 & 4 pass a CMT and stop pursuing. The two broken Purple BGs roll long and route off the table.
 |
| After Gedrosian 2nd turn. The two deaths heads by the Persian camp represent the two routed BGs. |
 |
| After the Persian 2nd turn. |
 |
| After Gedrosian 3rd turn |
 |
| After Persian turn 3. The black marker by the Gedrosian camp on the right should be a red death head as a formed BG evading off the table is 2 attrition points and not 1. |
 |
| After the Gedrosian 4th turn. The Persian camp is 1 attrition point in FOG 300 so the Persians are at 5 attrition points of 6. The Gedrosians are down 2. |
 |
| After the Persian 4th turn |
 |
| After the Gedrosian 5th turn. The attrition markers in front of the Gedrosian camp are now correct. Attrition stands at Persians at 5 - Gedrosians at 3. |
 |
| After the Persian 5th Turn. |
Subscribe to:
Posts (Atom)
Could this be a new campaign scenario?
69 AD was a busy year for the Romans. Could this be an interesting scenario for a campaign? I have plenty of Early Germans, Gallic types, ...

-
 A new version of the Broken Rays of the Sun campaign map is now available on the blog.
 -
 Finished up two more battle groups for the Normans in the Nunnery Campaign scenario yesterday and started the basing process this morning. ...
 -
 Had a bit of inspiration to paint lately and finished up 4 stands of Indian Clubmen. The figures are Khurasan 15s and look a bit cartoonis...