Sunday, May 27, 2018

FOG 300 Later Sassanids vs Pre-Islamic Arabians circa 575 AD

In the reign of the Illustrious King of Kings, Shahanshah of all Aryans and Non-Aryans, Khosrow I, the loyal subjects of the  Immortal Soul in the southern regions of the Arabian Desert petitioned the light of Mazda for relief from the depredations of the wicked Axiumites who had crossed the Red Gulf and practiced unspeakable acts against the loyal subjects of the lord of all Aryans and Non-Aryans.  In his magnificence, Khusrow I, the Immortal Soul, dispatched his most loyal general Vahrez Boes with a small force of dedicated soldiers to his subjects' aid.  In a short campaign, Vahrez Boes confirmed the Immortal Soul's trust in him, cast the evil Axumites out and restored Sayf ibn Dhi-Yazan to his throne.  Vahrez Boes then returned to the land of Aryans.

A short time later, the Auximites returned and killed Sayf ibn Dhi-Yazan.  The great Khosrow I, incensed by the acts of the Auximites, dispatched Vahrez Boes with a larger force to expel the Auximites once and for all.  In a short time, Vahrez Boes did just that and remained in the Arabian South to ensure the eternal peace for the loyal subjects of the Immortal Soul.

Yet, Vahrez Boes' work was not at an end.  The Auximites (with Roman Gold) stirred unruly elements of the populace south of Najran to oppose the will of the Immortal Soul and rose in rebellion.  Sheik al-Hamil ibn Said cast out Vahrez Boes' loyal representatives and treated them most unjustly.

As a consequence, Vahrez Boes gathered his forces and marched to find the recalcitrant Sheik and bring his people back to fold of the Immortal Soul.

On the road between Sana'a and Najran, the Sassanid forces met the revolting Arabs...

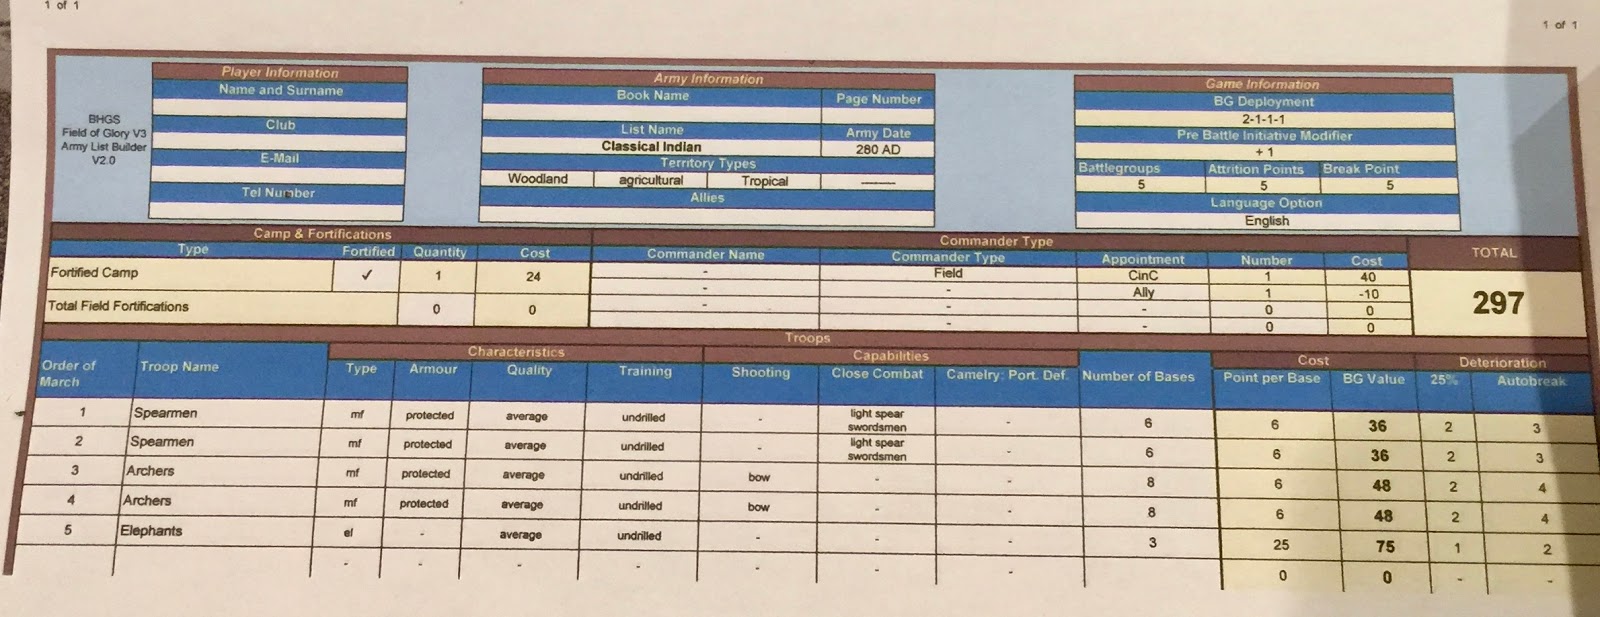
The Sassanid List and Host:


The Pre-Islamic Arabian List and Host:


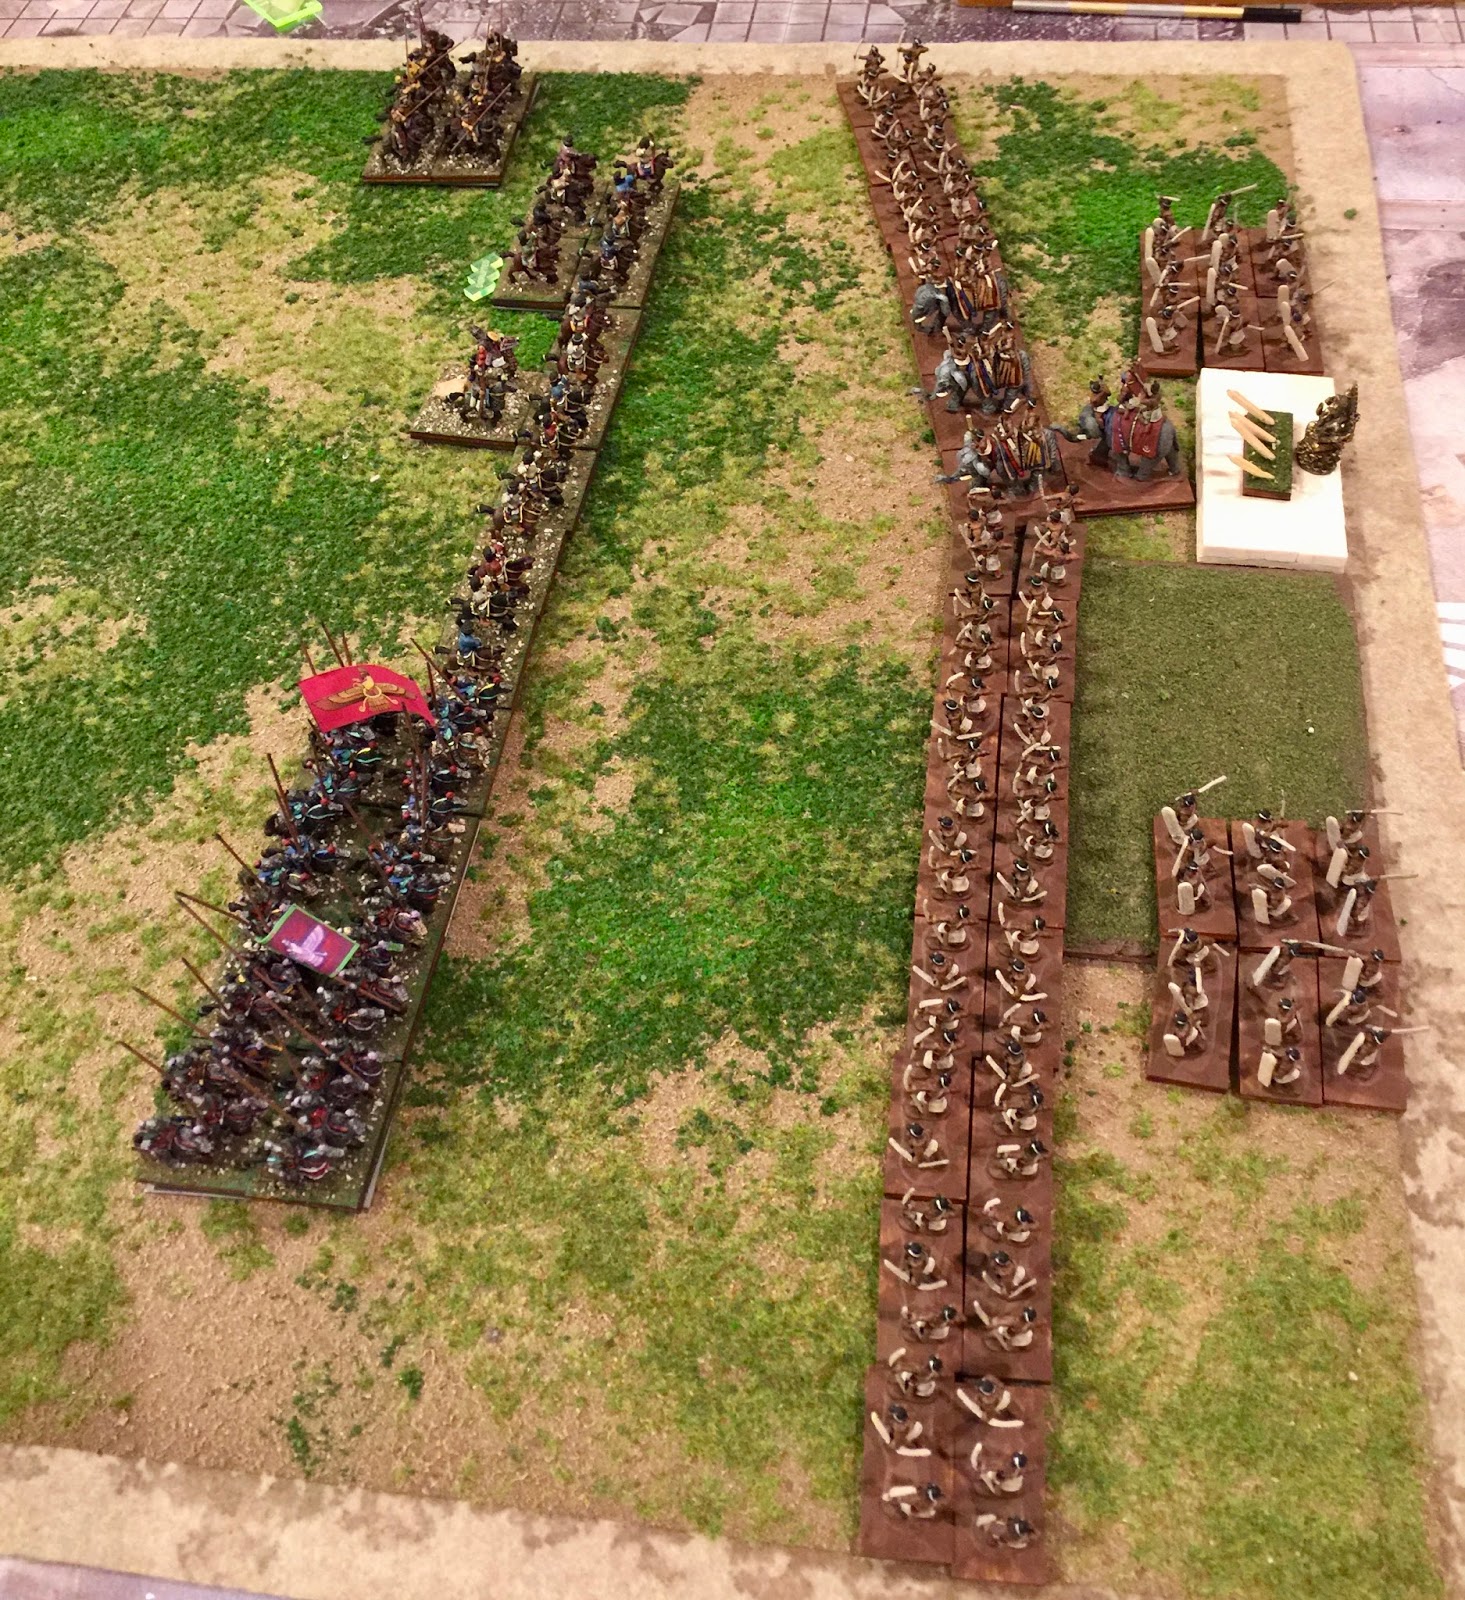
The rebels stood on the field as the Sassanid forces approached and opted for Developed.  The Sassanids took the compulsory enclosed field and the open.  The Arabs took the village and another enclosed field.  One enclosed field fell on the left of the Arab line (to the right in the picture below) while the village fell on the Arab right.  The other enclosed field fell on the Sassanid right.  The Arabs deployed between the enclosed field and the village (just off camera to the left).  The three Foot Warrior BGs deployed from the enclosed field towards the village.  The Bedouin light horse deployed on the left of the foot (in the picture) with the City Cavalry to the left of them.


The Sassanids deployed with the Superior Asvaran BG on the far left next to the enclosed field.  One of the average Asvaran deployed next to them.  The last average Asvaran BG deployed on the Sassanid right (in the picture) with the Cataphracts in the middle.


The Sassanids moved first.  The two Asvaran cavalry BGs on the Sassanid right moved a full 5" straight ahead to close the gap between the two armies.  The Cataphracts and the remaining Asvaran BG double moved forward shifting 1 single base to their right in their first move. With no shooting or melee, the Sassanid 1st turn ended.  


The Pre-Islamic Arabian 1st turn saw the Arabian foot move as a group straight ahead 3".  The Arabian cavalry opted to remained stationary.  There was no shooting at this point so the turn ended.
  

The Sassanid 2nd turn opened with the Cataphracts rolling not to charge - they held.  The Cataphracts and adjacent cavalry move to just short of 2" of the Arabian foot and just outside 5" of the City Cavalry.  The right flank Sassanid cavalry moved to within 3" of the Arabian foot.  The center Arabian foot took 3 hits in the shooting phase but shrugged off both the death roll and cohesion test.  All other shooting was forgetalble.  Thus the Sassanid 2nd turn ended.


The Arabian 2nd turn opened with the right most Arabian Foot (the reds and whites right to left respectively) charging the Sassanid cavalry line to chase them off.  Both cavalry evaded with the Superior Asvaran moving normal and the average to their left going 2" short.  The red Arabian foot went 5" in pursuit while the white Arabian foot went normal.  The last Arabian foot (the blacks) failed a CMT to move short in front of the cataphracts so opted to sit.  The Bedouin cavalry moved to within 1.5" of the Cataphracts and the City cavalry moved to stay on line.  The Sassanid shooting against the City cavalry had no effect so the Arabian 2nd turn ended.


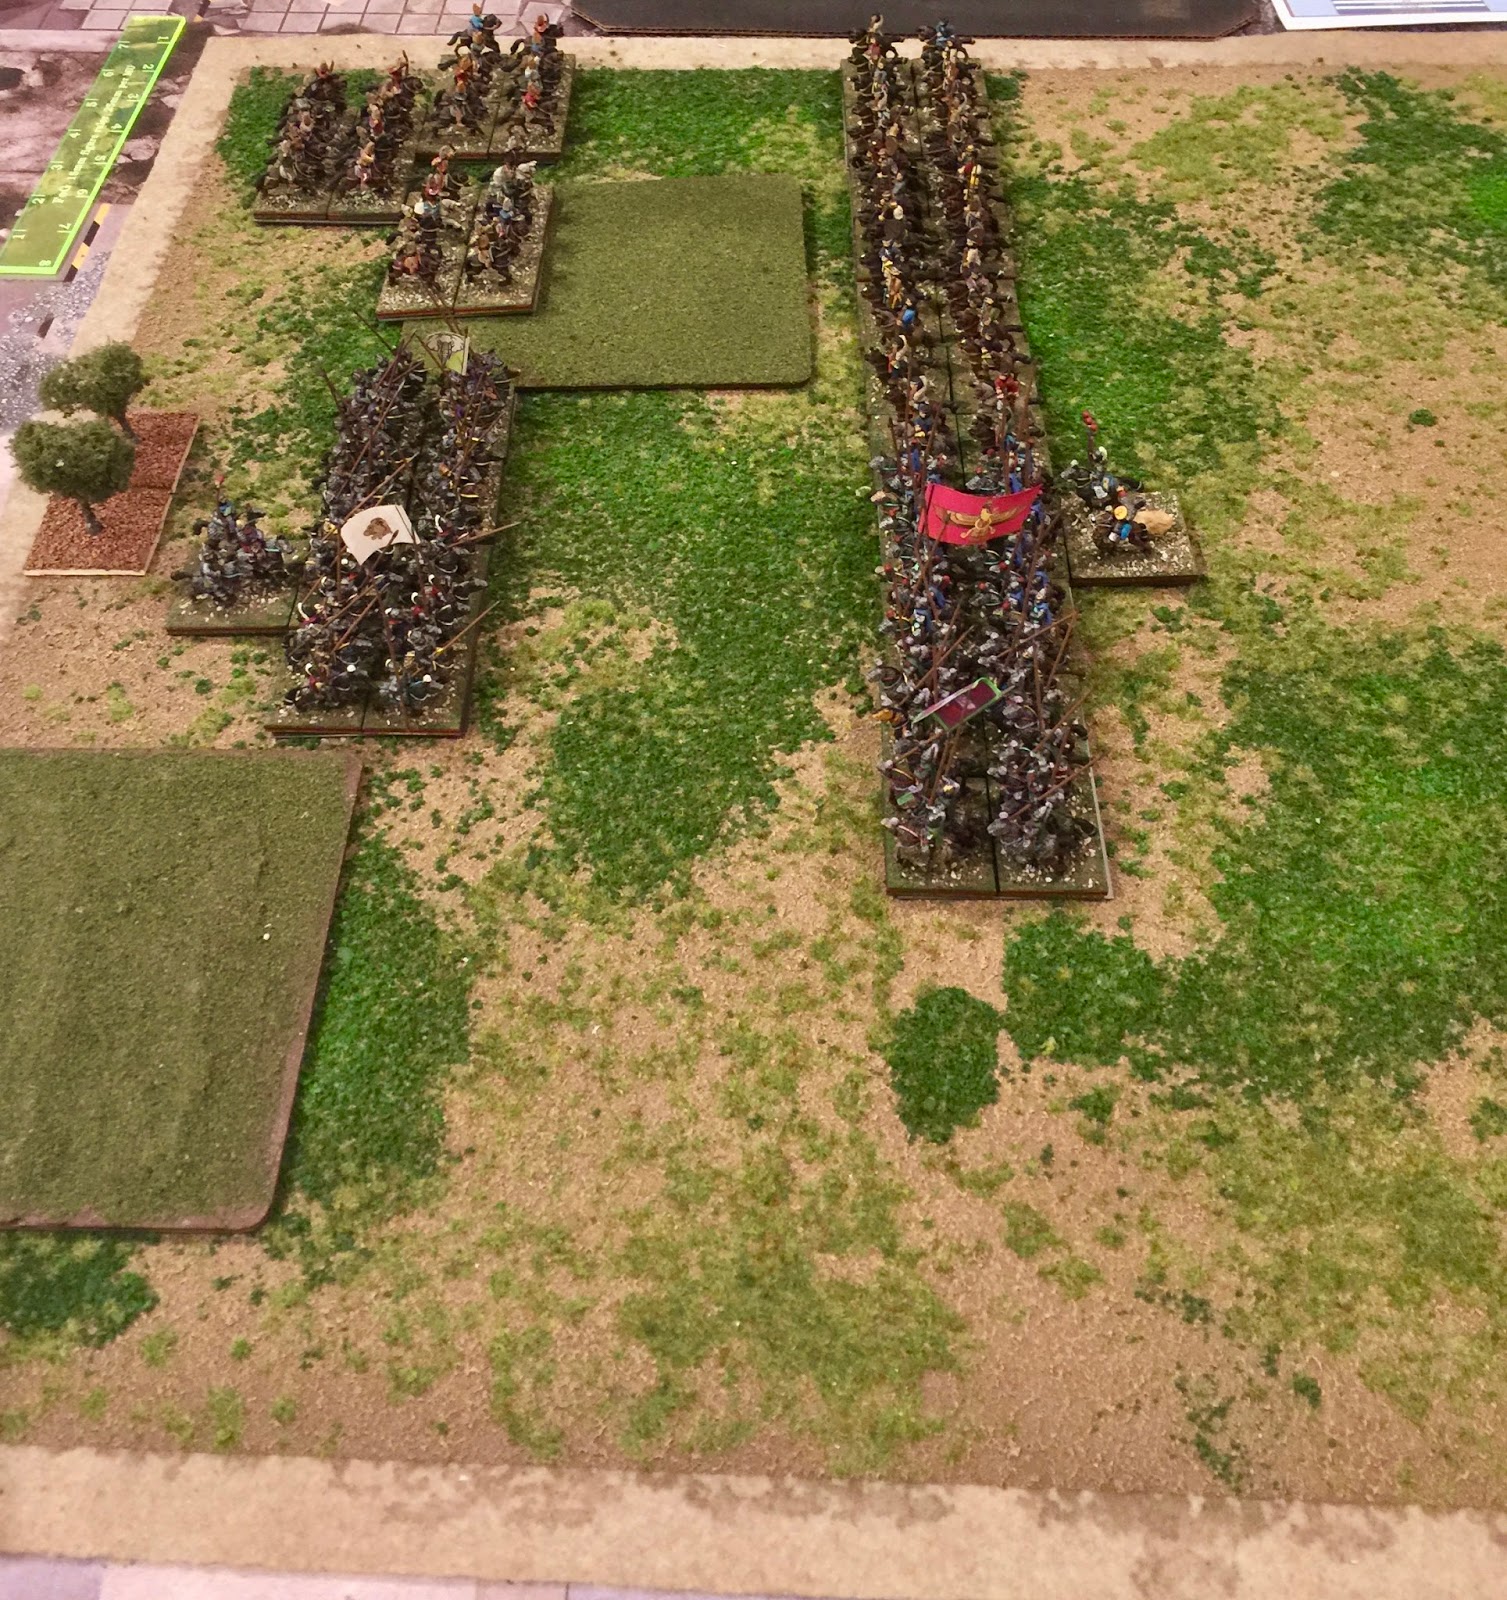
To start the Sassanid 3rd turn, the Cataphracts charged straight ahead.  The Bedouins evaded, rolled normal move and stopped just short of going off the table.  The Cataphracts plowed into the black Arabian foot with one base making contact.  In Impact, the Cataphracts scored 2 hits to none which was catastrophic to the Arabs as the Arabian foot lost a base and double dropped to fragmented.  In the Movement Phase, the Cataphracts slid to their right to conform and the Arabs covered the 2nd file of the Cataphracts.  The two right flank Sassanid cavalry BGs turned around and sat.  The left flank cavalry BG made a CMT and backed up 2" and turned back around.  Sassanid shooting again had no effect.  In Melee, the Cataphracts scored 3 hits to 1.  The black Arab foot passed the death roll but failed cohesion and is caught in the pursuit after going 1" losing another base.  No-one cared about the broken Arab foot and in Joint Action the Cataphracts stopped pursuing while the broken Arabs went another 2".  The Sassanid 3rd turn ended at this point.


To begin the Arab 3rd turn, the City Cavalry charged the Sassanid cavalry to their front who evaded 3" back while the City Cavalry pursued forward 5.  The red and white Arab foot on the other end of the Arab line also charged and the Sassanid cavalry to their front evaded.  The right most Sassanid cavalry went 5" and the next one went 7".  The Arab foot lumbered along with the red Arab foot going 2" and the black Arab foot going 3".  In the Movement Phase, the Bedouin cavalry turned 90 and wheeled forward 4.5" to get out of the way of the fleeing Arab foot.  As there was no shooting or melee, the Joint Action quickly arrived and saw the broken Arab foot fleeing 3" to towards the table edge, ending the Arab 3rd turn.


The Sassanids 4th turn opened with no charges.  All three Asvaran BGs turned 180 in place to face the Arabs.  The Cataphracts turned 90 in place.  The Asvaran Bg facing the Arab City Cavalry was the only unit within shooting range but had no effect.  The Joint Action Phase saw the broken Arab foot exit the table ending the Sassanid 4th turn.


To start the Arab 4th turn, the City Cavalry charged the Sassanid cavalry to their front but rolled short on their VMD and only went 3".  The Sassanid cavalry went a full 5".  In movement, the red and white Arab foot on the Arab left moved 3" forward towards the Sassanid cavalry.  The Bedouin light horse moved to just in front of the Cataphracts at an angle.  In the shooting phase, the Sassanids scored 4 hits on the red Arab foot who passed both their death roll and cohesion test.   With nothing to do in the Joint Action Phase, the Arab 4th turn ended.


To begin the Sassanid 5th turn, the Cataphracts successfully rolled not to charge the Bedouins and instead wheeled towards the Arab City Cavalry.  The Sassanid cavalry in the middle of the table advanced to within 3" of the white Arab foot.  The Sassanid cavalry in front of the Arab City Cavalry turned to face.  The Sassanid cavalry threw a lot of dice in the shooting phase but nothing happened.  In the Joint Action Phase, the Arab Sheik moved to the red Arab foot BG thus ending the Sassanid 5th turn.


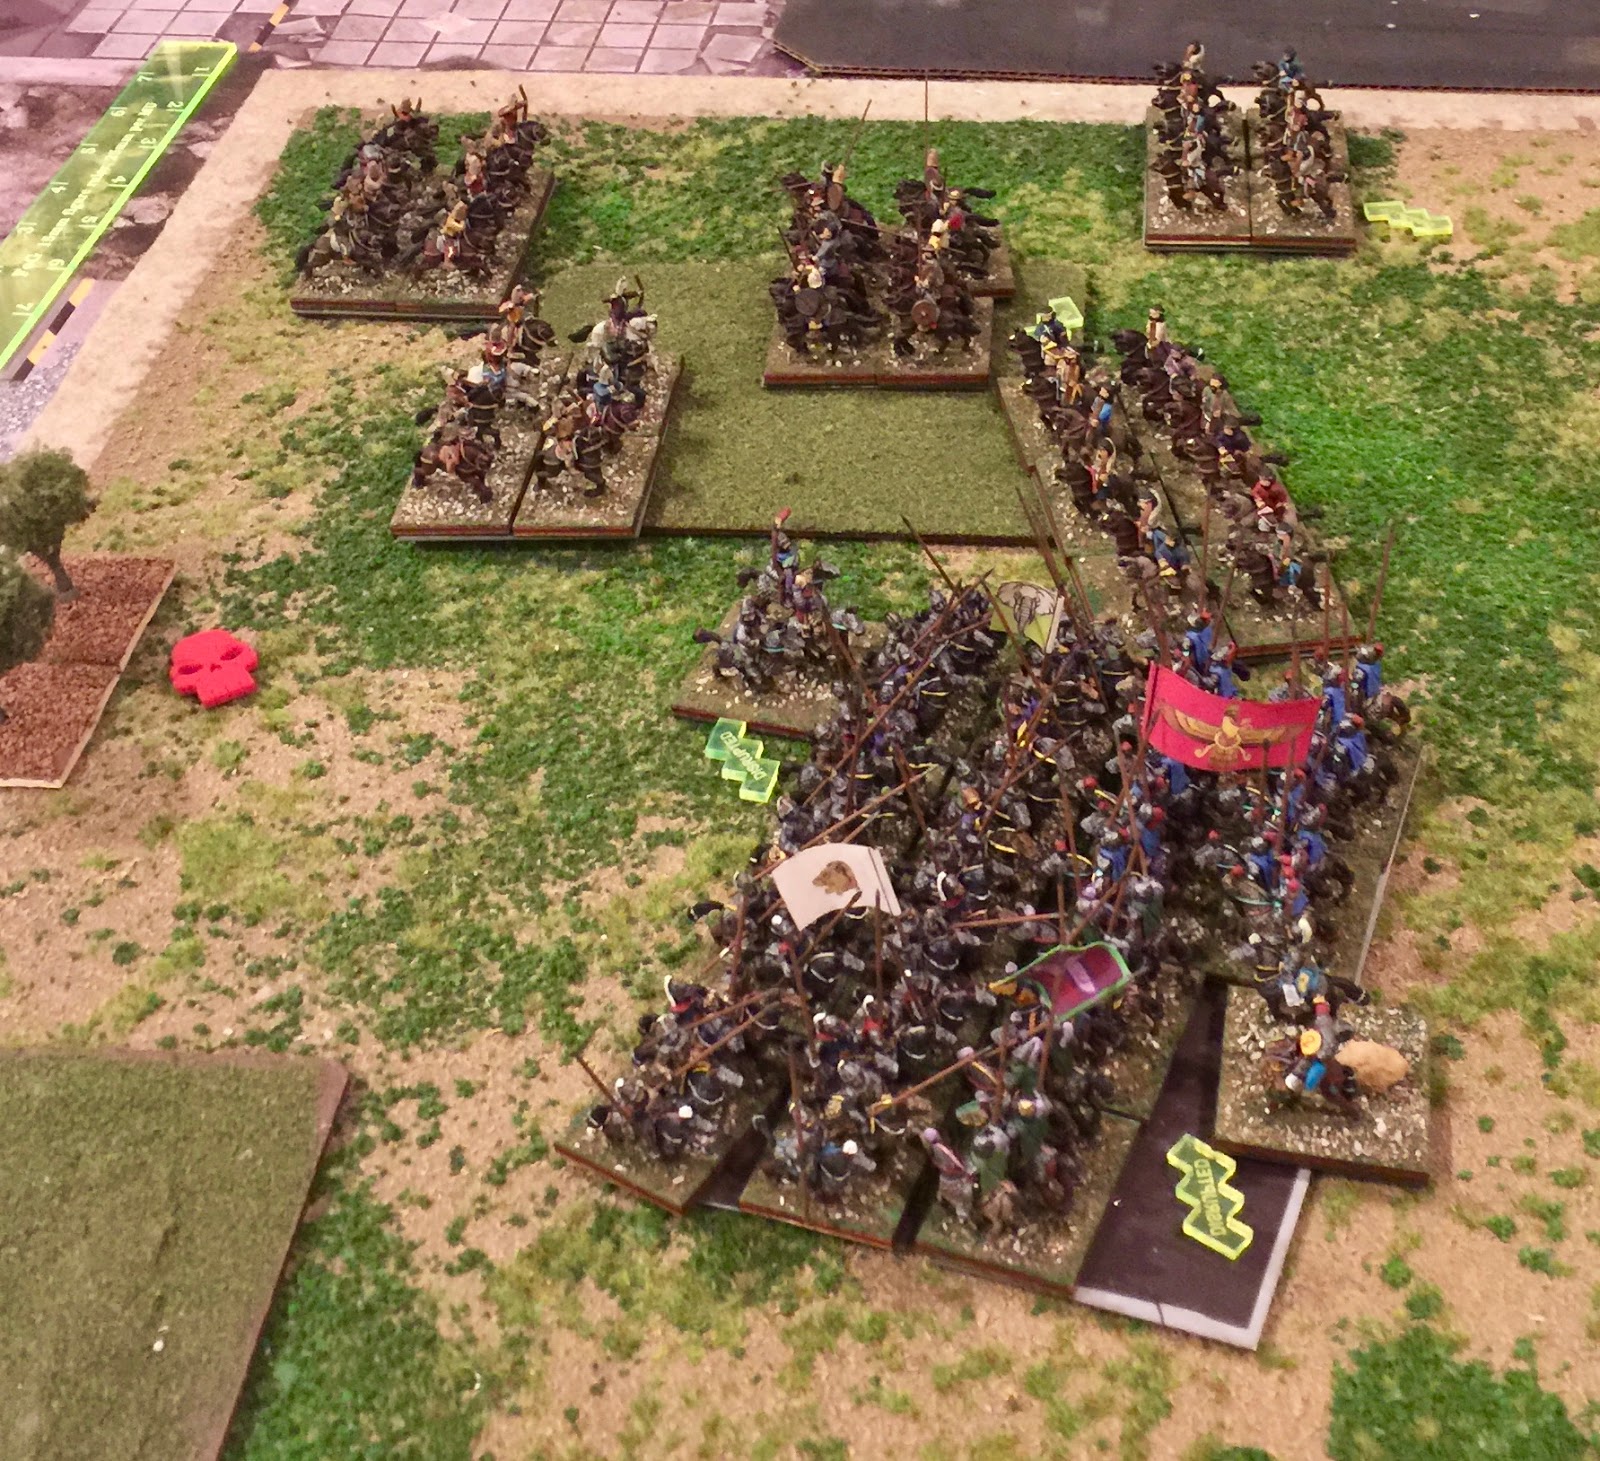
To start the Arab 5th turn, the Arabs charged across the board.  The three Sassanid cavalry BGs, with space running out behind them, all stood.  The Bedouin light horse charge into the Cataphract flank.  Vahrez Boes opted to lead the Cataphracts himself.  The Arab Sheik decided to lead the red Arab foot to counteract the superior morale of the Sassanid cavalry facing his men.  In Impact, the Cataphracts recieved 3 hits to 1, lost a base but survived the cohesion test and the Bedouin's attempts to kill Vahrez Boes.  The Sassanid cavalry facing the Arab City Cavalry scored 2 hits to 4, lost a base and disrupted.  The Sassanid cavalry facing the white Arab foot scored 2 hits to 3, lost a base and disrupted.  The Superior Sassanid cavalry facing the red Arab foot scored 4 hits to 4, survived the death roll and managed to kill the Arab general on a 12.  The red Arab foot consequently disrupted for seeing the CinC killed but the white Arab foot next to them did not care.  As everything on the table was in melee, there was no shooting.  In the melee phase, the Cataphracts scored 2 hits to 1 but the Bedouins emerged unscathed.  The Arab City cavalry scored 2 hits to 0.  The Asvaran cavalry lost a base and autobroke.  No one was close enough to care and they routed right off the table.  The Arab City Cavalry pursued to the table edge.  The white Arab foot scored 2 hits to 0 against the Sassanids to their front who passed the death roll but fragmented on cohesion.  The red Arab foot scored 2 hits but took 3 in return suffered no loss from the death roll and passed the cohesion test.  In the Joint Action Phase, the fragmented Sassanid cavalry broke off to the edge of the table.  At the end of the Arab 5th turn, the Arabs had lost 2 attrition points to the 3 lost by the Sassanids.  


The Sassanid 6th turn began with no charges.  The fragmented Sassanid cavalry moved to overlap the red Arab foot and hopefully swing the affair into the Sassanid favor.  In melee. the Cataphracts scores 3 hits to 0 on the Bedouins who lost 1 base and disrupted.  The red Arab foot managed 2 hits against the Sassanid cavalry but took 3 hits in return.  The red Arab foot survived the death roll but fragmented on cohesion.  With nothing to be done in Joint Action, the Sassanid 6th turn ended with the Sassanids at 3 attrition points to 3 for the Arabs.


To start the Arab 6th turn, the white Arab foot charged the fragmented Sassanid cavalry to their front who broke for being charged while fragmented.  The game ended at that point.  Total playing time 1.5 hours.


Vahrez Boes, seeing the Asvaran on the far right of his line giving way, orders the rest of the army to withdraw towards Sana'a.  The Arabs, leaderless, mill around the field stripping the dead Persians of all of their wealth.  None stop to think that maybe they should pursue the disorganized Persians to end the fight today.  Vahrez Boes swears to return and crush the rebellious Arabs, but that is another story...


Saturday, May 5, 2018

Reading Update

Just finished book 3 of Jack Ludlow's trilogy on Belisarius.  Personally I think his trilogy on the Normans in the South of Italy was better overall but as I have an interest in the Early Byzantines, I am googling up everything I can find.


I will be starting the Legend of Africanus trilogy about the illustrious general tonight by Matthew Jordan Storm as I anxiously await the third book in Paolo A. Belzoni's Belisarius series.  Nothing new Ludlow's book and he really just glossed over his later campaigns.  He did paint a vivid picture of the animosity Theodora held for our hero, though.

Updated FOG 300

Just finished going through the Army Book 2 and have updated Appendix A in the FOG 300 Supplement with terrain for each of the ally lists in the appendix of Book 2.  You can find the latest using the link below:

FOG 300 May 2018 Update

Saturday, March 31, 2018

FOG 300 Early Sassanids vs Classical Indians II circa 282 AD

After his victory over the local Indian magnate east of the Indus, Hormizd, son of Shapur Mishanshah, governor of Sakastan and claimant to the Immortal Throne, has been forced to turn back to the west and face the false king, Bahram II.  Determined not to loose the impetus of his victory across the Indus, Hormizd has left his wife's sister's cousin, Yormrizd the Short in control of the local forces with orders to push east into the subcontinent.

Unfortunately for Yormrizd, Bhartrdaman, Saka lord of the Kshaharatas, has ordered Samanadra the Fatty One to lead his Indian subjects to the edge of the Thar Desert and turn back the Persian hordes from the west.

Sassanid list and host:


Classical Indian list and host: 


For this playtest, I will be using some of the suggestions put forth by Terry Shaw and Paris Papadopouos such as a 3'x2' table (the green lines you see in the pictures on the matt is where I cut 6" off each side of the 3x3 matt to get to 3x2) and deploying in quarters instead of halves.

The Sassanids won the initiative and opted for Agriculture.  The Indians took the compulsory open field, a second open field and the gully.  The Sassanids took the open.  The compulsory open field landed on the Indian left side edge and was moved 2" towards the middle by the Sassanid player.  The Sassanid open landed on the other Indian side edge and was not adjusted.  Both the 2nd open field and the gully landed on the Indian side edges but would not fit on either side and were discarded (Steppe by proxy).

First two shots of the Sassanid host deployed:  left is the 6 stand light horse bow, then the two cataphracts (the Purples and the Reds), the bow cavalry and then the 4 stand light horse bow.


The first two shots of the Indian host deployed:  1st archer BG then two elephants and the 2nd archer BG in the field, the two medium foot spear BGs deployed on each side of the camp.


The Sassanids rolled high and moved first.  The main host (6 pack of LH, both cataphracts and the bow cavalry) did a double move straight ahead with a one base shift to their left in the first move and stopped just outside of 5" of the Indian line.  The 4 pack of light horse move a full 7" forward and did a one base shift to come up beside the bow cavalry but slightly behind.  The Indians attempted some long range bow shots but they were ineffective.  Nothing happened in Joint Action so the Sassanid turn ended.


For the Indian 1st turn, the elephants wheeled towards the Sassanid line.  The right end archer BG maneuvered with them as part of the battle line.   The left end archer BG conducted a 4" move straight ahead.  Both medium spear BGs maneuvered to come parallel to the main Indian line.  Indian bow fire was abysmal in the shooting phase.  Both elephant BGs were forced to take cohesion tests by the Sassanid fire but to no effect.  Neither side had anything going on in Joint Action so the Indian 1st turn ended.


To  begin the Sassanid 2nd turn, the Red cataphracts charged into the Indian bow BG to their front.  The Purple cataphracts did not have to charge as they would have hit elephants. The Sassanid bow cavalry did not have to charge as along with their lance they are Bw*.  On impact both the cataphracts and the Indian archers scored 2 hits to no effect.  In the Maneuver Phase, the Sassanid bow cavalry moved up to the left of the Red cataphracts.  The 4 pack of light horse moved to the left of the cavalry.  The 6 pack of light horse wheeled to parallel of the elephants and stopped at 1".  In the Shooting Phase, the Indians had no effective shots and the Sassanids forgot what a bow was for.  In the Melee Phase, the Red cataphracts used their double POA to advantage and scored 4 hits.  The  Indians managed 3 in return.  The Sassanids passed their death roll and while the Indians lost a stand they passed cohesion.  The Red cataphracts subsequently broke off in Joint Action and the Sassanid 2nd turn ended.


To start the Indian 2nd turn, the left Indian elephant BG charged straight ahead forcing the Sassanid light horse to their front to evade.  The right elephant BG wheeled the maximum of 1" allowed (the Sassanid light horse started 1" away) towards the Purple cataphracts and struck with one base.  The Sassanid light horse evade 6" and the Indian left elephant BG trundled forward 2".  In Impact, both sides committed their generals.  The Indians scored a single hit while the Sassanids failed to hit at all.  The Sassanid cataphracts passed both the death roll and cohesion test.  In the Maneuver Phase, the right elephant BG conformed to the Purple cataphracts and the left archer BG wheeled 4" towards the center.  In the Shooting Phase, Indian bow fire proved ineffective while the Sassanids caused the right spear BG to disrupt.  In the Melee Phase, the Sassanids and the Indians both scored two hits for  a draw.  There was nothing to be done in the Joint Action Phase so the Indian 2nd turn ended.


To begin the Sassanid 3rd turn, the Sassanid Red cataphracts charged the bow to their front and the Sassanid bow cavalry charged the spearmen to their front.  The Red cataphracts score 3 hits to none on the archer BG while the Sassanid cavalry score 2 hits to none on the spear BG.  While neither Indian BG loses a base due to the death roll, both fail cohesion.  The archer BG but the spear BG double drops and breaks.  This in turn causes the archer BG to fragment for seeing friends break.  The pursuit takes the spear off the table and the Sassanid bow cavalry to the table edge.  The Maneuver Phase sees the 6 pack of Sassanid light horse turn around and close to bow range on the elephant BG to their front.  The 4 pack of Sassanid light horse turn around and conduct a full move back towards the center.  In the Shooting Phase, the Sassanid light horse score 2 hits on the elephants to their front who disrupt.  In moving to get within shooting range, the Sassanid light horse also came into extreme range of the left Indian archer BG who score 2 hits on the light horse who also disrupt.  In the Melee Phase, the Red cataphracts score 4 hits to 0 on the Indian archers to their front who suffer no death roll loss but break on cohesion.  In their initial route the Indian archer BG rolls long and plows through the remaining spear BG as it cannot shift enough bases to miss the spear and the camp.  Consequently, the spear BG disrupts.  The Red cataphracts roll normal on pursuit and stop just short of the camp.The Purple cataphracts score only 1 hit to 3 on the center elephant BG which causes them to lose a base but more importantly Yormrizd the Short is killed.  The Purple cataphracts double drop to fragmented.  The neighboring units (the 6 pack of light horse and the Red cataphracts) both fail cohesion with the Red cataphracts disrupting and the 6 pack of light horse fragmenting.  The center Indian elephant BG passes their cohesion test for seeing the right Indian archer BG break.   Thus what started out as a promising Sassanid 3rd turn has turned sour with the death of the general.


The Indians, sensing blood, start their 3rd turn with the disrupted left elephant BG declaring a charge on the fragmented Sassanid light horse.  The elephants pass their CMT and the Sassanid light horse fail their cohesion test for being charged while fragmented.  The Elephants charged forward 4" as the Sassanid light horse fled long to the table edge.  in the Maneuver Phase, the remaining Indian spear BG attempted a CMT to when onto the flank of the Red cataphracts but failed.  There was no shooting to be had and in Melee, the center elephant BG scored 2 hits to 0 on the Purple cataphracts who broke on cohesion without losing a base.  With the Purple cataphracts breaking, the Sassanid army broke.

Unfortunately for Hormizd, son of Shapur Mishanshah, governor of Sakastan and claimant to the Immortal Throne, his rebellion against the rightful King of Kings, Bahram II, would prevent him from returning to the Indian subcontinent.  In the following year (283 AD), he would face Bahram, himself, in open battle and die a horrible death on the tusks of one of Bahram's war elephants (okay I made that up but he did die in 283).

Total time pushed to one hour and twenty six minutes.  Before I decide on if this caused by the increased table size or deployment sequence.  I will try a few more playtests.  Very enjoyable game, nonetheless.


Monday, March 12, 2018

FOG 300 Update

Follow the link below to access the latest update to FOG 300.  The Appendices have been updated and now include a chart of terrain choices for the Ally lists found in Appendix 1 of Army Book 1 as well as the first of several Ally lists left out of the army books.  Additionally, I have added several changes suggested by Terry Shaw.

FOG 300 March 2018 Update

Sunday, February 25, 2018

FOG 300 Early Sassanids vs Classical Indians Circa 281 AD

With his victory over the Kushans on the plains of Farah and the suspicious death of the governor of the neighboring province of Turan, Hormizd, son of Shapur Mishanshah, governor of Sakastan, has moved to seize control of Turan itself.  He has made it clear that he plans to push over the mountains and the River Indus to add those lands to his control and also gain access to that which has historically only been the purview of the King of Kings, elephants.  

Contact with the local Indian magnate was not long in coming and Hormizd'z attempts to overawe the locals came to naught.  Somewhere on the plains east of the Indus, Hormizd and his host met the Indian forces.

Sassanid List and Host:


Classical Indian List and Host:


The Sassanids won the initiative and opted for Agricultural.  The Indians took the compulsory open field, a gully and an enclosed field.  The Sassanids wanted an open table and took an open as their single terrain piece.  The open field ended up on the Indian base line just left of center.  The gully ended up on the Sassanid base line in the center.  The enclosed field was picked up on a six as was the open.

After deployment, the Sassanid host looked like so with the two cataphracts deployed on the left (in the picture), the 4 pack of light horse deployed one deep in front of the gully followed by the six pack of light horse and then the cavalry unit on the right.  The Sassanid camp was behind the six pack of light horse.


After deployment, the Indians showed a solid line across the table with an 8 pack of archers, the elephants and two more eights of archers.  The two units of spearmen were deployed in double wide columns  in support.  The fortified camp was behind the elephants.


The Classical Indians rolled to move first but opted to remain stationary and make the Sassanids come to them.

The Sassanid 1st turn had the cataphracts and both light horse BGs move as a battle line 8" forward.  The cavalry on the Sassanid left moved 5".  The Sassanids had no shooting but the Indians scored 3 hits on the 6 pack of light horse and disrupted them.  In the Joint Action Phase, the Sassanid general moved to touch the 6 pack of light horse.  At the end of the turn, the field looked like below:


In the Indian 2nd turn, the Indians wheeled the right end bowmen with the Elephants to angle towards the Sassanid middle but remained just outside of 5" of the Sassanid cavalry.  The Sassanid light horse remained out of shooting range but the Indians managed 3 hits on the Sassanid 6 pack of light horse.  A base was lost to hits but the cohesion test was passed.  2 hits were also scored on the Purple Cataphracts on the right end of the Sassanid line but they passed their cohesion test.   In the Joint Action Phase, the Sassanids attempted to rally the 6 pack of light horse but to no avail.  At this point, the 2nd Indian turn ended.


The Sassanid 2nd turn opened with the cataphracts and both light horse BGs moving as a group to 3" of the Indian line.  The Sassanid cavalry moved a full 5" forward.  In the shooting phase, Sassanid shooting was completely ineffective.  The Indians managed 2 hits on the 6 pack of light horse (who passed cohesion), 2 hits on the Red Cataphracts (who passed cohesion) and 3 hits on the Purple Cataphracts (who passed both the death roll and cohesion).  In the Joint Action Phase, the 6 pack of Sassanid light horse rallied back from disrupted as the turn ended.


To start the Indian 3rd, the elephants wheeled an inch and charged towards the cataphracts.  Both Sassanid light horse BGs were forced to flee (the 6 pack went 5" back and the 4 pack went 9" back).  The Elephants rolled down and only trundled forward 3".  The right flank Indian bowmen passed a CMT and wheeled forward to be parallel of the Sassanid cavalry.  The remainder of the Indian line stayed in place.  In the shooting phase, only the Red Cataphracts were hit enough to matter and they easily passed cohesion.  In the Joint Action Phase, the Sassanid general moved to the Sassanid cavalry.


To start the Sassanid 3rd turn, both cataphracts and the Sassanid cavalry charged.  The Sassanid general joined the impact with the cavalry but as both sides scored 3 hits it was a draw.  The Red Cataphracts scored 3 hits to 3 as well but the Indians in the open field lost a base to the death roll.  The Purple Cataphracts, however, scored 4 hits to 2.  The Indians on the left end of the line lost a base to hits and disrupted.  In the maneuver phase, the 6 pack of light horse turned and stopped just out of 3" of the right flank Indian bow.  The 4 pack turned and moved to within 3" of the Elephant line.  In the shooting phase, all was for naught except the hit on the elephants, who subsequently rolled an unmodified 3 on their cohesion test and dropped to disrupted.  In the melee phase, the Sassanid cavalry only managed 1 hit to 3 but luckily survived both the death roll and the cohesion test.  The Red and Purple Cataphracts both scored 3 hits to their opponents and only took 1 each.  The center bow BG dropped another base but passed cohesion.  The right flank bow BG survived the death roll but double dropped on cohesion breaking.  Both the center bow BG and the spearmen behind them passed their cohesion for seeing a friend break.  The broken bowmen fled off the table while the pursuing cataphracts plowed into the spearmen behind.  In the Joint Action Phase, the Red Cataphracts and the Sassanid cavalry broke off.  The Purple Cataphracts remained in place to fight the next impact.  (I know this was discussed on the forum but as I could not find it readily during the game, could not remember what the consensus was and it just seemed wrong to break off, they remained stuck in).  No picture survived this turn so on to the Indian 4th we went.

The Indian 4th saw no Indian charges to resolve but the Purple Cataphracts scored 3 hits to 0 on the spear BG who lost a base and managed to disrupt.  In the maneuver phase, the spear BG expanded one base so that all stands would fight against the cataphracts.  The Elephant BG wheeled to get in position to charge the Red Cataphracts on the next Indian turn.  In the shooting phase, the Sassanid cavalry took 3 hits and disrupted.  The Red Cataphracts took 2 hits and also disrupted.  The Elephants took 1 hit but passed they cohesion.  In melee, the Purple Cataphracts scored 2 hits and took 2 hits so a draw.  In the Joint Action Phase, the Elephants rallied back to steady.


To begin the Sassanid 4th turn, both the Sassanid cavalry and the Red Cataphracts rolled successfully not to charge.  In maneuver, the Red Cataphracts rolled a CMT and wheeled forward to prevent a flank charge by the elephants.  The 4 pack of Sassanid light horse contracted to a 2 wide frontage (outside of elephant restricted zone).  The Sassanid cavalry successfully passed a CMT to move short.  In the shooting phase, both the Indian and Sassanid archery proved ineffective.  In melee, the Purple Cataphracts scored 2 hits to 0 on the spear BG who suffered no death but fragmented on cohesion.  In the Joint Action Phase, the Sassanid general moved to the cavalry who rallied back from disrupted.  With that, the Sassanid 4th turn ended. (Yet another turn in which no picture survived.)

To start the Indian 5th turn, the Indian elephants charged the Red Cataphracts.  The Indian general joined the fight and saw the Elephants core 5 hits to 3.  The Red Cataphracts lost 1 base and fragmented.  In the maneuver phase, the center bow BG turn into the flank of the Purple Cataphracts who turned one base to face.  In the shooting phase, Sassanid archery was awful and the two hits on the 6 pack of Sassanid light horse inflicted by the Indians were shrugged off.  In the melee phase, the Red Cataphracts only managed 1 hit to 2 from the elephants and broke on cohesion but did not lose a base.  The Purple Cataphracts scored 1 hit on the Indian bow and 3 on the spearmen and took 2 in return from the bow BG and none from the spear.  The spear BG followed up their stellar performance by losing a base and breaking.  The bow BG in the field disrupted as a result of seeing friends break.  The Purple Cataphracts passed cohesion for seeing the Red Cataphracts break.  The elephants lost contact with the Red Cataphracts in the pursuit.  (And we have another turn in which there is no picture.)

The Sassanid 5th turn saw the Sassanid cavalry charge the bow unit to their front.  The Indian bowmen managed only 1 hit on the cavalry while throwing 8 dice.  The Sassanid cavalry, however, hit 4 times causing the Indian Archers to lose a base and double drop to fragmented.  At this point, the Impact Phase ended with a Sassanid victory at 5 - 2 attrition points.


Not sure where Hormizd will show up next.  Historically, in 282 AD, he would rebell against Bahram II so his next appearance might be in a Sassanid Civil War.  Until next time...

Sunday, February 18, 2018

FOG 300 Early Sassanids vs Kushans Circa 280 AD Part II

After the despicable performance of Aspashir, 3rd Cousin of Shapur I, at the Battle of the Shahanshah's Tears,  Hormizd, son of Shapur Mishanshah, governor of Sakastan, gathered together the remnants of Aspashir's command and forged a new army mixed with new levies and his own personal bodyguard to face the invading horde of Kushans on the plains north of Farah.


To set the tone, we have Ganesha burning incense to prepare us for the clash between the Kushan Hordes and the loyal Sassanid forces (or perhaps it is an omen of where Hormizd will turn next).

The Sassanid Host - Hormizd made some adjustments to Aspashir's list which is reflected in the inked in changes.


The Kushan list and Horde:


The Sassanids won the initiative and opted for Agricultural.  The Kushan took the compulsory open field and an open.  The Sassanid opted for a single open field.  All terrain fell in the Kushan side of the table.  The open would not fit at all and was discarded. 

The Kushan horde deployed:  the two Kushan cataphracts deployed in the gap between the open fields with the camp behind them, the two Kushan light horse in front of the Kushan cavalry on the right end of the Kushan line.


The Sassanid host arrayed for battle:  the two cataphracts deployed on the right end of the Sassanid line (as you look at the picture), the 6 pack of light horse, the Sassanid cavalry, the 4 pack of Sassanid light horse.


The Sassanids rolled to move first and moved straight forward across the line to just outside 5" of the Kushans.  There was no shooting so the Sassanid 1st turn ended.


The Kushan 1st turn saw the Kushan Cataphracts angle their move towards the Sassanid cataphracts.  The Kushan middle light horse double wheeled in the center to open the gap between them and the left Kushan light horse so the Kushan cavalry could move up.


In the shooting phase, the Sassanid right flank light horse scored two hits on its Kushan counterpart who disrupted.  Elsewhere along the line, shooting was ineffective which saw the Kushan 1st turn end.


In the Sassanid 2nd turn, the Sassanids successfully held the cataphracts and the cavalry in the impact phase.  The Sassanid Cataphracts wheeled forward to line up with the Kushan cataphracts.  In the shooting phase, the Kushans managed 1 hit on the Sassanid light horse on the far right end of the line who disrupted.  Again, shooting was ineffective along the rest of the line.  In the Joint Action Phase, the Kushan general relocated to the green Kushan Cataphracts.


To start the Kushan 2nd turn, both Kushan Cataphracts charge.  The center Sassanid light horse evaded 5" back.  The center Kushan light horse wanted to charge but upon looking, it was pinned by the Sassanid cavalry in the middle and did not want to charge into it in the open.  The Kushan Green Cataphracts scored 1 hit and took 2 in return from the Sassanid Red Cataphracts.  The Kushan White Cataphracts scored 4 hits and took 2 in return from the Sassanid Purple Cataphracts.  The Kushan Green Cataphracts passed both their death roll and cohesion test as did the Sassanid Purple Cataphracts.  In the shooting phase, the Sassanid far right light horse took 2 hits but passed cohesion. The firing on the Sassanid cavalry was ineffective.  The Kushan left flank light horse took 2 hits but passed its cohesion test.  In the melee phase, the Kushan White Cataphracts scored 2 hits on the Sassanid Purple Cataphracts while taking 1 in return.  The Kushan Green Cataphracts scored 2 hits on the Sassanid Red Cataphracts but took 4 in return.  The Kushan Green Cataphracts survived both the death roll and cohesion test but the Sassanid Purple Cataphracts were not so lucky loosing 1 base and disrupting.  There was nothing happening in joint action so the turn ended.


For the Sassanid 3rd turn, the Sassanid cavalry in the center failed a CMT not to charge and proceeded to go 4" into the open field.  The Kushan center light horse opted not to stand and evaded 7" to its rear.  In the maneuver phase, the Sassanid center light horse turned around and moved up onto the flank of the Kushan Green cataphracts.  In the shooting phase, the Kushan cavalry was unable to score enough hits on the Sassanid cavalry in the center while the Sassanid right flank light horse scored enough hits to fragment the Kushan light horse opposite of them.  In melee, the Kushan White Cataphracts scored 2 hits to 1 from the Sassanid Purple Cataphracts who lost another base and fragmented on their Cohesion test.  The Kushan Green Cataphracts scored 3 hits to 1 from the Sassanid Red Cataphracts who passed both their death roll and their cohesion test.   Their was no action in the Joint Action Phase so the Sassanid 3rd turn ended.


As their were no charges to be had to start the Kushan 3rd turn, the Kushans moved their middle light horse to in front of the Sassanid cavalry.  In the shooting phase, the Kushan left flank light horse took 2 hits from the Sassanid light horse to its front and gave 1 in return.  The Kushan light horse broke on its cohesion test and routed back towards its baseline.  The Kushan cavalry and middle light horse scored 3 hits on the Sassanid cavalry in the field who passed its death roll but disrupted.  In melee, the Kushan White Cataphracts scored 1 hit and took 1 in return from the Sassanid Purple Cataphracts for a draw.  The Kushan Green Cataphracts scored 2 hits but suffered 4 in return from the Sassanid Red Cataphracts.  The Greens subsequently passed their death roll but disrupted on the cohesion test.  In Joint Action, the Sassanid leader moved to the Purple Cataphracts and rallied them back to disrupted.  The broken Kushan light horse routed off the table.


To begin the Sassanid 4th turn, the Sassanid cavalry in the field failed its CMT and charged into the Kushan light horse who opted to stand.  The Kushan cavalry intercepted so it would fight in the melee.  The Sassanid center light horse charged into the flank of the Green Kushan Cataphracts.  In the impact, the Kushan cavalry scored 1 hit to the Sassanid cavalry as did the Kushan light horse.  The Sassanid cavalry scored 2 hits to the Kushan cavalry and 1 to the Kushan light horse.  The Kushan cavalry subsequently lost 1 base and disrupted.  The Sassanid light horse in the center scored 2 hits to 1 against the Kushan Green Cataphracts who lost 1 base and dropped to fragmented.  In the maneuver phase the right flank Sassanid light horse attempted a CMT to form column but failed and opted to remain in place.  As there was no shooting, melee ensued.  The Sassanid cavalry scored 1 hit on the Kushan cavalry and 0 on the Kushan light horse but took 2 and 0 respectively.  They passed the subsequent death roll and cohesion test.  In the center, the Sassanid light horse scored 0 hits on the Green Kushan Cataphracts who managed 0 in return.  However, the Red Sassanid Cataphracts scored 2 hits to none on the Green Kushan Cataphracts who passed their death roll but broke on the cohesion test.  The Kushan White Cataphracts and the Sassanid Purple Cataphracts both managed 2 hits.  The Kushan White Cataphracts disrupted for seeing a friend break.  The Sassanid center light horse pursued the Green Kushan Cataphracts but failed to kill the general.  The Sassanid Red Cataphracts moved as far forward as possible but were blocked by the Sassanid light horse.  The Kushan host broke at this point.  

Unfortunately, no picture survived of the final turn. 

However, compensation, I offer up the following:  the Shahbanu of teh house, She Who Must Be Obeyed herself, presented this nice meerschaum box to me for our 14th Wedding Anniversary this week. 


September Update

 A new version of the Broken Rays of the Sun campaign map is now available on the blog.