Started back working on my Broken Rays of the Sun Campaign this week and have finished an update to the campaign mechanism. The new update has been uploaded to the Broken Rays of the Sun page and is listed under the Spring 2020 Broken Rays of the Sun tab. I will try out a few turns this week for grins and giggles and plan on having a few posts that track the progress of the campaign.
 |
| Title Page of the New Update |
 |
| Current Map of the Broken Rays Campaign |
To kick things off I trotted out my Later Pre-Islamic Bedouins to face off against Parthians circa 220 AD in more FOG 300 action.
 |
| Parthian List - Initiative should have been a 1 and the Army Break is 5. |
 |
| Parthian host on the army board: Bow Cavalry BG 1 at the top left, Light horse top center, Bow Cavalry BG 2 top right, Green Cataphracts bottom left, General in front of camp, Red Cataphracts bottom right. |
 |
| LPIB List: Army Break should have been a 6. |
 |
| The LPIB army on the army board. |
The Parthians won the initiative and opted for Steppe out of the Bedouin terrain options. The Bedouins took the compulsory open and then took the other open as their one terrain piece. The Parthians chose the broken and the gentle hill and hoped to put a few obstacles in the way of the mounted Bedouins. All in all their hopes were in vain as the table ended up very open.
The Parthian host is deployed in the distance. Bow cavalry BG 2 is on the left end of the Parthian line. The Green cataphracts are deployed in line in the center of the Parthian host with the Red cataphracts and the Parthian leader attached to the Green cataphracts in front of the Parthian camp. On the far right of the Parthian table side, the Bow cavalry BG 1 and the 6-pack of light horse are deployed in and beside the broken.

The Bedouin army is deployed in the distance. The Blue light horse are deployed on the hill on the left end of the Bedouin line with the Bedouin cavalry 1 next to them. The remainder of the Bedouin force deployed towards the right end of the table covering their camp. There are 5 more Bedouin cavalry BGs all with blue turbans that are deployed and numbered from left to right Bedouin cavalry BG 2 -5 with the Green light horse on the far right of the Bedouin line. The numbering will come into play later in this AAR. The Bedouin leader is deployed with Bedouin cavalry BG 1.
The Parthians went first and started with the light horse BG contracting 1 file and advancing forward stopping just outside of 7" of the Blue Bedouin light horse. Bow cavalry BG 1 moved 4" forward into the broken and did a 1 base shift to their left to come alongside the light horse. The two cataphract BGs moved a group 4" forward and shifted 1 base to their left in their first move and then moved to just outside of 5" of the Bedouin line for their 2nd move. The Bow cavalry BG 2 on the right end of the Parthian line moved 5" forward and shifted 1 base to their left to still be in line with the end of the cataphract line. There was no shooting this turn and in the Joint action phase the Bedouin general moved towards the main Bedouin line from Bedouin cavalry BG 1.
 |
| After the Parthian 1st turn |
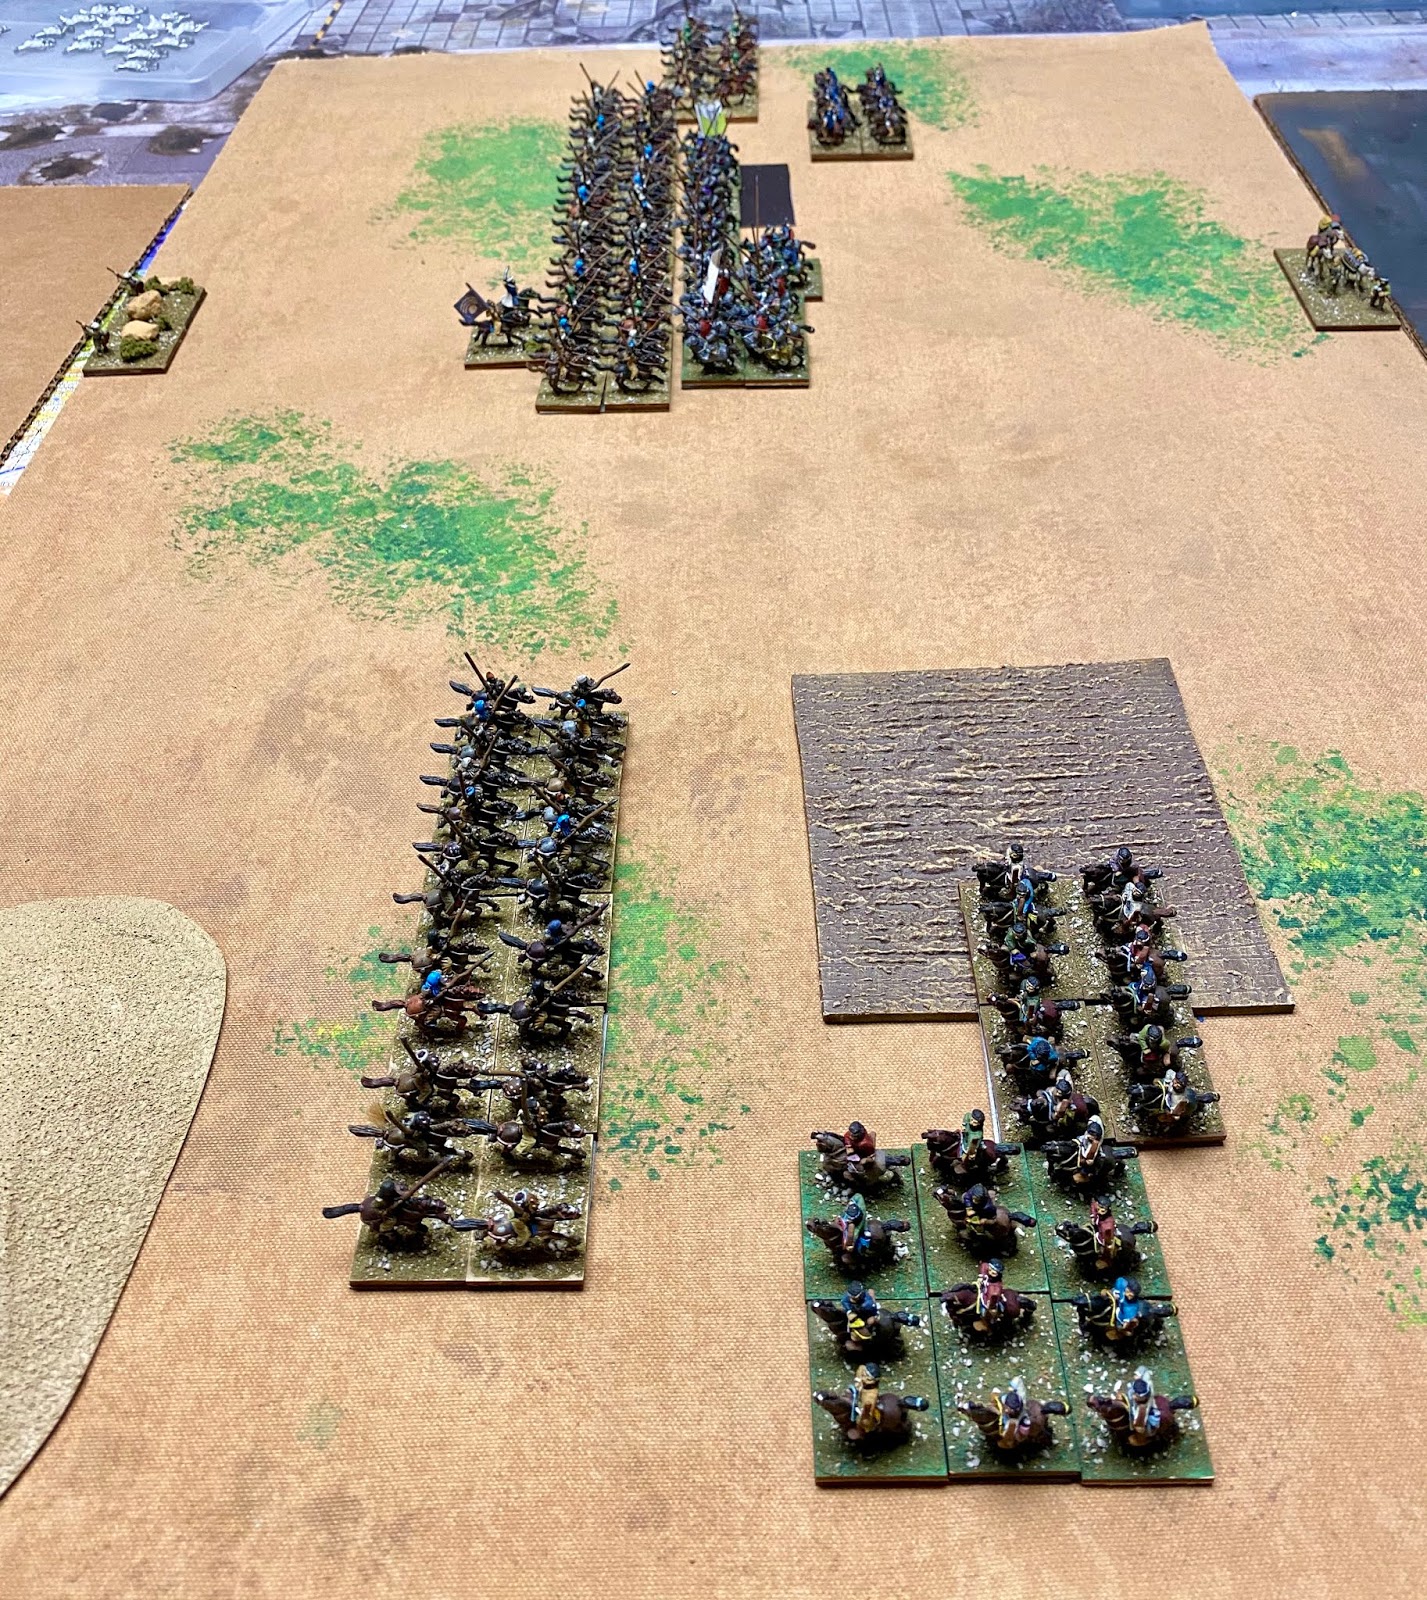
In the Bedouin 1st turn, the Bedouins had no charges. In the Maneuver phase, the Bedouin cavalry BG 1 moved forward 5" while the Green Bedouin light horse BG moved short to stay in line with them ( in the foreground of the picture below). The remaining Bedouin cavalry BGs moved 5" straight ahead ending up less than 1/4" away from the Parthian line. The Green Bedouin light horse BG (at the top of the picture below) moved 7" straight forward. The Bedouin leader moved 7" to the second file of Bedouin cavalry BG 2. The Parthian bow fire from Parthian Bow cavalry BG 2 (at the top of the picture) was split so had no effect. The Parthian bow fire from the Parthian light horse (at the bottom of the picture) managed only 1 hit for no effect. Neither side had anything to do in Joint action so the turn ended.
 |
| After the Bedouin 1st turn |
The Parthian 2nd turn started off with both cataphract BGs and Bow cavalry BG 2 charging. The Bedouin Green light horse BG chose to evade. The light horse BG evaded 7". The Parthian leader committed to the front rank with the Green cataphracts. In impact, the Red cataphracts inflicted 4 hots to 2 on Bedouin cavalry BG 2; the Green cataphracts scored 3 hits to Bedouin cavalry BG 3 and 1 hit to Bedouin cavalry BG 4 while taking 4 from Bedouin cavalry BG 3 and 2 from Bedouin cavalry BG 4; and the Parthian Bow Cavalry BG 2 scored 5 hits to Bedouin cavalry BG 5 while taking 3. The Red cataphracts survived their death roll as did the Bedouin cavalry BG 2. The Green cataphracts suffered a base loss for taking 6 hits in a losing fight. Bedouin attempts to kill the Parthian leader were for nought. Bedouin cavalry BG 3 also survived their death roll. The Parthian Bow cavalry BG 2 survived their death roll but the Bedouin cavalry BG 5 lost a base. The Bedouin cavalry BG 2 dropped to disrupted as did the Green cataphracts. Bedouin cavalry BG 5 managed to roll an adjusted 2 on their cohesion test and dropped to fragmented. In the Maneuver phase, the BGs in melee conformed. The Parthian light horse BG expanded a file and wheeled towards the Bedouin Blue light horse BG stopping when they came to 1". The Parthian Bow cavalry BG 1 also wheeled 1" to come on line with the Parthian light horse. In the Shooting phase, the Parthian horse archers combined for 2 hits on the Bedouin Blue light horse but it was for no effect. In the Melee phase, the Red cataphracts scored 4 hits to 1 against Bedouin cavalry BG 2; the Green cataphracts scored 1 hit to each of the Bedouin cavalry BGs (3 & 4) facing it while taking 1 from each in return; and the Parthian Bow cavalry BG 2 scored 0 and took 0 from Bedouin cavalry BG 5. The Parthian general survived combat once more while the Bedouin cavalry 2 BG lost a base to hits but passed cohesion. In Joint action, the Bedouin leader moved to the fragmented Bedouin cavalry BG 5 ending the Parthian 2nd turn.
 |
| After the Parthian 2nd turn |
For the Bedouin 2nd turn, the Bedouins opted not to charge with Bedouin cavalry BG 1 and passed a CMT to hold. In the Maneuver phase, the Bedouin Blue light horse BG passed a CMT to back up 2". The Bedouin Green light horse BG turned around. In the Shooting phase, the Parthian bow fire was ineffective. In the Melee phase, the Red cataphracts scored 2 hits and took 1 from Bedouin cavalry BG 2; the Green cataphracts managed 1 hit to each of the Bedouin cavalry BGs facing him ( 3 & 4) but took 2 from each in return; and the Parthian Bow cavalry BG 2 and Bedouin cavalry BG 5 both managed another round of 0 hits. The Bedouin cavalry BG 2 lost a base on the death roll and auto broke. The Green cataphracts survived their death roll and the general fighting but fragmented on cohesion. Bedouin cavalry BG 3 did not care that a friend broke beside him and carried on fighting. The broken Bedouins fled 6" while the Red cataphracts only followed 4" In the Joint action phase, the broken Bedouin cavalry fled off the table. The Bedouin leader attempted to rally Bedouin cavalry BG 5 but failed.
 |
| After Bedouin 2nd turn |
To begin the Parthian 3rd turn, there were no charges to declare. The Red cataphracts made a CMT and turned 90 degrees to tun into the flank of the Bedouin cavalry 3 BG. The Parthian light horse and the Parthian Bow cavalry BG 1 both maneuvered 3" forward towards their Bedouin opponents. In the Shooting phase, the Parthian bow fire was again ineffective. In the Melee phase, the Red cataphracts scored 1 hit to the Bedouin cavalry 3 BG and took none in return, the Green cataphracts scored 1 hit on the Bedouin cavalry BG 3 and 1 on Bedouin cavalry BG 4 taking one from each of the Bedouin BGs in return, the Parthian Bow cavalry BG 2 scored 1 hit on the Bedouin cavalry BG 5 and took 2 in return. The Bedouin cavalry BG 3 rolled out of its death roll and passed its cohesion test. The Parthian general survived another round of combat. The Parthian Bow cavalry BG 2 lost a base to the death roll and then disrupted. In the Joint action phase, The Green cataphracts rallied from fragmented to disrupted. The Bedouin attempt to rally BG 5 failed ending the Parthian 3rd turn.
 |
| After Parthian 3rd turn |
In the Bedouin 3rd turn, the Bedouin Blue light horse BG and the Bedouin cavalry BG 1 declared charges. The Bedouin Blue light horse, however, failed a CMT to charge and the Bedouin cavalry charged alone. At Impact, the Parthian Bow cavalry BG 1 scored 2 hits to 1 from the Bedouins. The Bedouins lost a base to hits but passed cohesion. In the Maneuver phase, the Bedouin Green light horse BG moved into overlap on the flank of the Parthian Bow cavalry BG 2. The Bedouin Blue light horse BG wheeled to be parallel to the Parthian light horse. In the Shooting phase, the Parthian light horse scored 2 hits on the Bedouin Blue light horse who disrupted. In the Melee phase, the Parthian Bow cavalry BG 1 and the Bedouin cavalry BG 1 both scored a single hit for a draw. In the center, the Red cataphracts scored 4 hits on the Bedouin cavalry BG 3 taking none in return while the Green cataphracts scored 0 hits on the Bedouin cavalry BG 3 and 1 on Bedouin cavalry BG 4 taking one hit in return from Bedouin cavalry BG 3. The Parthian Bow cavalry BG 2 scored 0 hits and took 2 from Bedouin cavalry BG 5 and 1 from the Bedouin Green light horse BG. The Bedouin cavalry BG 3 survived the death roll but fragmented on cohesion. The Parthian Bow cavalry BG 2 survived the death roll but broke on cohesion running 7" in route. The Green cataphracts did not care about the bow cavalry breaking. The Bedouin cavalry BG 5 pursued into the broken Parthian bow cavalry as did the Bedouin Green light horse BG taking another 2 bases. In Joint action, the Bedouin cavalry BG 5 rolled a successful CMT and stopped pursuing. The broken Parthian cavalry fled off the table. The Bedouin Green light horse rolled short and stopped 2" from the table edge. The Green cataphracts rallied once more to fresh status. The Bedouin leader attempted to rally the fragmented Bedouin cavalry BG 5 but failed ending the turn.
 |
| After Bedouin 3rd turn |
In the Parthian 4th turn, there were no Parthian charges. The Parthians opted to stand pat with their light horse to continue shooting. In the shooting phase, The Parthian light horse managed no hits. In the Melee phase, the Parthian Bow cavalry BG 1 scored 0 hits and took 1 in return but passed both the death roll and cohesion test. In the center, the Red cataphracts scored 2 hits against 0 on the Bedouin cavalry BG 3 while the Green cataphracts scored 1 to 0 to the same. The Green cataphracts also score 1 hit to 3 from the Bedouin cavalry BG 4. The Green cataphracts survived their death roll, the general in combat and their cohesion test. The Bedouin cavalry BG 3 suffered a base loss on the death roll and broke on cohesion. The broken Bedouin BG had to collapse down into a column to try and get away and ran 5" but were caught by the Red cataphracts and lost yet another base. In the Joint action phase, the Bedouin leader attempted to rally Bedouin cavalry BG 5 and failed yet again. The broken Bedouins routed 7" again and managed to elude the pursuing Red cataphracts who slammed into the side of Bedouin cavalry BG 4 dropping them to disrupted. The broken Bedouin cavalry BG 3 was picked up at the end of the turn as they were at 50%.
Unfortunately, the Buzzard cam apparently went down in this turn and no picture survives.
To start the Bedouin 4th turn, the Bedouin Blue light horse BG attempted a CMT to charge while disrupted and failed. The Red cataphracts only managed 1 hit to the Bedouin cavalry BG 4 and took 0 in return. The Bedouin cavalry subsequently lost a base on the death roll and then dropped to fragmented. In the Maneuver phase, Bedouin cavalry BG 5 turn 180 hopping to get another turn in so they could possibly charge the Green cataphracts in the rear. The Bedouin Green light horse BG passed a CMT, turned 90 and moved 5" towards the Parthian camel train. The Bedouin Blue light horse BG moved to the table edge on their side stopping just outside of 7" from the Parthian light horse. There was no shooting this phase so into Melee the turn proceeded. The Bedouin cavalry BG 1 scored 2 hits to the Parthian Bow cavalry BG 1 who rolled high on their death roll and survived cohesion. In the center, the fragmented Bedouin cavalry BG 4 scored only a single hit to the Red cataphracts and whiffed against the Green cataphracts taking 3 from each cataphract BG in return. This loss of a base auto broke the Bedouins breaking the Bedouin army.
 |
| After Bedouin 4th turn |
I am going to have to play with the editing software on my computer as the total number of similar BGs on the table made it difficult to keep up with which BG was which. I hope you enjoyed this report and will return for the continuing story of the Broken Rays of the Sun. Until next time, stay safe and keep your distance.


No comments:
Post a Comment
Due to spambots making inappropriate comments, all comments are currently moderated. My apologies for the inconvenience.