Sunday, August 6, 2017

FOG 300 Playtest - Early Crusaders vs Bedouin - 6 August 2017

Finally managed to work in another playtest while everyone else in the house was still asleep (including the cat).  This time we have Early Crusaders versus Bedouins (the ally list from Swords and Scimitars).

The Early Crusader List and Host:


The Bedouin List and Host:


The Crusaders won the initiative for this playtest and opted for Agriculture.  The Bedouins took the compulsory open field, the open and a road.  The Crusaders took the gentle hill and the gully.  The Crusaders picked up the open and the Bedouins picked up the gully by rolling a 6 on terrain adjustment leaving the table looking like this: 


The unfortified Crusader camp is in the lower center of the table and the unfortified Bedouin camp is top left.

Below we have the view of the Bedouin host from atop the gentle hill on the left end of the Crusader line.  From left to right, we have the Bedouin light foot, armoured Bedouins, two protected Bedouin Lancers and then two Bedouin light horse lancers.


Below we have the view of the Crusader host from Ali's magic carpet.  From left to right, we have the Green Knights deployed in a single base line with the Blue Knights deployed across the road.  Next to the Blue Knights is the Crusader spear (I wanted to try out the Black and Yellows for this playtest) followed by the two 4 stand crossbow BGs deployed across the hill.


The Crusader first move saw the foot do a double move on the left with the knights moving a full 5" on the right.  None of the missile troops were within range so the turn ended.

The Bedouin first move saw a single move cross the board with the Bedouin light horse only moving 5" and staying in line with the Bedouin cavalry and light foot.  The Crusader crossbow managed 3 hits on the Bedouin light foot who passed both their cohesion and death rolls.  The range was too far for the Bedouin missile fire to have any effect so the turn ended.


For the Crusader 2nd Move, no one was within charge range so we went straight to movement.  The left most crossbow moved straight forward 4".  The inside crossbow attempted a CMT to reposition but failed so opted to remain in place.  The spear performed a full move straight ahead pinning the Bedouin cavalry line.  Both knight BGs also moved straight ahead a full move pinning the Bedouin Light Horse.  The combined crossbow managed 1 hit between them to no effect.  The Bedouin light foot scored two hits on the outside crossbow who passed their subsequent cohesion test.   The Crusader 2nd turn ended with the field looking like this:


The Bedouin 2nd turn saw all three Bedouin lancers have to roll not to charge.  The middle lancer was the only one to pass the roll and the Armoured Bedouins plowed into the left end of the Crusader spear while the left Bedouin protected lancers launched themselves into the right end of the spearmen and the Blue Knights. Impact looked like below:

Ali failed to take a picture of the results of impact but the Armoured Bedouins scored one hit and took none in return.  The protected Bedouins scored 1 hit on the Blue Knights and none on the spearmen but took 2 from the knights and 1 from the spearmen.  The protected Bedouins subsequently disrupted but passed their death roll.

As everyone was too close together there was no movement for the Bedouins.  In the shooting phase, the Bedouin LF scored 2 hits on the outside crossbow who disrupt.  The Bedouin archers took 3 hits in return but pass both the cohesion test and the death roll.

In melee, the Armoured Bedouins scored 3 hits on the Crusader spearmen and took 2 in return.  The protected Bedouins scored 1 hit on the spearmen and none on the Blue Knights.  The spearmen scored 2 hits on the protected Bedouins in return while the Blue Knights scored 1.  The spearmen lost a base on their death roll while the protected Bedouins fragmented and lost a base.  Joint action passed quietly so the turn ended with the field as below:


To start the Crusader 2nd turn, the Green Knights charged the two Bedouin light horse.  Both evaded with the outside BG rolling short and moving only 6" while the other did a full move back just barely staying on the table.  Unfortunately for the Bedouins the Green Knights rolled up and caught both.  In impact, the Green Knights scored 3 hits on each of the Bedouin BGs while taking only 1 from each.  The hits are displayed below:


The inside Bedouin BG rolled an 11 on cohesion and a 5 on his death roll and survived.  The outside Bedouin, however, rolled a total of 6 for cohesion.  Down a -4 caused them to double drop.  To add insult to injury, they also lost a base on the death roll.  Their disrupted friends on the road subsequently fragmented for seeing friends break.

In movement, the Green Knights reformed in line and shifted a base to the left side of their line so it could fight in the melee.  The inside crossbow on the Crusader left failed another CMT.

The crossbow managed 0 hits on the Bedouin archers who did 2 hits to the outside crossbow who passed their cohesion test.

In melee, the Armoured Bedouins scored 3 hits on the spearmen who managed 2 hits in return.  The protected Bedouin scored 0 hits on spearmen and the knights but took 2 hits from the spearmen and 3 from the Blue Knights.  The Crusader spear survived their death roll but the protected Bedouins  lost a base on their death roll and broke on their cohesion test.  The Bedouin lancers to their right disrupted from seeing friends break.  The broken Bedouin lancers rolled normal on their rout but the Blue Knights only went 3" in pursuit.  Meanwhile, on the Bedouin left flank, the Green Knights score 7 hits to the Bedouin light horse who did 0 in return.  The Bedouin light horse lost 1 base automatically and survived the subsequent death roll but alas they broke on their cohesion test.  With their break, the Bedouin army was done and the table looked like this:


This match up went very fast (just over an hour from rolling for initiative to final break).  On a 2 x2 mounted armies are going to suffer as there is very little room for maneuver/evades.  I have at least two more playtests to work in (Fatimids and Arab Cities but possibly Cilician Armenian as well) before I start playing with the table size.  But I can see that it might be needed.  I am looking at 30" x 30" and 36" by 36" as the next possible size.  

Until next time, keep those troops on the table.

Friday, July 28, 2017

Too Much Work

No playtests and probably no painting updates this week as school starts next week and I have been swamped with getting everyone (or most everyone) registered and locker move-in taken care of.

I have 8 Maronite Syrian Archers and 2 priests in various stages of completion so you might get lucky after all.

Until next time, I leave you with this nugget from the teachings of the Buddha...

"Learn to walk alone.  It will make you stronger."

Saturday, July 22, 2017

Komnenan Byzantine Camp


A few years ago, I opted to play Komnenan Byzantine for the US Field of Glory Team Tournament.  I needed a camp for the army and could not find anything that really moved me until I found a seller on eBay who was selling Armenian Churches.  Most of what he was selling would fit well within the 80mm x 120mm camp footprint for FOG so I took a chance and ordered one.  Price was around $25 plus shipping from Armenia (around another $10).  It took about two weeks for it to arrive.  Once I had it in my hands the model of the church was 3 5/8 inches long, 2 1/4 inches wide and 3 5/8 inches tall at its highest point (the cross).  It came with two very thin metal gold colored crosses to use as steeples.  Did I say they were thin?  I broke one while trying to get to straighten it out to glue it in place.  That left me short one cross so I opted to add a banner to one of the steeples.  I found a reference to the Komnenan Dynasty using a double headed eagle on a yellow field and decided why not.

It occurred to me that hey this thing is tall.  Will it fit in my travel case?  The answer was no it would not.  So I started thinking how was I to get it Austin without destroying the ultra flimsy cross and messing up the banner.

I settled on mounting the church itself on a super thin piece of plywood and creating a 120mm x 80mm base that the church would just sit down on in play.  I wanted a arid look to it to fit in my idea (at the time) of a Middle Eastern look.  Below is picture of the church on its small base.


Here is a group of pictures of the two parts of the base from different angles and put together.


The seller I purchased these from still sells on eBay and his id is armeniacorner.  He had few churches up today in fact.  I will probably try and get another one to use for my Cilician Armenians that I am working on.

FOG 300 Playtest - Early Crusaders vs Komnenan Byzantine - 22 July 2017

Today's offering is the latest playtest of FOG 300.  This time we have the Early Crusaders vs Komnenan Byzantine.

For the first time in the playtest series the Crusaders won the initiative and chose to take Agriculture. The Komnenan's took the compulsory open field, a gully and a gentle hill.  The Crusaders chose an open and a road.  This is the first time I believe all terrain pieces made it on the board.  The Byzantine side is to the left.  The Crusaders to the right.


The Crusader list and host.


The Byzantine list and host


The birdseye view of the Byzantine host.  Two Skythikon Light horse are to the left.  The Latinikon knights are to their right with the Byzantine Cavalry to the right of them.  The ambush marker is in the gully to the far right of the picture.


Here we have the Byzantine view of the Crusader line.  The two crossbow battle groups are on each end of the line:  one in the open field and one on the gentle hill.  The spearmen are on the road in front of the camp with the two knight battle groups filling in the gap between the spearmen and the field.


In the Byzantine first move, the Latinikon and the Byzantine cavalry did a double move to just outside of 6 inches of the Crusader line.  The outside Skythikon horse waited until its neighbor moved a full move to the right of the Latinikon and turned to move a full move (-2 inches) to redeploy to the Byzantine left.  No one was within shooting range so the turn ended.


In their turn the Crusaders opted to move directly ahead to squeeze the Byzantine line and deny them room to maneuver.  The left flank crossbow angled across the field so they would be able to shoot at the Skythikon horse to their front but alas there were no hits on the heathen scum.


The Byzantines opted to charge the Crusader line before they could expand with the Latinikon hitting the Green Knights and the Byzantine cavalry hitting the Blue Knights.  The Byzantine leader joined in with the Byzantine cavalry as did the Crusader leader with the Blue Knights.  The Latinikon and Green Knights both only scored one hit.  The Blue Knights, however, even with the POA (Knight Lancers vs other Lancers) managed to loose 4 hits to 2.  As a consequence the Blues, lost a base and disrupted.


In the movement phase the Byzantines opted to move their Skythikons in ambush out of the gully while right flank Skythikons moved into overlap next to the Green Knights (this would prove to be mistake down the road).

In the shooting phase, the Skythikons in overlap took two hits from the crossbow and disrupted.

In the melee phase this turn, the Skythikons in overlap managed 0 hits while the Latinikon and Green Knights did 2 hits each.  The Byzantine cavalry managed 2 hits on the Blue Knights while the Blue Knights did 2 in return.

For the Crusader 2nd Turn, there were no charges but in the maneuver phase, both Crusader knights expanded.  The Green Knights expanded into the open field disordering the stand but trapping the Skythikon light horse in overlap.

The spearmen in the center failed a CMT to move short and sit for the turn.  The right flank crossbow move to within 6 inches of the outside Skythikon horse.   In the shooting phase, those same crossbow score two hits but the Skythikon horse pass.

In the melee phase, The Latinikon score 3 hits and the Skythikons score 1 to the Green Knights who score 3 and 1 back.  The Latinikon survive their death roll as do the Green Knights.  The Blue Knights only score 2 hits against the Byzantine cavalry who score 4 in return.  The Blue Knights survive their cohesion test and the death roll.

The Crusader attempt to rally the Blue Knights in Joint Action failed.

In the Byzantine 3rd turn, there were no chargers so we moved quickly to movement.  The Skythikons on the Byzantine left over up to gang up on the Crusader crossbow to their front.  The combined Skythikon fire scores 2 hits on the crossbow who give out 2 hits in return to the outside Skythikon horse.  The crossbow survive but the Skythikon horse disrupts.

In melee, The Byzantine right flank Skythikon horse score 0 hits but take 1 from the Green Knights in return.  The Latinikon score 1 hit on the Green Knights but take 3 in return.  The Skythikon horse pass their cohesion test but loose a base.  The Latinikon disrupt and looses a base this turn.  The Blue Knights and the Byzantine cavalry both manage 4 hits and pass their death rolls.

This turn the Blue Knights successfully rally.


To start the Crusader 3rd turn, the right flank crossbow charge the battered Skythikon horse to their front.  In impact, both the Skithikon horse and the crossbow inflict 1 hit.

In the maneuver phase, the spearmen contract 1 file and move 3 inches straight ahead.  This positions the spearmen in a position to draw the 2 dice of shooting from the non disrupted Skythikon on the Byzantine right.

The right flank crossbow inflict 2 hits on the already disrupted Skythikon horse dropping it to fragmented.

In the melee phase, the Byzantine cavalry and the Blue Knights inflict 2 hits apiece.  The Latinikon score 1 hit on the Green Knights while the Skythikon inflict 0 on the knights but 1 on the crossbow.  The Green Knights hit the Latinikon with 2 hits and the Skythikon horse with 1.  The crossbow inflict 4 hits to the Skythikon horse.  The Latinikon fragment and loose another base.  The Skythikon horse double drop and lose another base.  They subsequently route 9 inches.  The crossbow pursue 6.


In the Byzantine 4th turn, the fragmented Skythikon horse on the Byzantine right fail a CMT to move back 2 inches and turn around so opt to move back a full move into the gully.  The other Skythikon horse on that flank make their CMT and back up so they are 3 inches away from the spear but facing them.  There was no valid shooting targets after these moves.

In the melee phase, The Blue Knights manage 3 hits to the 1 from the Byzantine cavalry but the Byzantines manage to survive both their cohesion test and the death roll.  The Green Knights inflict only 1 hit to the fragmented Latinikon while taking 2 in return.  They survive however and the turn ends.


In the Crusader 4th turn, the spearmen opt to charge the Skythikon horse to their front who roll up 1 and stop a gnat's dodger in front of their camp.  They however only plod forward 1 inch.

The left flank crossbow pass a CMT and begin moving on the Byzantine camp.

There was no shooting to be had after the charge.

In melee, the Latinikon score 1 hit on the Green Knights who score 0 in return but they survive their cohesion test and death roll.  The Byzantine cavalry score 2 hits on the Blue Knights who do 3 in return.  The Byzantines survive both their cohesion test and death roll.


In the Byzantine 5th turn, there ended being no charging and no shooting after all the movement.

In melee, the Byzantine cavalry suffer 4 hits to 3 from the Blue Knights.  While the Byzantines disrupt the Blue Knights loose another base dropping them to 2.  The Latinikon and the Green Knights on the other hand only manage 1 hit apiece.

The Byzantine cavalry attempt to rally in the Joint Action phase but fail.

In the Crusader 5th turn, there were no charges.  The right flank crossbow pass a CMT and maneuver close enough to shoot at the non-fragmented Skythikon horse on the Byzantine left.  The spearmen move up into the Skythikon horse's face.  The Skythikon horse takes 2 hits from the crossbow fire and disrupts.  The other Crusader crossbow continues its plodding towards the Byzantine camp.


In melee the Byzantine cavalry inflict 1 hit on the Blue Knights but take 2 in return.  The Latinikon inflict 1 hit on the Green Knights but take 4 in return.  The Byzantine cavalry pass their cohesion and death rolls but the Latinikon to their right break and flee 4 inches.  The Byzantine cavalry survive seeing their "friends" break but to no purpose as the breaking of the Latinikon breaks the Byzantine army.


Game went much faster than the previous ones.  I am still thinking the table size needs to increase to 30" square to allow the mounted armies room to maneuver.  However, I have at least two more playtest that I want to get in before I change the table size.  All in all I think it makes an enjoyable game.  By the time I finish all of the playtests, I should have the campaign markers finished for a playtest of the campaign.


Sunday, July 16, 2017

FOG 300 Playtest - 16 Jul 2017 - Early Crusaders vs Seljuk Turks

FOG 300 2nd Playtest

This time I chose Early Crusaders vs Seljuk Turks.

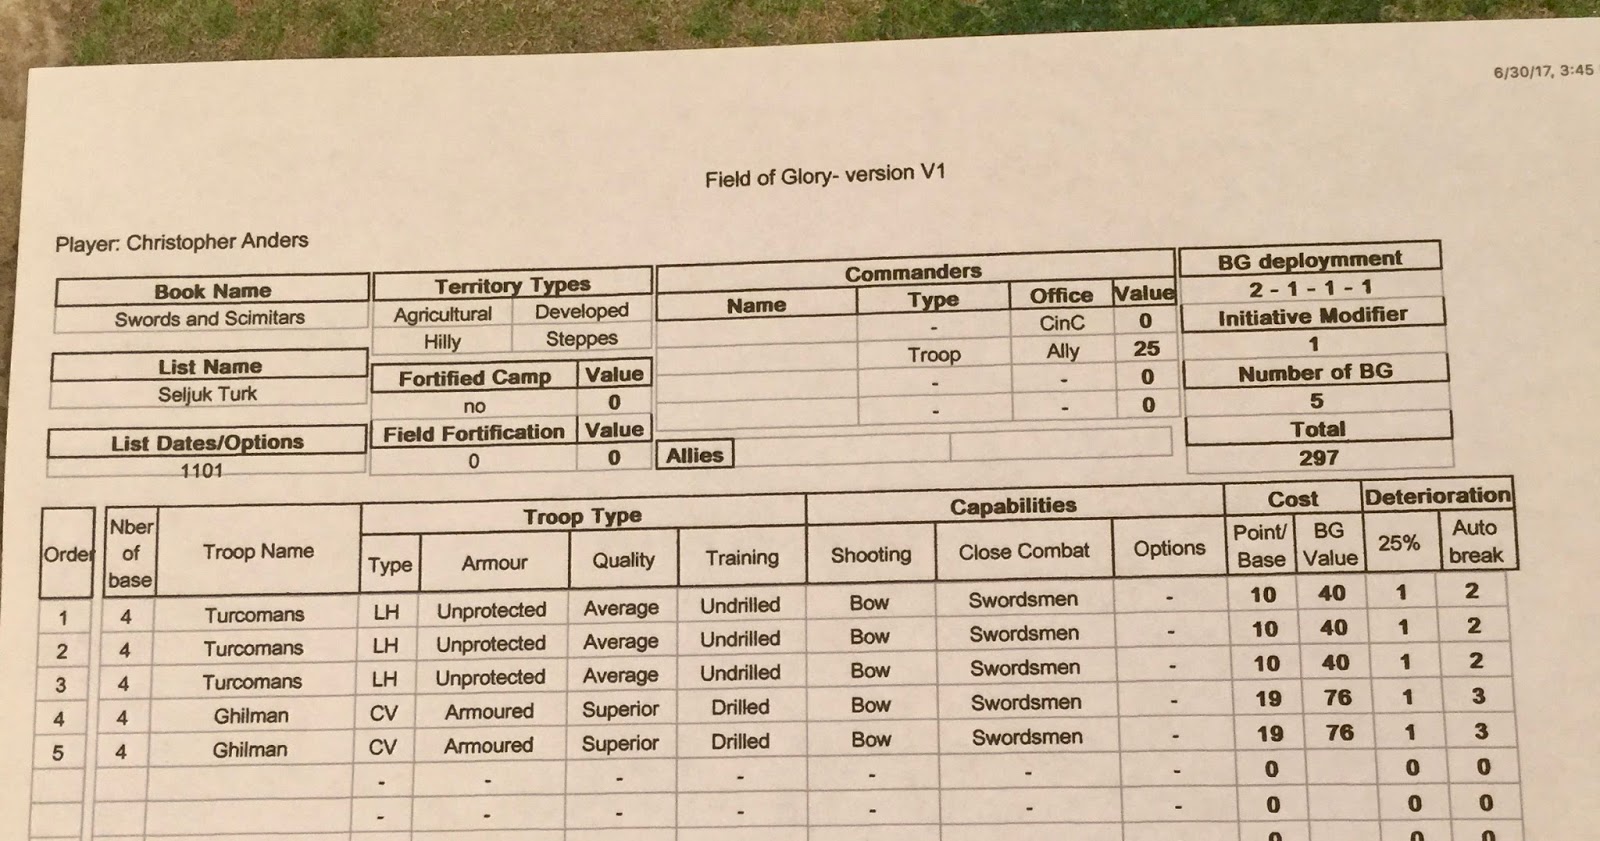
The Seljuk List and Host


Early Crusader List and Host


The Seljuks won the initiative and chose Steppe.  The Early Crusaders took the compulsory open along with a gully and gentle hill.  The Seljuks took another open and a broken.  The Crusader open was placed in the center of the Crusader board edge.  No adjustment was allowed on the 2 rolled by the Seljuks.  The Seljuk open turned out to be too big to fit on the Crusader half and was discarded.  The Seljuk broken was placed on the Crusader half touching a side edge but was picked up on a 6.  The Crusader gentle hill landed in the right hand corner of the Seljuk side where it stayed on a 1 for adjustment.  The gully landed in the left hand corner of the Seljuk side and even though the Seljuks rolled a 4 opted to keep it where it was.

The table to begin with looked like this.


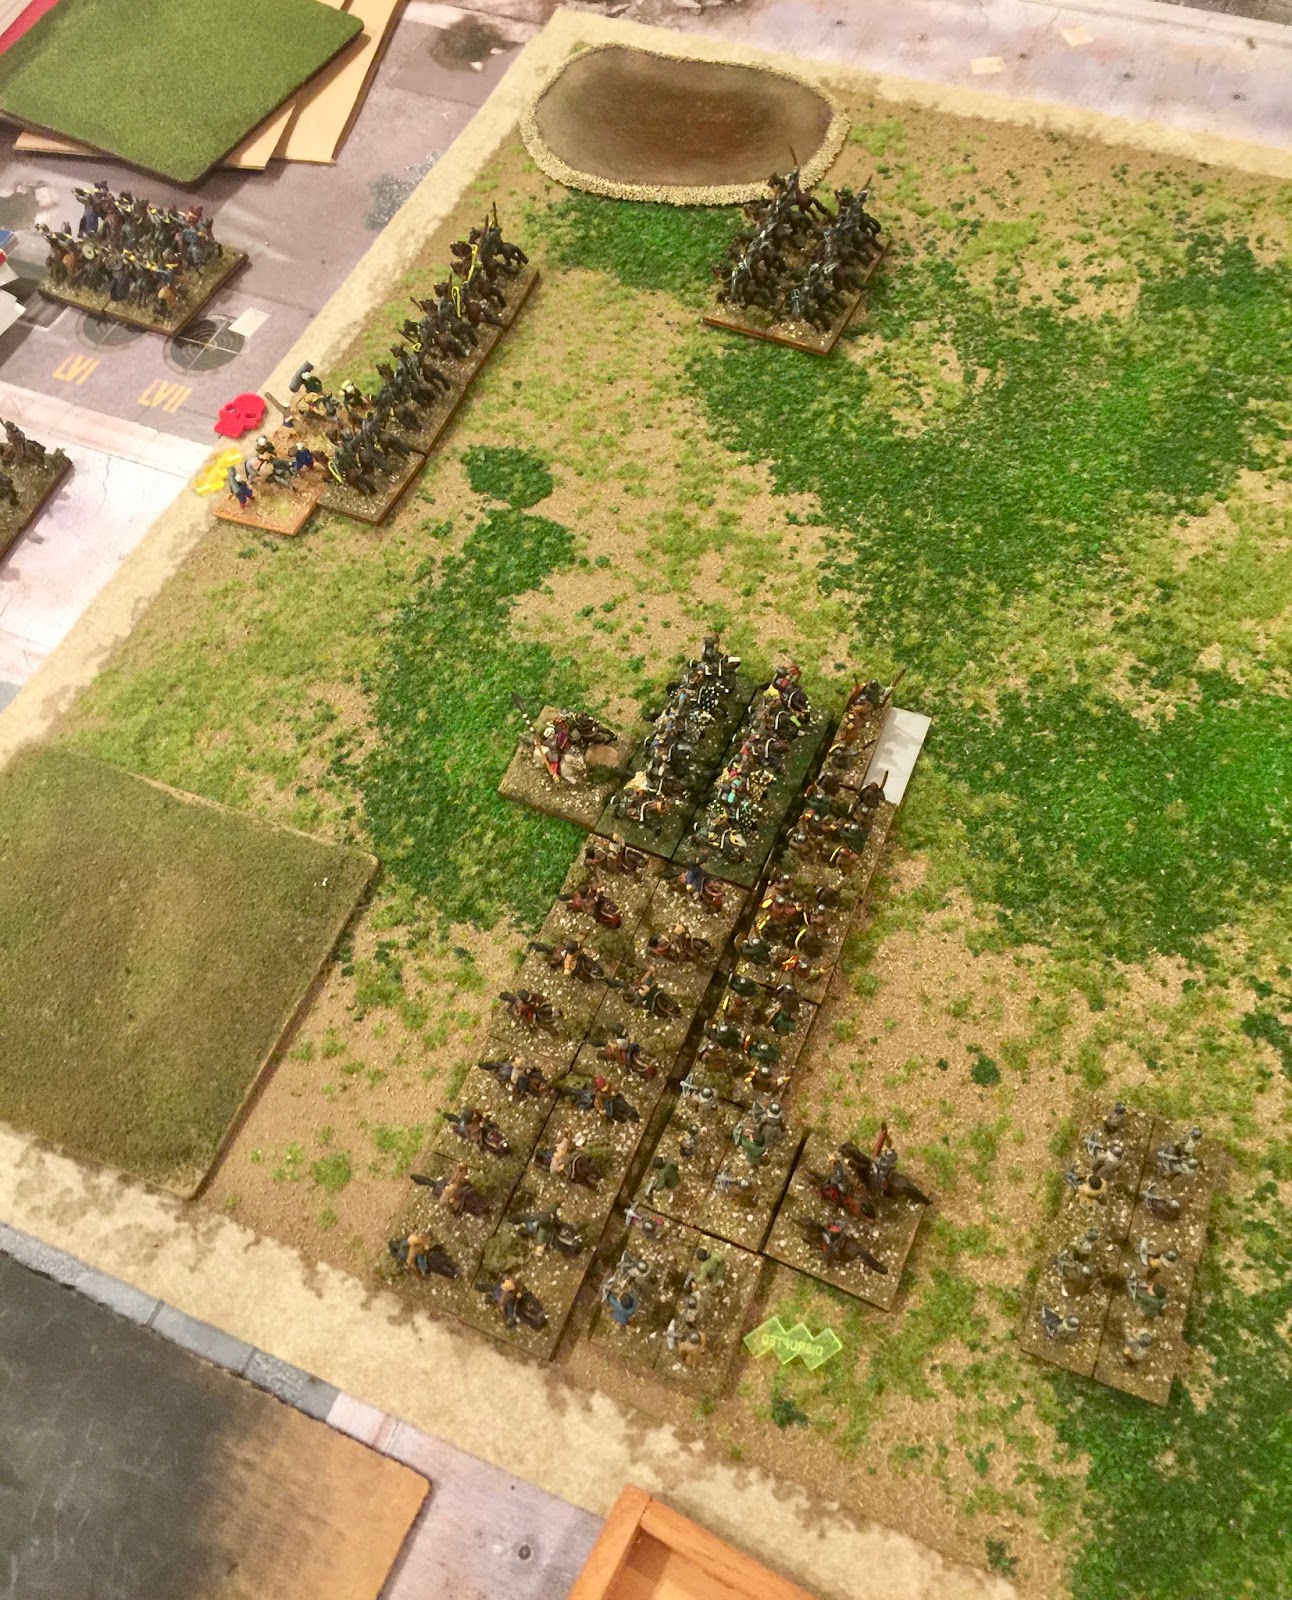
After deployment, the armies looked like so:
The Crusaders deployed the two knights on the left with the spearmen in the center flanked by one of the crossbow.  The second crossbow was deployed behind the spearmen and crossbow to provide support.


The Seljuks deployed with two Turcomans on the left on the hill and a Ghilmen next to them.  Another Ghilmen and the last Turcoman was deployed right up to the gully leaving a two stand gap in the center.

The Crusaders moved first and no one was within range for shooting.  The front rank spearmen and crossbow did a double-move and the knights moved a full move straight ahead.  The Blue Knights on the far right did a one base shift to the right.


The Seljuk 1st move had both right hand Turcomans move 7 inches straight forward and wheel towards the table edge.  The Ghilmen next to them moved 5 inches forward.  On the other flank, the Turcomans moved forward and wheeled over to the left to come up in front of the Blue Knights but outside of 5 inches.  The left Ghilmen expanded two bases and advanced 3 inches.


In the shooting phase, the Seljuks managed only 1 hit on the crossbow.  The crossbow responded with 3 hits on the Turcomans to their front.  The Turcomans passed cohesion and the death roll with no problem.

In the Crusaders 2nd turn, the Green Knights expanded in the middle.  The rest of the Crusader line stayed pat.  In the shooting phase, the Seljuks scored 2 hits on the crossbow who went on to disrupt.  The crossbow managed no hits.  The Crusader general slid over to behind the disrupted crossbow in preparation for the next turn.

In the Seljuk 2nd turn, the left end of the Seljuk line moved to 3 inches of both knights and the right end of the Seljuk line did the same.  The Seljuks inflicted 2 hits on the disrupted crossbow who passed cohesion.  The Spear received 3 hits and passed cohesion and the death roll.  The Green Knights took 3 hits and passed cohesion.  The Blue Knights took 2 hits and passed cohesion.  The crossbow managed 2 hits on the Turcomans who disrupted.

In the JAP phase, the crossbow rally back from disrupted.

For the Crusader 3rd turn, both knights charge.  The Turcomans and the Ghilmen evade.  The Turcomans rolled normal while the Ghilmen rolled up 1.  The Turcomans evaded first and then the Ghilmen moved.  The Blue Knights moved 6 inches and the Green Knights moved 4 inches.


In the movement phase, the spear and crossbow moved up into the face of the right end of the Seljuk line.  The crossbow managed only 1 hit in the shooting phase.  The Seljuk return fire across the line is ineffective.

 In the JAP phase, the right end Turcomans rallied from disrupted.

In the Seljuk 3rd turn, the left end Turcomans turned 180 and moved to within shooting range.  The yellow Ghilmen (left side) turned 180 in place.


In the shooting phase, the Blue Knights took 2 hits and passed their cohesion test.  The spearmen took 3 hits and passed their cohesion test and death roll.  The crossbow took no hits but only managed 1 hit in return.

In the Crusader 4th turn, both knights charge.  The Turcomans evaded off the table.  The Ghilmen evaded 3 inches and came up against the camp.  They turned 90 degrees and attempted to wheel past the camp.  Lucky for the Seljuks, the Green Knights rolled up but ended up just behind the Ghilmen.  The Blue Knights stopped just behind the Green Knights.


In the shooting phase, the right end Turcomans received 2 hits from the crossbow but passed their cohesion.  The crossbow took only 1 hit in return.  The Spear took 4 combined hits.  They passed cohesion but lost 1 base on the death roll

In the Seljuk 4th turn, the yellow Ghilmen (left end) moved 2 inches to straighten out the kink and turned to face the Green Knights.


In the shooting phase, the crossbow scored 1 hit on the Turcomans to no effect.  The Turcomans scored 0 hits on the crossbow.  The Spear took 3 hits but passed cohesion.  The yellow Ghilmen only managed 1 hit.

In the Crusader 5th turn, the Green Knights charged the yellow Ghilmen who opted to receive the charge as they did not have enough room to evade anyway.  Both the Green Knights and yellow Ghilmen scored 3 hits in impact.  The knights survived but the Ghilmen lost 1 base.


 (Note the fragmented marker by the camp denotes the 1 point of attrition from the Turcoman that evaded off the table.)

In the movement phase, the Blue Knights attempted to turn 90 but fail the roll.

In the shooting phase, the crossbow scored 3 hits on the right end Turcomans who passed cohesion and the death roll.  The crossbow took 2 hits in return and disrupted.  The Spear took 5 hits in return but managed to pass cohesion and the death roll.

In the melee phase, the Green Knights scored 6 hits and the yellow Ghilmen scored 3.  the Green Knights passed their death roll but along with the automatic base loss, the Ghilmen disrupted.


In the Seljuk 5th turn, There is no movement to be made.  The Seljuks scored no hits (out of 3 superior dice and 4 average).  The crossbow only managed 1 hit on the Turcomans in return.

In the final melee phase, the Green Knights scored 4 hits to the Ghilmen 2.  The Ghilmen fragment on their cohesion test but then lost a base auto breaking at 1 base.  In the ensuing pursuit, the Green Knights plowed into the Seljuk camp ending the game.


The game took around 1.5 hours.  The Seljuks were severely hampered by the 2 foot table and I will have to explore the possibility of a larger table.  I will need to complete several other playtests before then though.

Holy Banners 1

Check out the Holy Banners for the Crusaders and the Moslem armies.  The figures are Old Glory.  The Crusader is just a Norman Knight that I cut the lance off and drilled out the hand.  The flag is a 28mm Little Big Man Studios SAGA Norman banner that I resized to fit my needs.  I repainted the streamers to enhance the colors.  The Moslem is a from the Andalusian command pack.  I cut the banner out and drilled out his hand.  I created the banner on my computer.  I decided to go with a generic black Abbasid banner with a golden yellow edge.  For both of these I went oversize to make it stand out more on the table.  I had a copy of the Green and Gold banner that is supposed to have been William of Normandy's Holy Banner but wanted something a bit more colorful.


Could this be a new campaign scenario?

 69 AD was a busy year for the Romans.  Could this be an interesting scenario for a campaign? I have plenty of Early Germans, Gallic types, ...