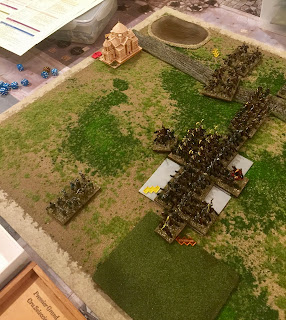
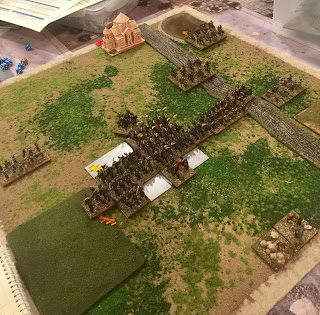
For the first time in the playtest series the Crusaders won the initiative and chose to take Agriculture. The Komnenan's took the compulsory open field, a gully and a gentle hill. The Crusaders chose an open and a road. This is the first time I believe all terrain pieces made it on the board. The Byzantine side is to the left. The Crusaders to the right.
The Crusader list and host.
The Byzantine list and host
The birdseye view of the Byzantine host. Two Skythikon Light horse are to the left. The Latinikon knights are to their right with the Byzantine Cavalry to the right of them. The ambush marker is in the gully to the far right of the picture.
Here we have the Byzantine view of the Crusader line. The two crossbow battle groups are on each end of the line: one in the open field and one on the gentle hill. The spearmen are on the road in front of the camp with the two knight battle groups filling in the gap between the spearmen and the field.
In the Byzantine first move, the Latinikon and the Byzantine cavalry did a double move to just outside of 6 inches of the Crusader line. The outside Skythikon horse waited until its neighbor moved a full move to the right of the Latinikon and turned to move a full move (-2 inches) to redeploy to the Byzantine left. No one was within shooting range so the turn ended.
In their turn the Crusaders opted to move directly ahead to squeeze the Byzantine line and deny them room to maneuver. The left flank crossbow angled across the field so they would be able to shoot at the Skythikon horse to their front but alas there were no hits on the heathen scum.
The Byzantines opted to charge the Crusader line before they could expand with the Latinikon hitting the Green Knights and the Byzantine cavalry hitting the Blue Knights. The Byzantine leader joined in with the Byzantine cavalry as did the Crusader leader with the Blue Knights. The Latinikon and Green Knights both only scored one hit. The Blue Knights, however, even with the POA (Knight Lancers vs other Lancers) managed to loose 4 hits to 2. As a consequence the Blues, lost a base and disrupted.
In the movement phase the Byzantines opted to move their Skythikons in ambush out of the gully while right flank Skythikons moved into overlap next to the Green Knights (this would prove to be mistake down the road).
In the shooting phase, the Skythikons in overlap took two hits from the crossbow and disrupted.
In the melee phase this turn, the Skythikons in overlap managed 0 hits while the Latinikon and Green Knights did 2 hits each. The Byzantine cavalry managed 2 hits on the Blue Knights while the Blue Knights did 2 in return.
For the Crusader 2nd Turn, there were no charges but in the maneuver phase, both Crusader knights expanded. The Green Knights expanded into the open field disordering the stand but trapping the Skythikon light horse in overlap.
In the melee phase, The Latinikon score 3 hits and the Skythikons score 1 to the Green Knights who score 3 and 1 back. The Latinikon survive their death roll as do the Green Knights. The Blue Knights only score 2 hits against the Byzantine cavalry who score 4 in return. The Blue Knights survive their cohesion test and the death roll.
The Crusader attempt to rally the Blue Knights in Joint Action failed.
In the Byzantine 3rd turn, there were no chargers so we moved quickly to movement. The Skythikons on the Byzantine left over up to gang up on the Crusader crossbow to their front. The combined Skythikon fire scores 2 hits on the crossbow who give out 2 hits in return to the outside Skythikon horse. The crossbow survive but the Skythikon horse disrupts.
In melee, The Byzantine right flank Skythikon horse score 0 hits but take 1 from the Green Knights in return. The Latinikon score 1 hit on the Green Knights but take 3 in return. The Skythikon horse pass their cohesion test but loose a base. The Latinikon disrupt and looses a base this turn. The Blue Knights and the Byzantine cavalry both manage 4 hits and pass their death rolls.
This turn the Blue Knights successfully rally.
To start the Crusader 3rd turn, the right flank crossbow charge the battered Skythikon horse to their front. In impact, both the Skithikon horse and the crossbow inflict 1 hit.
In the maneuver phase, the spearmen contract 1 file and move 3 inches straight ahead. This positions the spearmen in a position to draw the 2 dice of shooting from the non disrupted Skythikon on the Byzantine right.
The right flank crossbow inflict 2 hits on the already disrupted Skythikon horse dropping it to fragmented.
In the melee phase, the Byzantine cavalry and the Blue Knights inflict 2 hits apiece. The Latinikon score 1 hit on the Green Knights while the Skythikon inflict 0 on the knights but 1 on the crossbow. The Green Knights hit the Latinikon with 2 hits and the Skythikon horse with 1. The crossbow inflict 4 hits to the Skythikon horse. The Latinikon fragment and loose another base. The Skythikon horse double drop and lose another base. They subsequently route 9 inches. The crossbow pursue 6.
In the Byzantine 4th turn, the fragmented Skythikon horse on the Byzantine right fail a CMT to move back 2 inches and turn around so opt to move back a full move into the gully. The other Skythikon horse on that flank make their CMT and back up so they are 3 inches away from the spear but facing them. There was no valid shooting targets after these moves.
In the melee phase, The Blue Knights manage 3 hits to the 1 from the Byzantine cavalry but the Byzantines manage to survive both their cohesion test and the death roll. The Green Knights inflict only 1 hit to the fragmented Latinikon while taking 2 in return. They survive however and the turn ends.
In the Crusader 4th turn, the spearmen opt to charge the Skythikon horse to their front who roll up 1 and stop a gnat's dodger in front of their camp. They however only plod forward 1 inch.
The left flank crossbow pass a CMT and begin moving on the Byzantine camp.
There was no shooting to be had after the charge.
In melee, the Latinikon score 1 hit on the Green Knights who score 0 in return but they survive their cohesion test and death roll. The Byzantine cavalry score 2 hits on the Blue Knights who do 3 in return. The Byzantines survive both their cohesion test and death roll.
In the Byzantine 5th turn, there ended being no charging and no shooting after all the movement.
In melee, the Byzantine cavalry suffer 4 hits to 3 from the Blue Knights. While the Byzantines disrupt the Blue Knights loose another base dropping them to 2. The Latinikon and the Green Knights on the other hand only manage 1 hit apiece.
The Byzantine cavalry attempt to rally in the Joint Action phase but fail.
In the Crusader 5th turn, there were no charges. The right flank crossbow pass a CMT and maneuver close enough to shoot at the non-fragmented Skythikon horse on the Byzantine left. The spearmen move up into the Skythikon horse's face. The Skythikon horse takes 2 hits from the crossbow fire and disrupts. The other Crusader crossbow continues its plodding towards the Byzantine camp.
In melee the Byzantine cavalry inflict 1 hit on the Blue Knights but take 2 in return. The Latinikon inflict 1 hit on the Green Knights but take 4 in return. The Byzantine cavalry pass their cohesion and death rolls but the Latinikon to their right break and flee 4 inches. The Byzantine cavalry survive seeing their "friends" break but to no purpose as the breaking of the Latinikon breaks the Byzantine army.
Game went much faster than the previous ones. I am still thinking the table size needs to increase to 30" square to allow the mounted armies room to maneuver. However, I have at least two more playtest that I want to get in before I change the table size. All in all I think it makes an enjoyable game. By the time I finish all of the playtests, I should have the campaign markers finished for a playtest of the campaign.


No comments:
Post a Comment
Due to spambots making inappropriate comments, all comments are currently moderated. My apologies for the inconvenience.