Sunday, February 25, 2018

FOG 300 Early Sassanids vs Classical Indians Circa 281 AD

With his victory over the Kushans on the plains of Farah and the suspicious death of the governor of the neighboring province of Turan, Hormizd, son of Shapur Mishanshah, governor of Sakastan, has moved to seize control of Turan itself.  He has made it clear that he plans to push over the mountains and the River Indus to add those lands to his control and also gain access to that which has historically only been the purview of the King of Kings, elephants.  

Contact with the local Indian magnate was not long in coming and Hormizd'z attempts to overawe the locals came to naught.  Somewhere on the plains east of the Indus, Hormizd and his host met the Indian forces.

Sassanid List and Host:


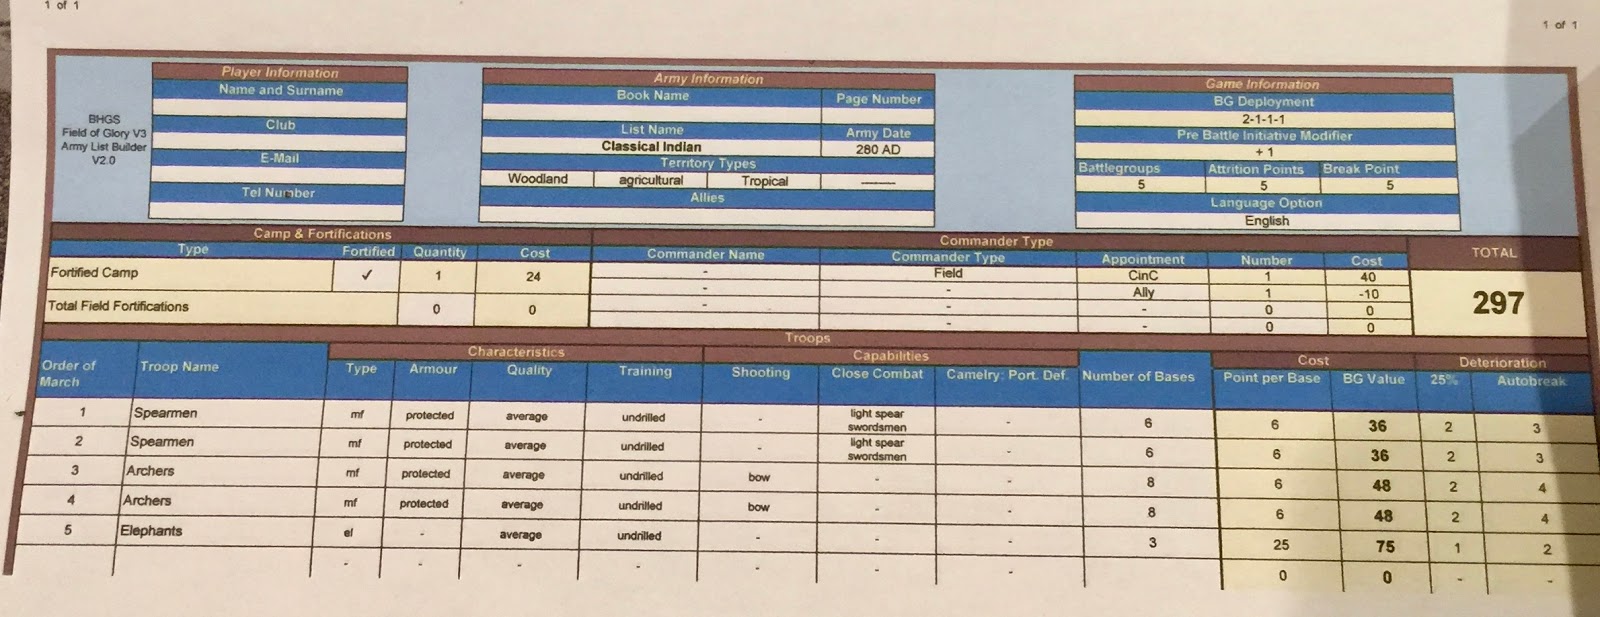
Classical Indian List and Host:


The Sassanids won the initiative and opted for Agricultural.  The Indians took the compulsory open field, a gully and an enclosed field.  The Sassanids wanted an open table and took an open as their single terrain piece.  The open field ended up on the Indian base line just left of center.  The gully ended up on the Sassanid base line in the center.  The enclosed field was picked up on a six as was the open.

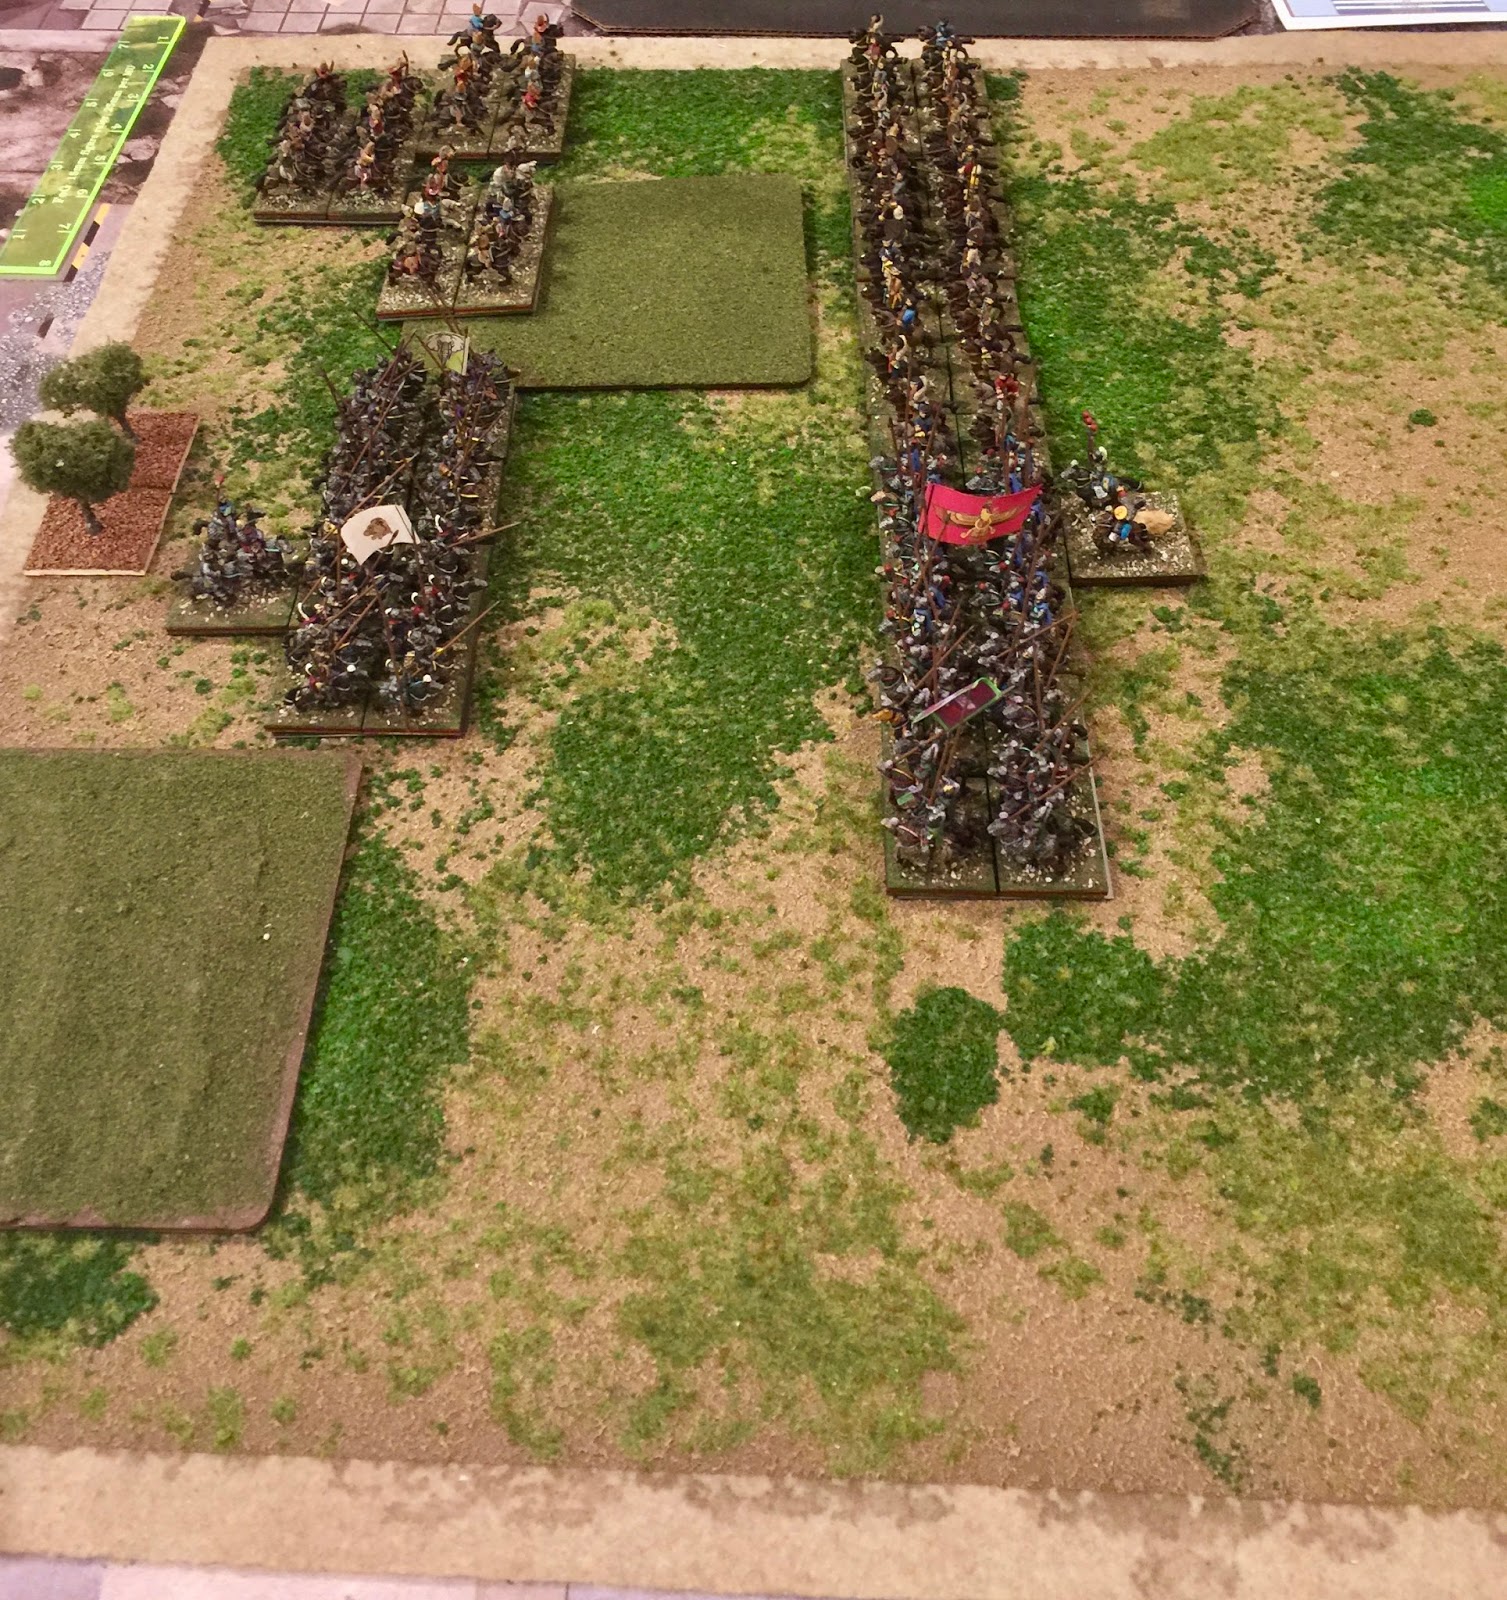
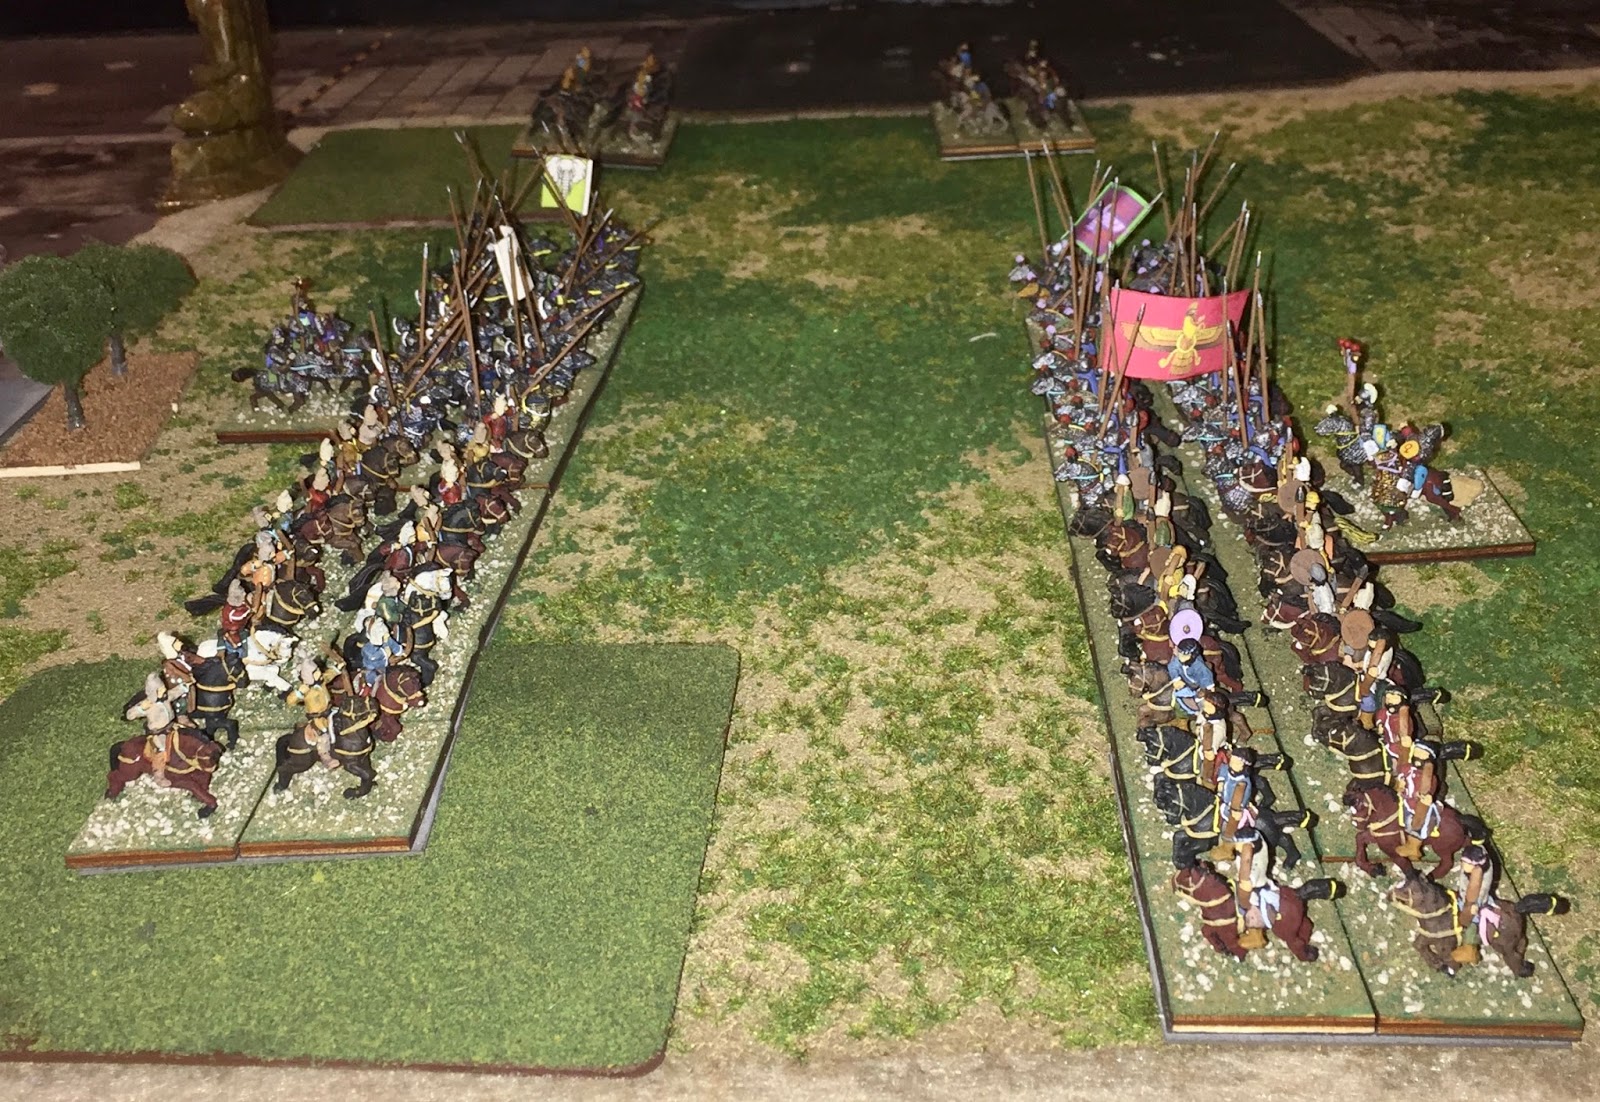
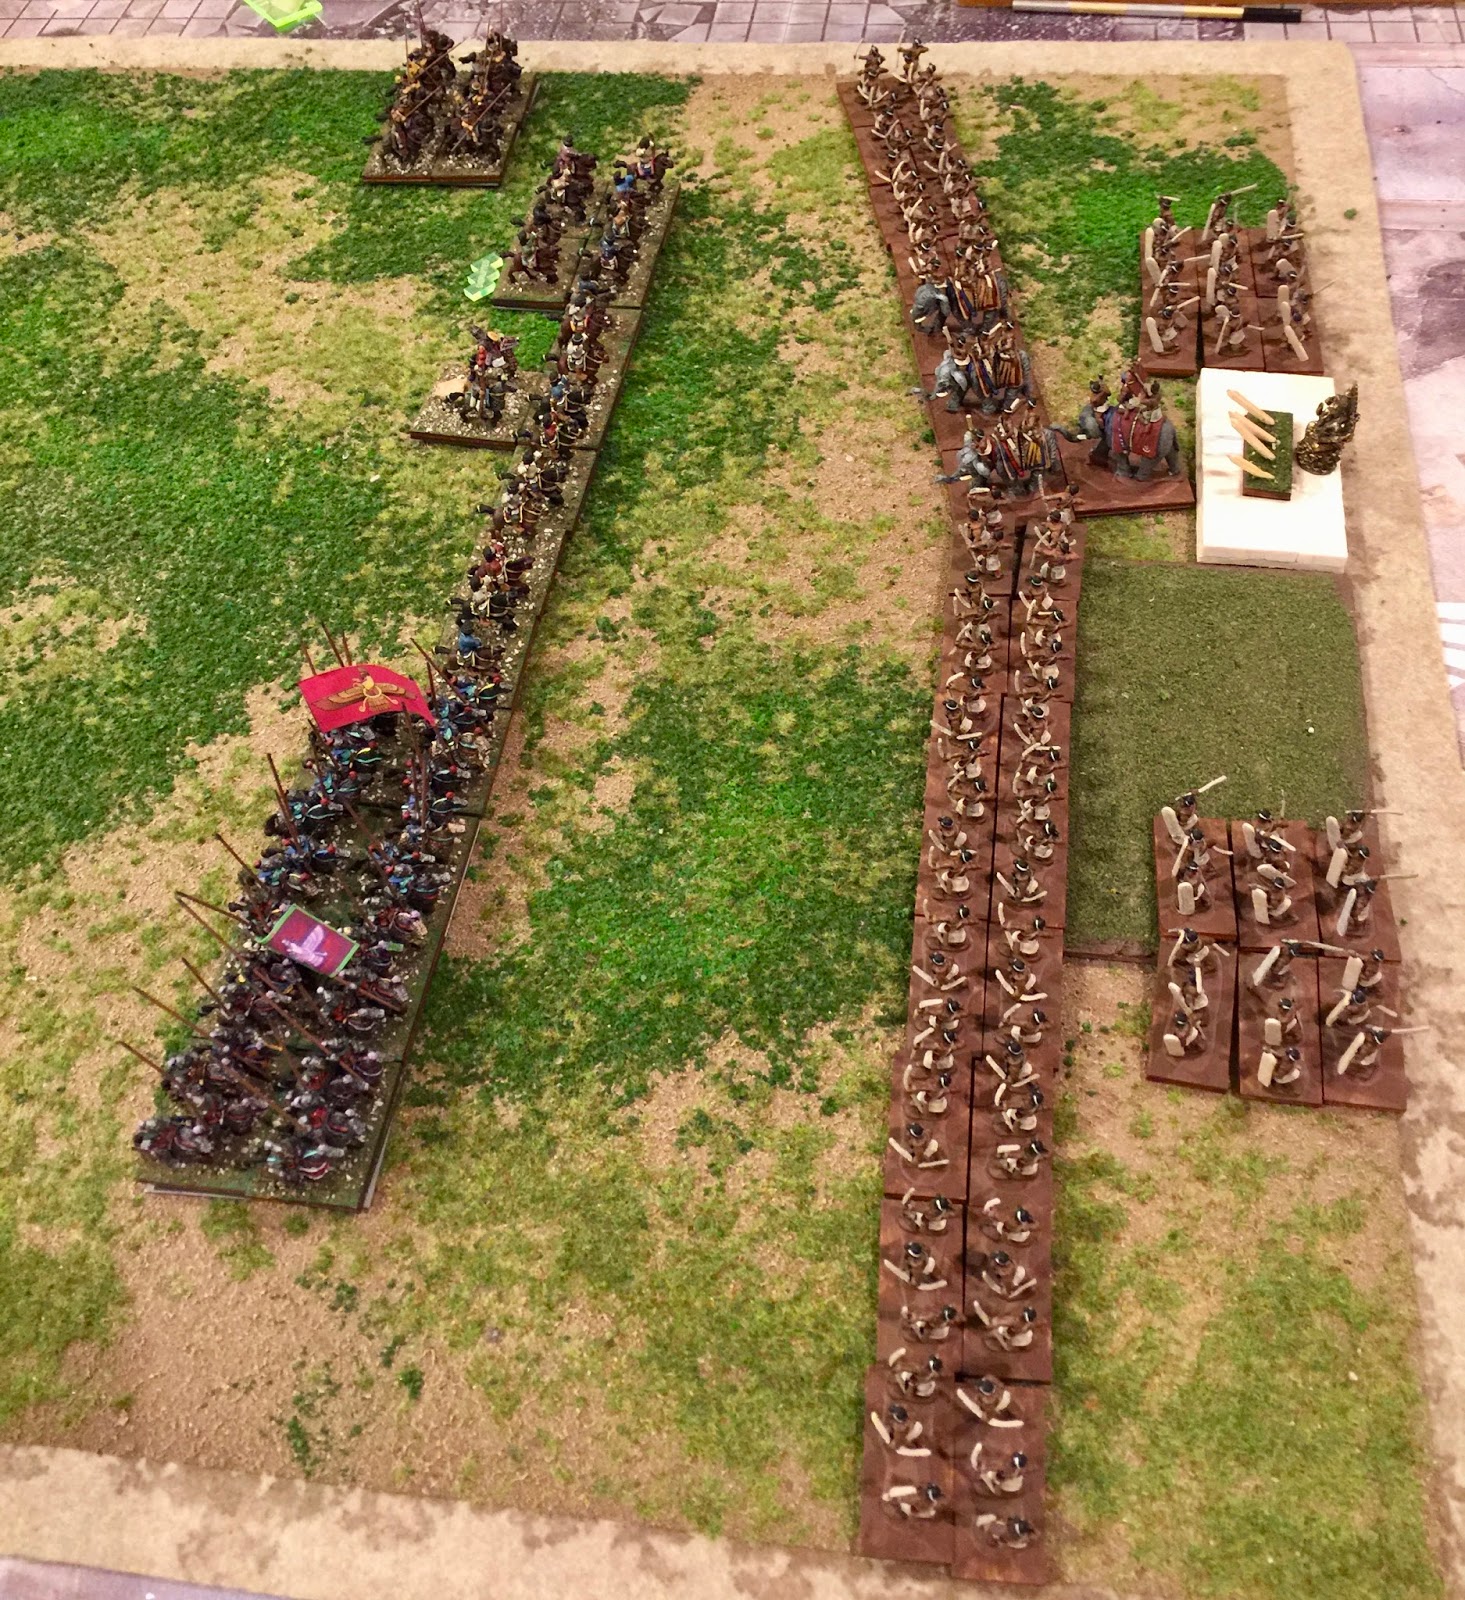
After deployment, the Sassanid host looked like so with the two cataphracts deployed on the left (in the picture), the 4 pack of light horse deployed one deep in front of the gully followed by the six pack of light horse and then the cavalry unit on the right.  The Sassanid camp was behind the six pack of light horse.


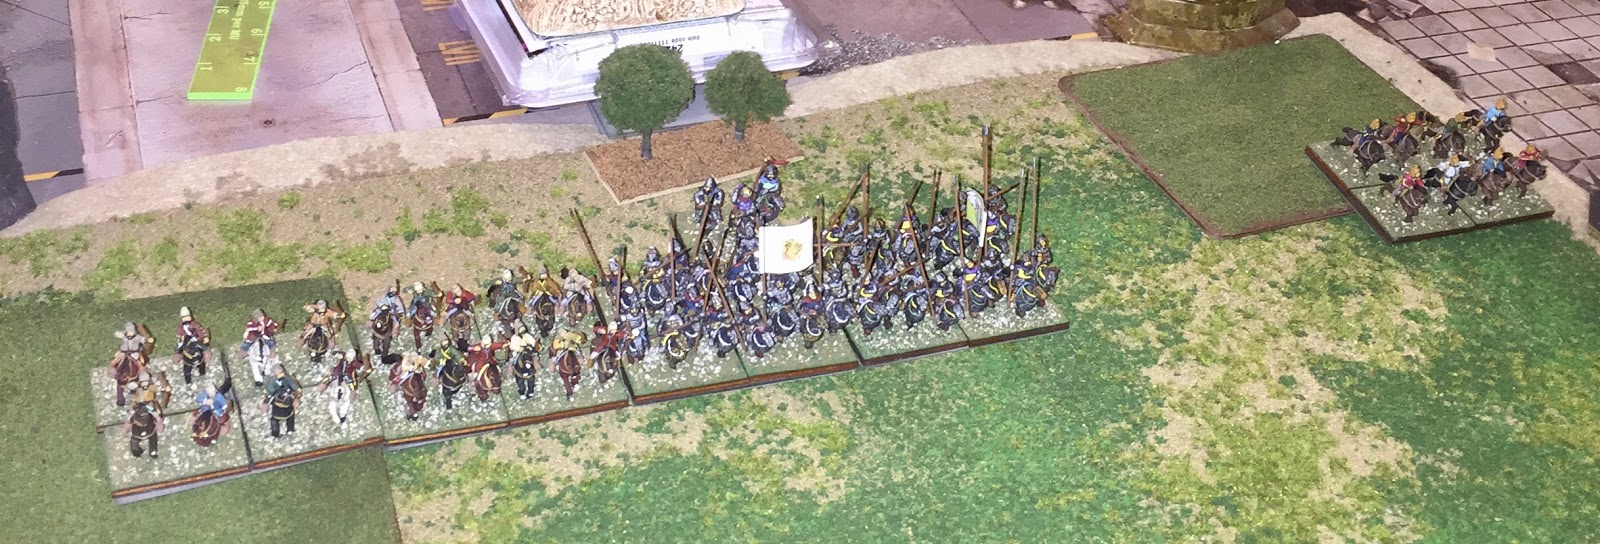
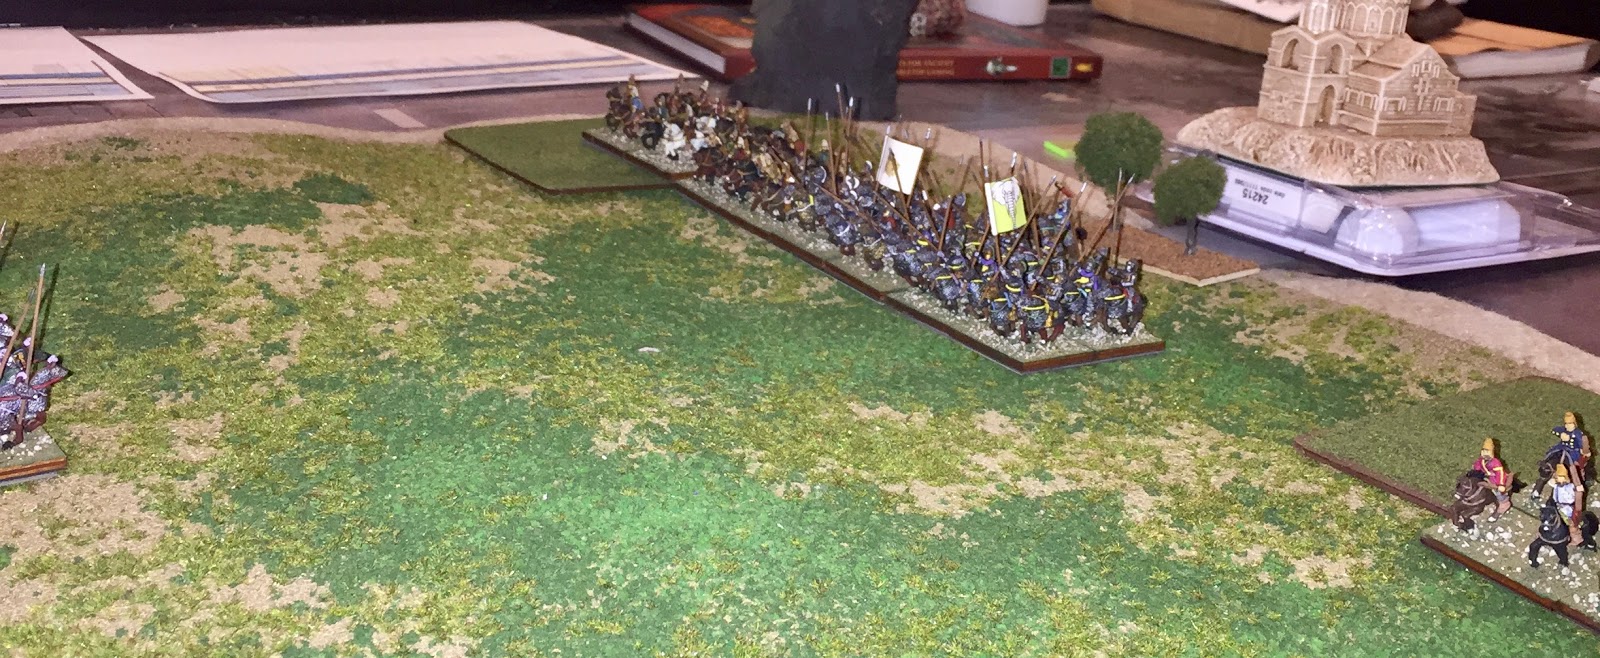
After deployment, the Indians showed a solid line across the table with an 8 pack of archers, the elephants and two more eights of archers.  The two units of spearmen were deployed in double wide columns  in support.  The fortified camp was behind the elephants.


The Classical Indians rolled to move first but opted to remain stationary and make the Sassanids come to them.

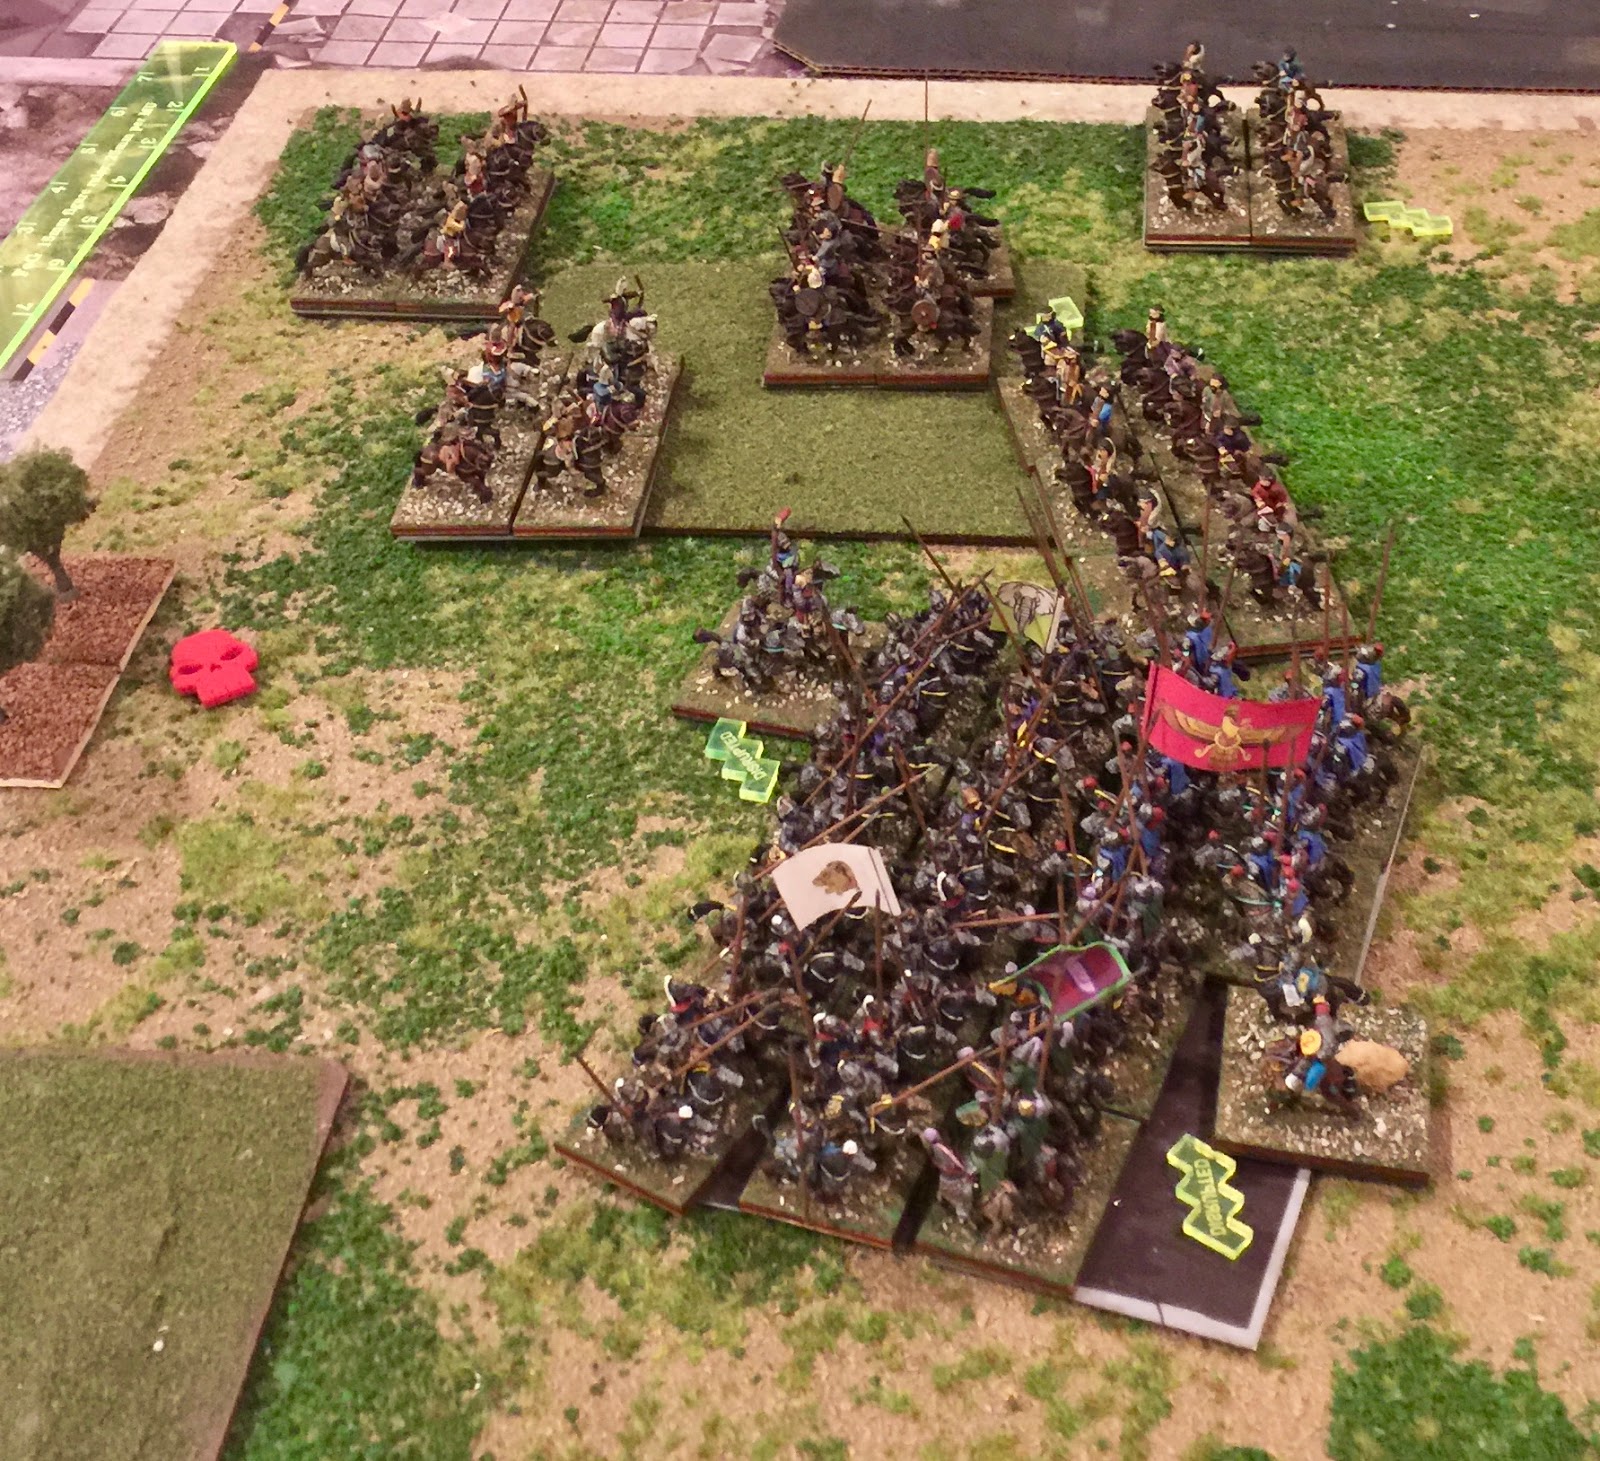
The Sassanid 1st turn had the cataphracts and both light horse BGs move as a battle line 8" forward.  The cavalry on the Sassanid left moved 5".  The Sassanids had no shooting but the Indians scored 3 hits on the 6 pack of light horse and disrupted them.  In the Joint Action Phase, the Sassanid general moved to touch the 6 pack of light horse.  At the end of the turn, the field looked like below:


In the Indian 2nd turn, the Indians wheeled the right end bowmen with the Elephants to angle towards the Sassanid middle but remained just outside of 5" of the Sassanid cavalry.  The Sassanid light horse remained out of shooting range but the Indians managed 3 hits on the Sassanid 6 pack of light horse.  A base was lost to hits but the cohesion test was passed.  2 hits were also scored on the Purple Cataphracts on the right end of the Sassanid line but they passed their cohesion test.   In the Joint Action Phase, the Sassanids attempted to rally the 6 pack of light horse but to no avail.  At this point, the 2nd Indian turn ended.


The Sassanid 2nd turn opened with the cataphracts and both light horse BGs moving as a group to 3" of the Indian line.  The Sassanid cavalry moved a full 5" forward.  In the shooting phase, Sassanid shooting was completely ineffective.  The Indians managed 2 hits on the 6 pack of light horse (who passed cohesion), 2 hits on the Red Cataphracts (who passed cohesion) and 3 hits on the Purple Cataphracts (who passed both the death roll and cohesion).  In the Joint Action Phase, the 6 pack of Sassanid light horse rallied back from disrupted as the turn ended.


To start the Indian 3rd, the elephants wheeled an inch and charged towards the cataphracts.  Both Sassanid light horse BGs were forced to flee (the 6 pack went 5" back and the 4 pack went 9" back).  The Elephants rolled down and only trundled forward 3".  The right flank Indian bowmen passed a CMT and wheeled forward to be parallel of the Sassanid cavalry.  The remainder of the Indian line stayed in place.  In the shooting phase, only the Red Cataphracts were hit enough to matter and they easily passed cohesion.  In the Joint Action Phase, the Sassanid general moved to the Sassanid cavalry.


To start the Sassanid 3rd turn, both cataphracts and the Sassanid cavalry charged.  The Sassanid general joined the impact with the cavalry but as both sides scored 3 hits it was a draw.  The Red Cataphracts scored 3 hits to 3 as well but the Indians in the open field lost a base to the death roll.  The Purple Cataphracts, however, scored 4 hits to 2.  The Indians on the left end of the line lost a base to hits and disrupted.  In the maneuver phase, the 6 pack of light horse turned and stopped just out of 3" of the right flank Indian bow.  The 4 pack turned and moved to within 3" of the Elephant line.  In the shooting phase, all was for naught except the hit on the elephants, who subsequently rolled an unmodified 3 on their cohesion test and dropped to disrupted.  In the melee phase, the Sassanid cavalry only managed 1 hit to 3 but luckily survived both the death roll and the cohesion test.  The Red and Purple Cataphracts both scored 3 hits to their opponents and only took 1 each.  The center bow BG dropped another base but passed cohesion.  The right flank bow BG survived the death roll but double dropped on cohesion breaking.  Both the center bow BG and the spearmen behind them passed their cohesion for seeing a friend break.  The broken bowmen fled off the table while the pursuing cataphracts plowed into the spearmen behind.  In the Joint Action Phase, the Red Cataphracts and the Sassanid cavalry broke off.  The Purple Cataphracts remained in place to fight the next impact.  (I know this was discussed on the forum but as I could not find it readily during the game, could not remember what the consensus was and it just seemed wrong to break off, they remained stuck in).  No picture survived this turn so on to the Indian 4th we went.

The Indian 4th saw no Indian charges to resolve but the Purple Cataphracts scored 3 hits to 0 on the spear BG who lost a base and managed to disrupt.  In the maneuver phase, the spear BG expanded one base so that all stands would fight against the cataphracts.  The Elephant BG wheeled to get in position to charge the Red Cataphracts on the next Indian turn.  In the shooting phase, the Sassanid cavalry took 3 hits and disrupted.  The Red Cataphracts took 2 hits and also disrupted.  The Elephants took 1 hit but passed they cohesion.  In melee, the Purple Cataphracts scored 2 hits and took 2 hits so a draw.  In the Joint Action Phase, the Elephants rallied back to steady.


To begin the Sassanid 4th turn, both the Sassanid cavalry and the Red Cataphracts rolled successfully not to charge.  In maneuver, the Red Cataphracts rolled a CMT and wheeled forward to prevent a flank charge by the elephants.  The 4 pack of Sassanid light horse contracted to a 2 wide frontage (outside of elephant restricted zone).  The Sassanid cavalry successfully passed a CMT to move short.  In the shooting phase, both the Indian and Sassanid archery proved ineffective.  In melee, the Purple Cataphracts scored 2 hits to 0 on the spear BG who suffered no death but fragmented on cohesion.  In the Joint Action Phase, the Sassanid general moved to the cavalry who rallied back from disrupted.  With that, the Sassanid 4th turn ended. (Yet another turn in which no picture survived.)

To start the Indian 5th turn, the Indian elephants charged the Red Cataphracts.  The Indian general joined the fight and saw the Elephants core 5 hits to 3.  The Red Cataphracts lost 1 base and fragmented.  In the maneuver phase, the center bow BG turn into the flank of the Purple Cataphracts who turned one base to face.  In the shooting phase, Sassanid archery was awful and the two hits on the 6 pack of Sassanid light horse inflicted by the Indians were shrugged off.  In the melee phase, the Red Cataphracts only managed 1 hit to 2 from the elephants and broke on cohesion but did not lose a base.  The Purple Cataphracts scored 1 hit on the Indian bow and 3 on the spearmen and took 2 in return from the bow BG and none from the spear.  The spear BG followed up their stellar performance by losing a base and breaking.  The bow BG in the field disrupted as a result of seeing friends break.  The Purple Cataphracts passed cohesion for seeing the Red Cataphracts break.  The elephants lost contact with the Red Cataphracts in the pursuit.  (And we have another turn in which there is no picture.)

The Sassanid 5th turn saw the Sassanid cavalry charge the bow unit to their front.  The Indian bowmen managed only 1 hit on the cavalry while throwing 8 dice.  The Sassanid cavalry, however, hit 4 times causing the Indian Archers to lose a base and double drop to fragmented.  At this point, the Impact Phase ended with a Sassanid victory at 5 - 2 attrition points.


Not sure where Hormizd will show up next.  Historically, in 282 AD, he would rebell against Bahram II so his next appearance might be in a Sassanid Civil War.  Until next time...

Sunday, February 18, 2018

FOG 300 Early Sassanids vs Kushans Circa 280 AD Part II

After the despicable performance of Aspashir, 3rd Cousin of Shapur I, at the Battle of the Shahanshah's Tears,  Hormizd, son of Shapur Mishanshah, governor of Sakastan, gathered together the remnants of Aspashir's command and forged a new army mixed with new levies and his own personal bodyguard to face the invading horde of Kushans on the plains north of Farah.


To set the tone, we have Ganesha burning incense to prepare us for the clash between the Kushan Hordes and the loyal Sassanid forces (or perhaps it is an omen of where Hormizd will turn next).

The Sassanid Host - Hormizd made some adjustments to Aspashir's list which is reflected in the inked in changes.


The Kushan list and Horde:


The Sassanids won the initiative and opted for Agricultural.  The Kushan took the compulsory open field and an open.  The Sassanid opted for a single open field.  All terrain fell in the Kushan side of the table.  The open would not fit at all and was discarded. 

The Kushan horde deployed:  the two Kushan cataphracts deployed in the gap between the open fields with the camp behind them, the two Kushan light horse in front of the Kushan cavalry on the right end of the Kushan line.


The Sassanid host arrayed for battle:  the two cataphracts deployed on the right end of the Sassanid line (as you look at the picture), the 6 pack of light horse, the Sassanid cavalry, the 4 pack of Sassanid light horse.


The Sassanids rolled to move first and moved straight forward across the line to just outside 5" of the Kushans.  There was no shooting so the Sassanid 1st turn ended.


The Kushan 1st turn saw the Kushan Cataphracts angle their move towards the Sassanid cataphracts.  The Kushan middle light horse double wheeled in the center to open the gap between them and the left Kushan light horse so the Kushan cavalry could move up.


In the shooting phase, the Sassanid right flank light horse scored two hits on its Kushan counterpart who disrupted.  Elsewhere along the line, shooting was ineffective which saw the Kushan 1st turn end.


In the Sassanid 2nd turn, the Sassanids successfully held the cataphracts and the cavalry in the impact phase.  The Sassanid Cataphracts wheeled forward to line up with the Kushan cataphracts.  In the shooting phase, the Kushans managed 1 hit on the Sassanid light horse on the far right end of the line who disrupted.  Again, shooting was ineffective along the rest of the line.  In the Joint Action Phase, the Kushan general relocated to the green Kushan Cataphracts.


To start the Kushan 2nd turn, both Kushan Cataphracts charge.  The center Sassanid light horse evaded 5" back.  The center Kushan light horse wanted to charge but upon looking, it was pinned by the Sassanid cavalry in the middle and did not want to charge into it in the open.  The Kushan Green Cataphracts scored 1 hit and took 2 in return from the Sassanid Red Cataphracts.  The Kushan White Cataphracts scored 4 hits and took 2 in return from the Sassanid Purple Cataphracts.  The Kushan Green Cataphracts passed both their death roll and cohesion test as did the Sassanid Purple Cataphracts.  In the shooting phase, the Sassanid far right light horse took 2 hits but passed cohesion. The firing on the Sassanid cavalry was ineffective.  The Kushan left flank light horse took 2 hits but passed its cohesion test.  In the melee phase, the Kushan White Cataphracts scored 2 hits on the Sassanid Purple Cataphracts while taking 1 in return.  The Kushan Green Cataphracts scored 2 hits on the Sassanid Red Cataphracts but took 4 in return.  The Kushan Green Cataphracts survived both the death roll and cohesion test but the Sassanid Purple Cataphracts were not so lucky loosing 1 base and disrupting.  There was nothing happening in joint action so the turn ended.


For the Sassanid 3rd turn, the Sassanid cavalry in the center failed a CMT not to charge and proceeded to go 4" into the open field.  The Kushan center light horse opted not to stand and evaded 7" to its rear.  In the maneuver phase, the Sassanid center light horse turned around and moved up onto the flank of the Kushan Green cataphracts.  In the shooting phase, the Kushan cavalry was unable to score enough hits on the Sassanid cavalry in the center while the Sassanid right flank light horse scored enough hits to fragment the Kushan light horse opposite of them.  In melee, the Kushan White Cataphracts scored 2 hits to 1 from the Sassanid Purple Cataphracts who lost another base and fragmented on their Cohesion test.  The Kushan Green Cataphracts scored 3 hits to 1 from the Sassanid Red Cataphracts who passed both their death roll and their cohesion test.   Their was no action in the Joint Action Phase so the Sassanid 3rd turn ended.


As their were no charges to be had to start the Kushan 3rd turn, the Kushans moved their middle light horse to in front of the Sassanid cavalry.  In the shooting phase, the Kushan left flank light horse took 2 hits from the Sassanid light horse to its front and gave 1 in return.  The Kushan light horse broke on its cohesion test and routed back towards its baseline.  The Kushan cavalry and middle light horse scored 3 hits on the Sassanid cavalry in the field who passed its death roll but disrupted.  In melee, the Kushan White Cataphracts scored 1 hit and took 1 in return from the Sassanid Purple Cataphracts for a draw.  The Kushan Green Cataphracts scored 2 hits but suffered 4 in return from the Sassanid Red Cataphracts.  The Greens subsequently passed their death roll but disrupted on the cohesion test.  In Joint Action, the Sassanid leader moved to the Purple Cataphracts and rallied them back to disrupted.  The broken Kushan light horse routed off the table.


To begin the Sassanid 4th turn, the Sassanid cavalry in the field failed its CMT and charged into the Kushan light horse who opted to stand.  The Kushan cavalry intercepted so it would fight in the melee.  The Sassanid center light horse charged into the flank of the Green Kushan Cataphracts.  In the impact, the Kushan cavalry scored 1 hit to the Sassanid cavalry as did the Kushan light horse.  The Sassanid cavalry scored 2 hits to the Kushan cavalry and 1 to the Kushan light horse.  The Kushan cavalry subsequently lost 1 base and disrupted.  The Sassanid light horse in the center scored 2 hits to 1 against the Kushan Green Cataphracts who lost 1 base and dropped to fragmented.  In the maneuver phase the right flank Sassanid light horse attempted a CMT to form column but failed and opted to remain in place.  As there was no shooting, melee ensued.  The Sassanid cavalry scored 1 hit on the Kushan cavalry and 0 on the Kushan light horse but took 2 and 0 respectively.  They passed the subsequent death roll and cohesion test.  In the center, the Sassanid light horse scored 0 hits on the Green Kushan Cataphracts who managed 0 in return.  However, the Red Sassanid Cataphracts scored 2 hits to none on the Green Kushan Cataphracts who passed their death roll but broke on the cohesion test.  The Kushan White Cataphracts and the Sassanid Purple Cataphracts both managed 2 hits.  The Kushan White Cataphracts disrupted for seeing a friend break.  The Sassanid center light horse pursued the Green Kushan Cataphracts but failed to kill the general.  The Sassanid Red Cataphracts moved as far forward as possible but were blocked by the Sassanid light horse.  The Kushan host broke at this point.  

Unfortunately, no picture survived of the final turn. 

However, compensation, I offer up the following:  the Shahbanu of teh house, She Who Must Be Obeyed herself, presented this nice meerschaum box to me for our 14th Wedding Anniversary this week. 


Sunday, February 4, 2018

FOG 300 V3 - Early Sassanids vs Kushans 280 AD

In the reign of Bahram II, it came to pass that Hormizd, son of Shapur Mishanshah, governor of Sakastan, ordered Aspashir, 3rd cousin of Shapur I, to invade the lands of the Kushans on the northeastern borders of the lands of the Shahanshah.  Marshaling his forces, Aspashir marched into the lands of the Kushans, raping and pillaging, until he encountered a force of Kushans intent on stopping his raid.  Aspashir withdrew until said time as his pillaging forces were gathered in one place.  This is the story of his battle...

The Early Sassanid list


The gathered Sassanid host


Several close-ups of the Cataphracts.  I intentionally made the flags for the Cataphracts on the large size as I wanted to make them stand out heroically.  Although it is a beautiful flag, I may have over done the red flag.


The Kushan list


The Kushan host


Close up pictures of the Kushan Cataphract command stands.  The cataphracts in both armies double for Parthians as well.


The Sassanids won the initiative and opted to take Agricultural.  The Kushans took the compulsory Open Field and an Open.  The Sassanids wanted as much open terrain as possible and only took an Open Field.

Here are a couple of shots of the Kushan host deployed with a light horse BG, a cavalry BG, the two cataphracts with the general behind on the left and the remaining light horse all alone on the far right.  (Disregard the church in the background as it is holding down the mat.  The Baeuda mats do not roll out very well if they have been stored and mine wanted to roll back up)


The Sassanid host was deployed in almost a mirror image oft the Kushans with a light horse BG, a cavalry BG, the two cataphracts and the general on the Sassanid right and a lone light horse BG on the far left of the Sassanid line.


The Sassanids moved first and saw a general advanced across the table.  The superior leadership of Aspashir allowed him to move his four BGs on his left forward to just outside of 5" of the Kushan line while the lonely light horse on the other flank moved a full 7" forwards.   As there was no shooting to be had, the turn ended and the forces looked like below:


The Kushans opted to wheel their line to the left with the right hand light horse BG and the cavalry BG moving individually.  The cataphracts moved last as a battle line and with the general managed a double wheel.  The light horse BG on the far left of the Kushan front moved to within bow range.  Shooting ended up being wasted so the Kushan 1st turn ended.


The Sassanid general opted to charge everywhere to begin his 2nd turn.  The right flank Kushan light horse BG evaded 6" with the pursuing Sassanid light horse also going 6".  Elsewhere everyone stood their ground.  The staggered nature of the Kushan line prevented the Sassanids from getting all of their bases into the impact:  Five Sassanid bases contacted three Kushan.  The Kushan cataphract at the top of the picture below opted to intercept the Sassanid charge as it would not have been contacted otherwise.


Impact did not go well overall for the Sassanids as the center Sassanid Cataphract lost a base on a death roll and the right most cataphract (the purple) lost a base and disrupted.  The Kushan cavalry disrupted on impact but did not lose a base.  Neither general was committed at this point.

On the far right of the table, the Sassanid light horse only scored 3 hits to 4 to the Kushan light horse even with lances.  Both sides passed their death rolls on this end and the Sassanid passed his cohesion test.

In the maneuver phase, the only movement was for the Sassanids to conform to the Kushan line.


As there was no shooting to be had, the turn moved quickly into melee.  At the top of the table, the Sassanid light horse failed to hit the Kushans but took 1 in return.  Passing their death roll, they disrupted on their cohesion test.  Meanwhile, the Sassanid cavalry failed to hit the Kushan cavalry at all.  The Sassanid Red cataphracts (red flag) scored no hits against the Kushan cavalry and no hits against the Kushan White cataphracts (white flag) but took 1 hit from the Kushan cavalry and 1 from the Kushan cataphracts.  The Sassanid Purple cataphracts (purple flag) scored 1 hit on the Kushan White cataphracts but none against the Kushan Green cataphracts taking 2 hits in return.  The Sassanid cavalry survived their death roll and cohesion test.  The Red cataphracts lost a base and disrupted.  The Purple cataphracts did not lose a base but fragmented.


To start the Kushan 2nd turn, the Kushan light horse (just out of the picture to the bottom left) opted to turn around and shoot at the Sassanid light horse trailing them.  This was the only shooting in this turn and ended up being ineffective for both sides.  In the following melee phase, the light horse lottery at the top of the table remained ineffective.  In the main scrum, the Kushan cavalry scored 1 hit on the Sassanid cavalry but none on the Red cataphracts.  The Sassanid cavalry passed both their death roll and cohesion test.  The Kushan White cataphracts scored 1 hit on the Sassanid Red cataphracts and took 1 in return for a draw.  The Kushan White cataphracts scored 1 hit on the Sassanid Purple cataphracts while the Kushan Green cataphracts scored 2 more hits on the Purple cataphracts.  The Sassanid Purple cataphracts passed their death roll but broke on their cohesion test.  In the ensuing pursuit, the Purple cataphracts rolled short and were caught by the Kushans losing another base.  The Sassanid Red cataphracts survived their cohesion for seeing a friendly BG rout.  In Joint Action, the Kushan Green cataphracts stopped pursuing.  The Sassanid Red cataphracts rallied back from disrupted as did the Kushan cavalry BG.  The Sassanid Purple cataphracts were removed from the table at the end of JAP as they were at 50%.


Things were looking pretty grim for Aspashir as he started his 3rd turn.  The left most Sassanid light horse BG charged the remaining Kushan light horse and managed to angle the charge so that both front bases made contact.  The Sassanid lances proved decisive as they scored 3 hits to none and the Kushans lost a base and disrupted.   After conforming the Sassanid light horse exhausted the maneuver phase and no one could shoot, the melee phase began.  The light horse lottery at the bottom of the table saw the Sassanids score 2 hits to 1 and the Kushans roll out of the death roll but fail the cohesion test and fragmented.  The light horse lottery at the top of the table saw the Kushans score 3 hits to 1.  The Sassanid light horse lost a base and fragmented.  In the center, the Sassanid cavalry scored 2 hits on the Kushan cavalry  and took 1 in return.  The Sassanid Red cataphracts scored 2 hits on the Kushan cavalry and suffered 2 in return.  The Sassanid Red cataphracts also scored 1 hit on the Kushan White cataphracts but took 3 in return.  The Kushan cavalry survived the death roll but disrupted.  The Sassanid Red cataphracts lost a base to hits but survived their cohesion test.


To start the Kushan 3rd turn, the Kushan Green cataphracts passed a CMT to turn 90 degrees towards the Sassanid line.  Again there was no shooting, so on to melee we went.  The light horse lottery at the top of the table saw the Kushans score 3 hits to 2.  The Sassanids lost a base to the death roll and auto broke.  The light horse lottery at the bottom of the table saw each side hit 1 time to no effect.  In the center.  The Kushan White cataphracts scored 1 hit on the Sassanid Red cataphracts.  The Kushan cavalry scored 2 hits and 1 hit to the Red cataphracts and the Sassanid cavalry respectively.  The Sassanids only managed 1 hit from the Red cataphracts to the Kushan cavalry in total.  Both the Sassanid cavalry and the Red cataphracts survived their death rolls but the Red cataphracts disrupted on their cohesion test.


With the conclusion of the melee round of the Kushan 3rd turn, the game ended with a Kushan victory.  In total, the game took 57 minutes.

Aspashir fled the field with the remains of his command and has never been heard from again...

I incorporated a few suggestions from Mr. Shaw in this battle such as allowing troops to set-up 6" into the table as well as tweaking some other terrain set-up rules.  The changes to the Sassanid list allowing lance to some of the horse archers is interesting and if anything served to get the Sassanids into trouble as they had no melee weapon and once they whiffed on impact the sword capability of the Kushan cavalry and light horse made a difference.

Blog Update April 2024

The focus of the blog has changed.  Field of Glory gaming in the USA is essentially dead and until a viable ancient rules comes along that h...